


This article provides an hassle free method, for upgrading the element of your bathroom space. If you're starting a full bathroom remodeling project or just looking to swap out a smart toilet, this guide from HOROW, a well known toilet brand, makes the installation process easy ensuring a safe and leak proof setup. From collecting the required tools to carrying out each step we'll walk you through every part of installing a smart toilet giving you the confidence and ability to enhance your bathroom effortlessly. Lets start this trip to an efficient smart toilet that boosts the overall look and usefulness of your bathroom.
Common Issues During Smart Toilet Installation and Corresponding Solutions
During smart toilet installation, people may face the following 8 issues. Let’s explore how to smartly solve these problems.
Leaking Water Tank
Causes: Improper installation or damaged components inside the tank.
Solution: Check and adjust the float ball, fill valve, and flush valve. Replace any damaged parts if necessary.

Leakage
Causes: Improper installation or poor sealing of the flange.
Solution: Ensure the flange is properly placed and tightly sealed with the drain. Use a new, suitable flange and apply an appropriate amount of sealant at the connection between the smart toilet and the floor.
Unstable Toilet
Causes: The mounting screws are not tightened or the floor is uneven.
Solution: Adjust the smart toilet position to make it level and use the proper tools to tighten the screws. If the floor is uneven, shims may be needed to balance the toilet.
Poor Drainage
Causes: Misalignment between the toilet and the drain outlet, or clogged pipes.
Solution: Align the drain outlet carefully before installation and make necessary adjustments to the smart toilet position. Ensure the pipes are clear and free of obstructions.
Weak Flush
Causes: Insufficient water pressure or design issues in the flushing system.
Solution: Confirm that the water pressure in your home meets the toilet’s requirements and consider installing a booster pump. Check the smart toilet for blockages and clear them if needed.
Smart Function Malfunction
Causes: Incorrect wiring or faulty smart components.
Solution: Ensure all electrical connections are correct and follow the instructions. If a smart component fails, contact the manufacturer for repair or replacement.
Odor Issues
Causes: Poor sealing of the flange or issues with the trap design.
Solution: Inspect and replace the flange, ensuring a proper seal. Make sure the P-trap is functioning correctly and retaining water to block odors.

Improper Installation Location
Causes: The toilet's location affects usability or aesthetics.
Solution: Plan the installation location in advance, ensuring there is enough space and that it suits user habits.
After each installation or repair, thorough testing should be conducted, including flush tests and checking for leaks, to ensure the smart toilet functions properly. If complex issues arise, it is advisable to consult a professional for assistance.

Smart Toilet Installation: Take HOROW T16 as an Example
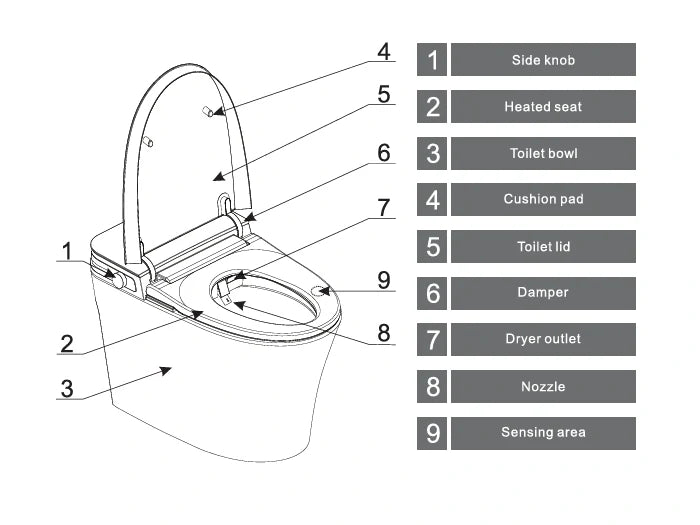
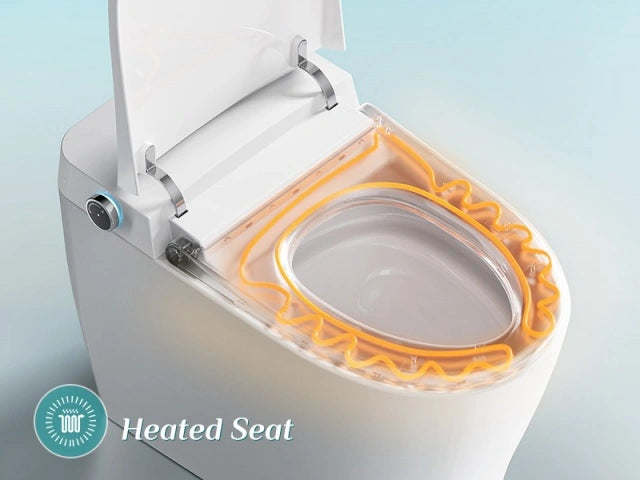
HOROW T16 is a smart toilet with bidet toilet combination. Based on advance pre-wetting and adjustable 4-level heated seat, it not only provides a warm environment, but also flushes away excrement more thoroughly. Let’s take this smart toilet as an example to show how to install a toilet by yourself. You can draw inferences about other cases from this case.
Supply Stop Installation
1.Turn on the old supply stop and flush for 1 minute, to flush out any sundries that may damage the toilet structure.
2.Turn off the supply stop and remove it.
3.Wrap sealing tape on the end(1/2" NPT male) thread of the water supply pipe to ensure good sealing performance. Screw the adapter onto the water supply pipe, ensuring that the direction of the adapter arrow is as shown in the figure.
4.Use Teflon tape to ensure good sealing performance.Make sure start wrapping at the end of the fitting,covering the end to prevent the thread from seizing.For the joint assembly,you should tighten the threaded joint 1-2 turns beyond finger tight,be careful do not over tighten.

Confirm Water Flow
1.Install a matching hose, which is guided to a bucket of 3 gallons(11.4L) or more. If you cannot find a matching hose, you can use a cloth to cover the outlet of the supply stop and place the bucket under the valve.
2.Turn on the supply stop. Ensure that the water can outflow at least 1 gallon within 10 seconds.
3.If the water pressure is too low, it is recommended to remove the flow regulator of the supply stop or use a booster pump to increase the water pressure.
4.Close the supply stop.
Flow regulator
5.Remove the installed hose.
Install the Smart Toilet
Lets start by setting up your toilet installation process! Start by putting in the flange and bolts before removing the toilet seat cover and lid.Next step is to place a sealing ring followed by aligning the smart toilet with the flange and securing it using a wrench.Make sure you put in the battery, for backup flushing well.Lastly reconnect the seat cover and lid. You're all set to make use of your toilet.
If you need information, on the installation process, in detail refer to the table below for a grasp of the steps involved.
|
Step
|
Action
|
Note
|
|
1 |
For new installations, toilet flanges need to be installed. Install flange bolts. |
/ |
|
2 |
Lift the toilet seat-lid assembly from the toilet. Lift from the interior, back right. |
Do not excessively pull the cover when lifting the toilet seat-lid assembly. |
|
3 |
Install a sealing ring under the toilet. |
/ |
|
4 |
Install the toilet to the flange and ensure that the bolts are aligned with the holes in the toilet (from the top). |
/ |
|
5 |
Use a wrench to lock nuts and other accessories to the fixing bolts (from the top). |
/ |
|
6 |
Carefully remove the cover of the battery case. |
1.Use alkaline batteries. 2.The battery maintains flushing in case of power failure. 3.Dispose of used batteries at a local collection center. |
|
Connect and install the battery, then slide the cover back to the battery box. |
||
|
Press the control dial on the side to confirm that flushing is normal. |
||
|
7 |
Reinstall the toilet seat-lid assembly to complete the toilet installation. |
Do not push too hard when putting back the toilet seat-lid assembly. |
Connect the Water Inlet Pipe
Connect the water inlet hose to the supply stop.
Note:
1.After tightening by hand, turn the nut 1/4 turn with a wrench.
2.Open the supply stop.
3.Check for leaks.
4.Apply silica gel to the bottom of the toilet. Wait for 24 hours to dry.
Install the Remote Controller
Tear the paper of double sided tape on the back of bracket, stick the bracket on the wall
Notice: Clean the installation position before pasting. Strongly and evenly press the tape when pasting. Use it after 15 minutes.

Two Critical Aspects to Consider During Smart Toilet Installation
Gathering the Essential Tools for a Successful Smart Toilet Installation
When installing a smart toilet at home or elsewhere it's important to have the tools, on hand to ensure an leak free setup without any wobbling concerns in the future! Here's a handy list of tools required for toilet installation along with their uses – using these tools correctly will help you establish everything firmly and seal it properly to avoid issues such as leaks or unstable fittings, in the run.
|
Tool |
Purpose |
|
Drill |
For creating holes to secure the toilet to the floor. |
|
Silicone Gun |
For applying silicone sealant to prevent water leakage around the base. |
|
Tape |
Ensures a tight, leak-free connection by wrapping around pipe threads. |
|
Knife |
Used for cutting sealant or packaging materials. |
|
Marking Pen |
For marking the location for drilling and pipe installations. |
|
Spanner (Wrench) |
For tightening nuts and bolts during installation. |
|
Screwdriver |
To fasten screws securely. |
|
Measuring Tape |
For measuring distances to ensure proper placement and alignment. |
|
Measuring Cup |
To measure the amount of water for testing or flushing mechanisms. |

Properly Install a Smart Toilet Flange to Prevent Leaks
Proper installation of a toilet flange is a key step to prevent water leakage and unpleasant odors in the bathroom. Below is a detailed installation process to ensure a good seal between the toilet and the drain:
Preparation Stage
To begin, turn off the water supply and drain any remaining water from the toilet. Use a towel or sponge to absorb any residual water in both the toilet bowl and tank. Next, remove the screws and nuts that secure the toilet to the floor, and carefully lift the toilet off, ensuring no damage occurs during removal.
Cleaning and Inspection
Clean the drain opening and the floor flange thoroughly, making sure to remove any old sealing materials. Ensure the drain opening is free of debris, and clean it further if necessary to prepare for a proper seal.
Installing the Flange
Ensure that the round side of the flange is facing upwards and place it directly over the drain opening on the floor. If the flange has mounting screws, ensure they are in place but do not over-tighten them.

Positioning the Toilet
Slowly lower the toilet, aligning it with the flange and drain opening. Make sure the bolt holes at the base of the toilet align with the mounting points on the floor. Keep the toilet level. It may help to have someone sit on the toilet to help seal the flange.
Securing and Sealing
Reinstall the screws and hand-tighten them to avoid over-tightening, which could crack the toilet. Reconnect the water supply line and turn on the water to check for any leaks. Finally, apply a bead of silicone sealant around the base of the toilet where it meets the floor to enhance the seal and improve the appearance.
Testing and Inspection
Fill the tank and perform several flushes to test for leaks. Ensure that all connections are properly sealed with no water leaking or seeping out.
Precautions
Ensure the flange you choose matches the size of the toilet’s drain opening. During installation, make sure the toilet is evenly in contact with the floor to avoid uneven pressure. Regularly check the flange over time, as it may age or become damaged with long-term use, requiring replacement to maintain a proper seal. By following these steps, you can effectively prevent leakage after toilet installation and ensure a clean and comfortable bathroom environment.
Unlock Bathroom Luxury: Key Guidelines to Picking the Perfect Smart Toilet
When selecting a smart toilet, multiple factors should be considered to ensure it meets personal needs and offers good performance. Below are some key purchasing guidelines:
Core Functions and Technology
Instant Heating: Smart toilets with instant heating provide warm water on demand, making it more hygienic and water-saving.
Antibacterial and Self-Cleaning Nozzles: Ensure the nozzles are made of antibacterial materials and have an automatic cleaning function.
Water Pressure Adaptability: Choose models without water pressure limitations or with built-in booster pumps, especially suitable for homes with unstable water pressure.
Installation and Design
Installation Type: Depending on space and preference, choose between wall-mounted or floor-standing models. Wall-mounted toilets look more aesthetically pleasing but require professional installation.
Water-Saving Technology: Look for toilets with dual-flush systems that automatically adjust the flushing volume. These toilets are both eco-friendly and practical.
Smart Features and Convenience
Built-in Water Tank and Pump: In certain cases, a built-in water tank and pump ensure normal use during power outages.
Smart Sensors: Opt for capacitive Microwave induction or foot-kick switches, which avoid the misoperation that may occur with infrared or laser sensors.
Glaze and Cleaning
High-Quality Glaze: A smooth glaze is easy to clean. You can test the quality by writing on it with a marker.
Heated and Antibacterial Seat: Choose seats with antibacterial properties and adjustable heating settings for comfortable use in different seasons.
Personalized Features
Smart Lid: Automatic or foot-sensing lid with seat lifting functions can improve hygiene and convenience.
Spraying Function: Instant heated water with adjustable levels for personalized cleaning needs.
Dual Water Flushing Design: Ensure the flushing water and cleaning water are separate to enhance hygiene standards.
Brand and After-Sales Service:
Choose well-known brands like HOROW with good reputations and reliable after-sales service to ensure long-term, worry-free use.
Experience the Ultimate in Hygiene & Comfort: Try HOROW Smart Toilets Today!
HOROW T36
HOROW T36 is an advanced, one-piece black smart toilet designed for ultimate comfort, convenience and elegance. Measuring at a 12-inch rough-in, this smart toilet boasts a sleek digital display, an auto open & close seat, and an integrated personal cleansing system. The elongated bowl provides extra room and enhanced comfort, while its standard installation process ensures a seamless fit into any bathroom.
Its function of automatic bowl pre-wetting, prepares the bowl before each use. The toilet also offers a smart bidet feature with alternating washes between cold and warm water, including front and rear wash, posterior wash, feminine wash, pulsating wash, and oscillating wash, ensuring personalized hygiene.
Convenience is key with its auto flush system, offering a 4-way flushing option: auto flush, foot touch flush, remote flush, and manual control flush. The heated seat, dryer, and water temperature can be adjusted through 6 settings, all controlled effortlessly via the touchless remote control.
Powered by a built-in pump-assisted system, this toilet further enhances the user experience with an automatic deodorizer that significantly reduces odors and circulates fresher air, surpassing the effectiveness of activated carbon. Its intelligent night light illuminates the area, making it easy to navigate even in darkness.
 |
 |
HOROW T37
HOROW T37 is an elegant one-piece intelligent toilet that fuses minimalist style with unparalleled hygiene. Designed for a 10-inch rough-in, this smart toilet showcases a sleek digital display and an integrated personal cleansing system for a comprehensive cleaning experience.
Its elongated bowl provides ample room and comfort, making it an ideal choice for any bathroom. Its installation is straightforward, adhering to standard toilet installation procedures. You can also experience ultimate convenience with the automatic lid opening and closing feature. It offers hand-free two-way operation via auto or foot touch.
This smart bidet feature takes hygiene to the next level, offering alternating washes between cold and warm water, including front and rear wash, posterior wash, feminine wash, pulsating wash, and oscillating wash. Enjoy the convenience of a 4-way auto flush system, including auto flush, foot touch flush, remote flush, and manual control flush, ensuring a hassle-free experience.
What’s more, HOROW T37 personalizes your comfort with adjustable 4 settings for the heated seat, dryer, and water temperature. Its easy-to-use remote control allows for touchless control of all features, enhancing the overall user experience. Furthermore, the automatic deodorizer effectively reduces odors and circulates fresher air.
Its intelligent night light illuminates the area, making it effortless to navigate in the dark. Additionally, HOROW T37 contributes to environmental sustainability by reducing wasteful toilet paper usage. This intelligent toilet is the ultimate upgrade for modern bathrooms, offering a blend of style, hygiene, and convenience.
 |
 |
FAQs
1. What is the proper way to install a toilet flange?
Make sure the circular side of the toilet flange is pointing upwards and position it over the drain opening, on the floor directly. Fasten it in place using mounting screws while being careful not to tighten them. Thoroughly clean both the drain opening and flange before proceeding with the installation process.
2. How do I prevent leaks during smart toilet installation?
To avoid any water leaks, from happening; use tape to secure the pipe threads apply a silicone sealant, around the bottom of the toilet where it touches the floor; and make sure all connections are adequately tightened up. Remember to check for leaks after setting everything up and while using it to catch any issues.
3. What are some common issues during smart toilet installation and their solutions?
Frequent problems involve leaks and inadequate drainage in addition, to water tank leaks and ineffective flushing mechanisms in toilets with malfunctioning features. To address these issues effectively; ensure installation and sealing of components; properly align the smart toilet with the drain opening; inspect and replace any parts; verify water pressure levels; and check for accurate electrical connections. For complicated issues or if unsure about the solutions provided above; it is advisable to seek assistance, from a professional.

Leave a comment
This site is protected by hCaptcha and the hCaptcha Privacy Policy and Terms of Service apply.