


A toilet cistern is the tank that stores water and releases it to flush the toilet bowl. When it works well, you barely think about it. When it does not, you notice fast: constant trickling sounds, a toilet that keeps running, weak flushes, damp patches on the floor, or water bills that suddenly jump.
This guide gives clear, practical answers. You will learn what a toilet cistern is, how it works, and which type of toilet cistern suits your bathroom. You will see how to fix common faults, how to change parts inside the toilet tank. We will cover cistern types and parts, buying tips, installation basics, care and cleaning, and troubleshooting.
Toilet Cistern Types
Knowing the main type of toilet cistern makes choosing or fixing one much easier. Most toilets fall into these categories:
Close-coupled cistern
The most common style. The cistern sits directly on the toilet bowl as one unit. It’s easy to install, simple to repair, and suits most bathrooms. It does take up more visible space, but you can lift the lid and access all parts easily.
Concealed cistern
The cistern is hidden inside a wall, frame, or furniture unit. Only the flush button and toilet bowl show. This creates a clean, modern look and can save space. However, access for repairs is through the flush plate or a service panel, so good planning is essential.
Wall-hung toilet with concealed cistern
The cistern sits inside a strong metal frame in the wall, and the bowl hangs off the frame with no floor contact. This makes cleaning easier and can make small bathrooms feel larger. It needs a solid wall or frame system and is best for renovations or new builds.
Back-to-wall toilet
A middle option. The bowl sits on the floor against a back panel, and the cistern is hidden in a slim cabinet. It looks neat and usually offers easier access than a fully in-wall system.
High-level and low-level cisterns
Seen in older or traditional homes.
-
High-level: cistern mounted high on the wall with a long flush pipe; flush by pulling a chain.
-
Low-level: cistern mounted just above the bowl with a short exposed pipe. Both rely on gravity for a strong flush but have more visible pipework.
Each layout balances style, space, and ease of maintenance. For quick replacements, close-coupled or back-to-wall styles work best. For full remodels, concealed or wall-hung systems offer the cleanest look.
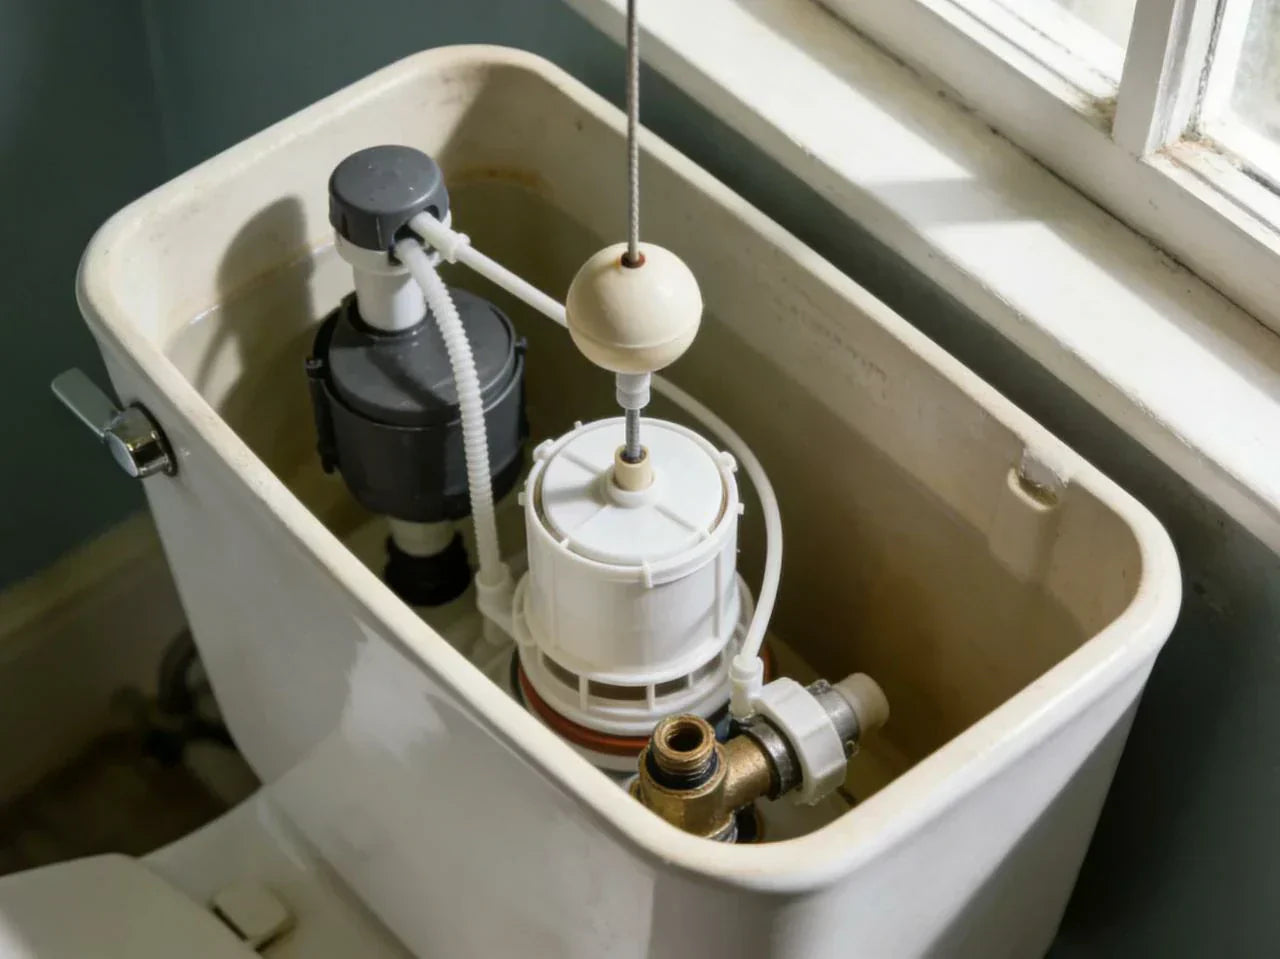
Toilet Cistern Parts & How They Work
After understanding the different types of toilet cisterns, the next step is to look at the parts inside. Knowing how these components work together will make future repairs, adjustments, and replacements much easier.
Internal Components of a Toilet Cistern
Inside a toilet cistern, a few key parts control how the tank fills, stores, and releases water. Understanding them makes replacing toilet cistern parts much easier.
-
Fill (inlet) valve Connects to the water supply and refills the tank. It opens when the water level is low and closes automatically when the level reaches the set height. Most modern toilets use a compact plastic fill valve on one side of the cistern.

-
Float mechanism Attached to the fill valve. It may be a float on an arm or a vertical float cup. As the water drops, the float drops and tells the valve to open. As the water rises, the float rises and shuts the valve when full.
-
Flush valve Located in the centre of the tank. Pressing the button or lever lifts the flush valve, releasing water into the toilet bowl for the flush. When it closes again, the tank can refill. A worn seal here causes slow leaks or a constantly running toilet.
-
Overflow tube A safety tube that prevents flooding. If the water level gets too high—because the fill valve sticks or the float is mis-set—the excess water flows down the tube into the bowl instead of spilling over the tank.
-
Seals and gaskets Rubber seals around bolts, pipe openings, and a tank-to-bowl gasket prevent leaks. They keep water inside the cistern where it belongs.
These components sit inside a ceramic or plastic tank and work together to deliver a reliable flush.
How a toilet tank flush mechanism works (step‑by‑step)
To put it simply, a cistern toilet works in three main phases.
Filling phase
After you flush the toilet, the water in the tank drops. As the water level inside goes down, the float also drops. This movement tells the fill valve to open. The valve allows the water from the supply line to enter through the inlet and refill the tank. As the water level rises, the float mechanism opens the valve less and less until it shuts off at the set level, usually a little below the top of the overflow tube.
Flushing phase
When you want to flush again, you flush by pressing a button, pressing a push button, or pulling a lever. On some industrial and commercial toilets, a motion sensor to activate the flush gives a hands‑free option. Your action pulls a chain or moves a link that lifts the flush valve. The button opens the valve, and water from the cistern rushes through the flush outlet and down into the bowl. The flow of water from the tank into the toilet bowl creates a siphon effect that draws waste away through the trap and out into the drain.
Refilling and shut‑off phase
As the cistern empties, the flush valve returns to its seat and button only empties the set amount of water. The valve seals so water from the tank no longer flows into the bowl. Now the float is low again, so the valve to open or close moves to “open”, and the tank begins refilling with water from the tank’s inlet. When the float rises to the target level, it closes the valve. The water used to flush is now replaced, and the system waits for the next flush.
If you drew a simple flow diagram of one flush, you would see: press button → valve opens → water rushes to bowl → valve shuts → float drops → fill valve opens → tank fills → float rises → fill valve closes.
How to Choose the Right Toilet Cistern
Once you know the internal parts, it becomes easier to decide which cistern features and designs fit your bathroom best. The section below will help you choose based on space, plumbing layout, and performance needs.
Match the cistern to your bathroom and plumbing
Start by looking at the space you have and the plumbing already in place.
-
Close-coupled cisterns are the easiest option for most homes, especially if you’re keeping the same toilet bowl. They fit under windows, take normal space, and are simple to repair.
-
Concealed or wall-hung systems save visual space and can make small bathrooms feel bigger. The wall must be deep enough for the frame and tank.
-
Check the waste outlet (floor or wall), the water supply position, bolt spacing, and flush outlet height so the new cistern lines up correctly.
-
For concealed systems, make sure there is a large enough access opening behind the flush plate for future repairs.
If your home has low water pressure, choose a cistern designed for gravity-fed supply.

Flush performance, noise & build quality
Flush effectiveness depends on the flush mechanism, water volume, bowl design, and pipe layout.
Most modern toilets have dual flush, such as 3/4.5 L or 3/6 L, letting you choose a small or full flush to save water.
Quiet-fill valves reduce noise, and some cisterns include insulation to dampen sound and reduce condensation.
Better build quality means thicker tank walls, sturdy metal fittings, and durable plastics. A good cistern can last 15–25 years.
Water efficiency labels & regulations
Many regions require or recommend water-efficient cisterns.
You may see:
-
WaterSense labels (US) for low-use, tested toilets
-
Star ratings or litre-per-flush labels in other countries
-
EN/ISO standards in Europe and beyond
Modern efficient cisterns often use 4.5 L full flush / 3 L half flush or less, saving significant water compared with older 9–11 L models.
Always check local plumbing codes and any available rebates for upgrading to low-flush systems.
Installation & Replacement: Step‑by‑Step Overview
After selecting the right cistern, the next stage is learning how to install or replace it properly. The following step-by-step overview will guide you from preparation to installation safely and smoothly.
Pre‑installation checks and planning
Before you start any change to your toilet system, do some quick checks. Confirm that the new cistern matches the existing toilet bowl in shape and fixing points. Measure bolt spacing, flush outlet size, and the height of the bowl rim to the base of the cistern. Make sure the water supply entry is on the correct side or that you can adapt the water supply line without strain.
If you are fitting a concealed cistern or wall‑hung frame, check the wall structure. A frame needs solid fixing points and enough depth for the tank. Think ahead about tiling, waterproofing, and how you will reach the valves later through an access hatch or flush plate opening.
Have the right tools ready: spanners, screwdrivers, a drill if you are mounting to a wall, PTFE tape for threads, a bucket, and towels. Safety gear like gloves and eye protection is also wise. Always read the manufacturer’s installation instructions fully before you start.
A simple checklist graphic or PDF can help you tick off: measurements, wall checks, pipe locations, tools, and parts.
Replacing an exposed toilet tank or cistern (high‑level steps)
For a standard close‑coupled or low‑level cistern toilet, many handy homeowners can replace the cistern or replace the insides of a toilet tank. Here is a basic outline.
-
Turn off the isolation valve on the water line to the cistern. Flush to empty as much water in the cistern as possible. Soak up the rest with a sponge.
-
Disconnect the water supply line from the fill valve. Loosen and remove any bolts holding the cistern to the bowl and wall. Lift the old cistern off carefully.
-
Check the tank‑to‑bowl gasket, mounting holes, and bowl rim for cracks or damage. Clean surfaces before fitting the new unit.
-
Fit the new cistern with new seals and bolts as per instructions. Connect the flush outlet or flush pipe to the bowl and tighten bolts evenly to avoid cracks.
-
Reconnect the water supply using fresh washers. Turn the valve back on slowly and watch as the tank fills. Check all joints for leaks and adjust the water level if needed.
Toilet Cistern Maintenance: Cleaning, Settings & Prevention
Once the cistern is installed, good routine maintenance can extend its lifespan and prevent common issues. The next section covers the most useful checks, cleaning steps, and adjustment tips.

Regular inspection checklist (every 2–3 months)
A quick look inside the cistern every few months can stop small problems arise with these devices turning into big ones. You do not need special tools, just a bit of time and a torch.
Here is a simple table of checks, how often to do them, and what signs to watch for:
| Check item | How often | What to look for |
|---|---|---|
| Float movement & water level height | Every 2–3 months | Water about 2.5 cm (1 inch) below overflow; float moves freely |
| Inlet/fill valve and flush valve surfaces | Every 2–3 months | Mineral buildup, grit, rough surfaces |
| Inside walls of tank | Every 2–3 months | Slime, scale or flakes that could clog parts |
| Around cistern bolts and tank‑to‑bowl gasket | Every 2–3 months | Damp spots, rust stains, slow drips |
| Floor around base of toilet and rear wall | Monthly | Wet patches, smells, signs of ongoing leaks |
Safe cleaning inside the cistern (avoid damage)
To clean inside of the toilet cistern, first turn off the water supply and carefully lift off the lid. The lid and lid seal can chip or crack if dropped, so set them somewhere safe.
Use mild cleaners such as white vinegar and baking soda in warm water. A soft brush or cloth can scrub away mineral deposits on the fill valve, flush valve, and inside walls. Avoid bleach tablets or very harsh chemicals inside the tank. These can eat away at rubber seals and thin plastic parts, leading to leaks and early wear and tear.
After cleaning, turn the water back on and flush the toilet several times to rinse out loosened debris.
Adjusting water level and float mechanism
Getting the water level right is key to good performance and low water wastage. The usual aim is to have the water sit about 2.5 cm (1 inch) below the top of the overflow tube.
On many cisterns, you can adjust the float with a screw on the float arm or a clip on the float cup. Turning the screw or sliding the clip changes how high the plastic float rises before it shuts the valve.
If the water level is too high, you may hear water trickling into the bowl through the overflow, and your cistern may keep filling and stopping. If it is too low, you can get weak flushes or partial flushes that leave waste behind.
A small change in the float setting can often fix a toilet cistern that keeps running, without replacing any parts.
Common Cistern Problems & DIY Repairs
Even with proper care, toilet cisterns can still develop problems over time. The following section explains common issues and simple DIY fixes to help you restore normal function quickly.
Fixing a running toilet or constantly filling cistern
A running toilet usually has one of three causes:
-
A worn or warped flapper or flush seal on the flush valve.
-
A float set too high or stuck so the fill valve never fully closes.
-
Dirt or grit stuck in the inlet valve so it cannot shut.
To fix this, you can follow steps like these:
-
Lift the cistern lid and watch what happens after a flush. Does water keep rising and flow into the overflow tube? That points to the fill valve or float. Does water level look normal but you still hear a trickle into the bowl? That points to the flush valve seal.
-
For a float issue, gently move the float up and down. If it sticks, clean the rod or guide and adjust the level down so the water stops below the overflow.
-
For a worn flapper or seal, turn off the water, empty the cistern, and unclip or unscrew the old seal from the flush valve. Take it with you to match a new part of the same size and type. Fit the new seal, making sure it sits flat.
-
If you suspect debris in the fill valve, you can shut off the water, open the top of the valve (on many models), and rinse or wipe the small filter inside.
A simple before/after drawing would show the float too high and the seal not closing properly, then the corrected positions with the water level lower and the seal tight.
Dealing with leaks, drips & water on the floor
Water on the bathroom floor near the toilet is worrying, but do not panic. First, check if it is condensation or a real leak. In humid rooms, cold water in the cistern can cause moisture to form on the outside and drip down. If the tank feels wet all over but joints are dry, this may be the cause.
Leaks from joints often come from:
-
Worn rubber seals on cistern bolts.
-
A failing tank‑to‑bowl gasket.
-
A crack in the cistern body.
To fix seal leaks, turn off the water, empty the tank, and remove the cistern from the bowl if needed. Replace the old rubber seals and gasket with new ones. When re‑tightening bolts, go slowly and tighten each side in turn to avoid stressing the ceramic.
If you find a hairline crack in the cistern body, repairs are rarely safe or long‑lasting. In that case, it is better to replace the cistern with a new one.

Weak flushes, partial flushes & slow filling
Weak or partial flushes can make daily use annoying. Common causes include:
-
Mineral scale blocking rim jets or siphon outlets in the bowl.
-
Water level in the tank set too low.
-
A partly closed isolation valve or clogged inlet filter leading to slow filling.
To clean rim jets, use a stiff brush and a descaling cleaner safe for ceramic. You can also pour vinegar into the overflow tube and let it sit before flushing to clear hidden passages.
Check the water level and raise it slightly if it sits far below the mark in the cistern. Make sure the isolation valve on the supply pipe is fully open. If filling is still slow, inspect the fill valve filter as noted earlier.
FAQs
1. What is the cistern on a toilet?
A toilet cistern is a water-holding chamber, sometimes simply called a tank, that sits behind or above the toilet bowl and cistern setup. If you are not sure what a toilet cistern actually does, it stores water per flush and releases it through the flush pipe mechanism, allowing the plumbing system’s water to fill the bowl with enough force for waste removal. Inside this cistern within the unit are several components that control how the toilet cistern works. A plastic float allows the fill valve to open or close based on the water level; when it becomes too low and requires refilling, the system has remained reliable for decades. Whether mounted on the wall or hidden within the wall, knowing what is a toilet cistern helps homeowners understand toilets and cisterns better and maintain a modern toilet more confidently.
2. Can you just replace a cistern on a toilet?
Yes, you can replace only the cistern to the toilet without changing the bowl, but you need to know about toilet cisterns first. Many standard household toilets allow swapping the cistern within the existing setup, including the bowl and mounting holes. Before fitting a new toilet cistern, check bolt spacing and the flush pipe mechanism. If the water per flush rating matters, choose a unit that matches your flush systems. Replacing just the tank—sometimes called a tank change—does not require a full new toilet. A plastic float allows the fill valve to register the water level inside and ensures the plumbing system’s water to fill correctly after installation. When unsure, a professional plumber or plumbing service can handle problems effectively, especially when the unit is mounted on the wall or hidden within the wall.
3. What are the three common faults in a cistern toilet?
Three common issues in toilets and cisterns include constant running, weak flushing, and slow refilling. These faults usually appear when the plastic float allows the fill valve to malfunction, the flush pipe mechanism wears out, or seals inside the cistern within the tank degrade. Each issue affects how the toilet cistern works and disrupts allowing the plumbing system’s water to fill properly. Homeowners who need to know about toilet problems often ask whether the system has remained reliable, and it generally has—faults come from wear rather than design. Understanding what is a toilet cistern and its several components helps diagnose problems effectively. In both standard household toilets and units mounted on the wall, the failures are similar because both rely on gravity or air pressure movement. Learning these basics helps anyone maintaining a modern toilet or planning a new toilet installation.
4. How to fix a toilet cistern that keeps running?
To fix a running cistern, start by checking whether the plastic float allows the fill valve to open or close based on the correct level. If it registers the water level inside incorrectly, the bowl and cistern may never stop refilling. Sometimes the flush pipe mechanism sticks, especially if the button to a half-tank flush or flush for a liquid flush is worn. Many people who need to know about toilet repairs can manage minor adjustments themselves, but when the level becomes too low and requires refilling nonstop, changing inside of toilet tank parts may be necessary. Guides on how to replace the insides of a toilet tank show how several components can be swapped easily. If unsure, a professional plumber or plumbing service can solve problems effectively and ensure toilets and cisterns return to normal working order.
5. How much does a plumber charge to replace a toilet cistern?
The cost of having a professional plumber replace a cistern varies by region, but it generally includes labour, parts, and disposal of the old unit. Prices may rise if the cistern is mounted on the wall or hidden within the wall because accessing several components takes more time. When homeowners are not sure what a toilet cistern replacement involves, they can underestimate the work needed. Replacement often means changing inside of toilet tank fittings, aligning the cistern to the toilet bowl and cistern connection, and ensuring allowing the plumbing system’s water to fill correctly afterward. Standard household toilets with simple flush systems cost less to service than units relying on gravity or air pressure or a hands-free option for industrial and commercial setups. Asking a plumbing service for an estimate is the most reliable way to plan.
6. What is the average lifespan of a cistern?
A well-built cistern within a household setup often lasts 15–25 years, depending on usage and water quality. The system has remained dependable because several components inside the tank are simple and durable. When the plastic float allows the fill valve to work properly, the toilet cistern works efficiently and maintains stable water per flush control. Lifespan also depends on whether the unit is mounted on the wall, hidden within the wall, or part of standard household toilets. People who need to know about toilet longevity often don’t realise how toilets and cisterns benefit from the advancement and development of technologies, especially modern flush systems. Knowing what is a toilet cistern and how it ages helps users maintain a modern toilet better and detect when parts become too low and require refilling or replacement.
7. Can the inside of a toilet cistern be replaced?
Yes. Changing inside of toilet tank components is common and often simpler than replacing the entire unit. Guides explaining how to replace the insides of a toilet tank show that several components such as the fill valve, the plastic float allows the fill, and the flush pipe mechanism can be swapped without disturbing the toilet bowl and cistern. This helps maintain a modern toilet without buying a full new toilet. When the water level becomes too low and requires refilling too often or seals fail, knowing what is a toilet cistern helps homeowners address problems effectively. Whether mounted on the wall, hidden within the wall, or part of standard household toilets, most designs still rely on allowing the plumbing system’s water to fill through the same proven system that has remained dependable for decades.
References


Leave a comment
This site is protected by hCaptcha and the hCaptcha Privacy Policy and Terms of Service apply.