


Smart toilets can be “drop-in” only when your bathroom already matches what the toilet expects: a stable flange, a level floor, enough clearance, reliable water flow, and safe power within cord reach. When those conditions aren’t met, the install stops being a weekend swap and turns into subfloor work, drain correction, outlet relocation, or ongoing leaks and odors.
This smart toilet installation guide is written to help you figure out whether a smart toilet will actually work in your home, what typically goes wrong, and what costs more than people expect when it doesn’t.
Decision Snapshot: Will this work in your bathroom—today?
When planning to enhance your bathroom with smart toilets, this Smart Toilet Installation Guide is your go-to resource—whether you want to learn how to install a smart toilet, try a DIY smart bidet toilet install, understand electrical requirements for bidet, master smart toilet plumbing setup, or explore hardwiring a smart toilet and installing bidet toilet with outlet. From 12-inch and 10-inch rough-in measurements, GFCI outlet requirements, and water supply setup to auto flush, heated seat, and self-cleaning features, it covers every detail to ensure proper installation, including tips for plumber-assisted repairs, booster pump needs, and seamless integration with bathroom renovation or remodeling projects, helping you achieve a sleek, hygienic, and worry-free smart bathroom experience.
Choose it if you have a standard 12-inch rough-in, solid flange, level floor, and a GFCI outlet within ~0.8 m
A smart toilet installation is realistic when:
-
Your rough-in measures 12 inches (wall to flange center) and the toilet’s spec matches it.
-
The toilet flange is solid, flat, and properly anchored to the finished floor.
-
The floor is level enough that the bowl won’t rock (or you’re willing to shim correctly).
-
You have a GFCI-protected outlet close enough that the cord reaches without stretching, pinching, or crossing a walkway.
Avoid or reconsider if your floor rocks/tilts, flange is cracked/offset, or your drain alignment is questionable (leak/odor risk)
This is where people get callbacks:
-
A cracked, low, or off-center flange can “sort of” work with a basic toilet, but smart toilets often have tighter bases and sealing surfaces.
-
Rocking bowls usually turn into wax/seal failure, then odor, then subfloor damage.
Reconsider if water pressure/flow is marginal (tankless models can flush weakly or fail without a booster pump)
Tankless or pressure-assisted smart toilets can be picky. If your supply is weak, you can see:
-
Incomplete bowl clears
-
Repeated “double flush” habits
-
Error codes or shutoffs (varies by model)
-
A surprise need for a booster pump or plumbing upgrades
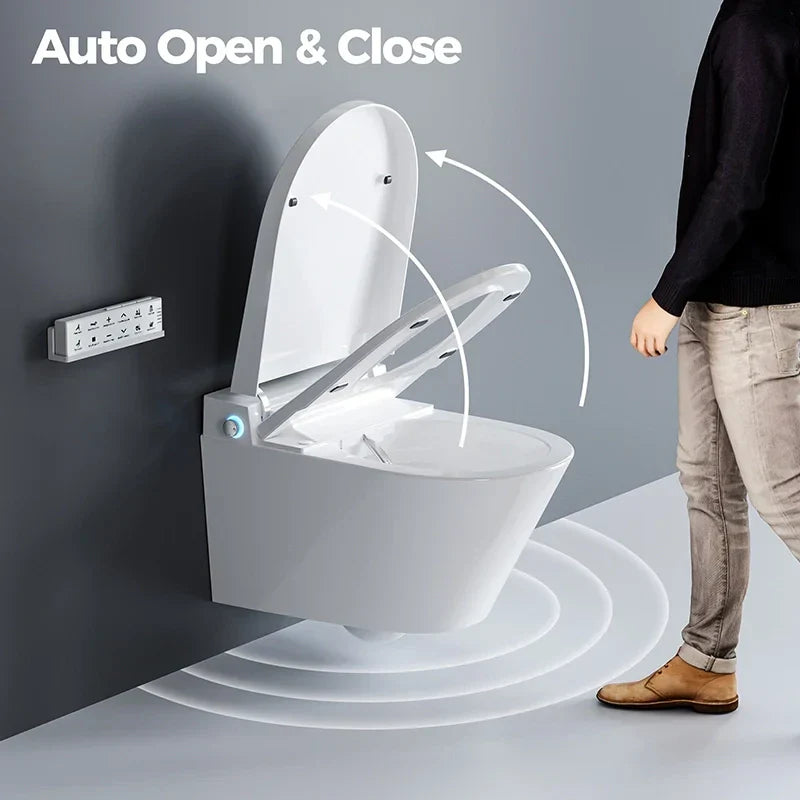
Reconsider if power is unreliable or easily kicked/loosened (smart functions—including flushing—can stop)
Real-world annoyance: a loose plug, tripped GFCI, or shared circuit can disable:
-
Heated seat and warm water
-
Auto lid/close
-
Drying and deodorizing
-
Sometimes flushing, depending on the toilet’s design
If your outlet location makes the plug easy to bump, plan to fix that before you commit.
Who this is for / not for based on home conditions (before you buy)
As part of your Smart Toilet Installation Guide, understanding home and bathroom compatibility is critical—whether you’re planning a DIY smart bidet toilet install, navigating electrical requirements for bidet, considering hardwiring a smart toilet, installing bidet toilet with outlet, or fine-tuning your smart toilet plumbing setup. Smart toilets and bidet toilets rely on your home’s plumbing (like modern pipes vs old cast iron), stable water supply, proper electrical setup (GFCI outlet, circuit capacity), and bathroom layout to deliver comfort, hygiene, and reliable function—from heated seats and warm water to auto flush. This section helps you identify which homes are best for a smooth install and which may lead to regrets, ensuring your smart bathroom upgrade is seamless and worry-free.
Best-fit homes: modern plumbing, accessible shutoff valve, standard drain outlet alignment, predictable power
Smart toilet installation tends to go smoothly when:
-
You have a modern bathroom with a working stop valve that fully shuts off water.
-
The drain is a standard floor outlet with a proper flange height (not buried, not floating above tile).
-
You have stable water supply and a predictable electrical setup (GFCI protection, adequate circuit capacity).
-
You can access the sides of the toilet during install (not wedged between a vanity and a wall).
If your current toilet never rocks, never smells, and never “mysteriously” clogs, you’re starting from a good place.
High-regret homes: older retrofits with cast iron/odd flanges, patched subfloors, or “it worked fine before” assumptions
Older homes and “many-hands” remodels create the tricky installs:
-
Flanges set too low after new tile, or too high after patch floors
-
Flanges screwed into weak subfloor or thin patch layers
-
Cast iron drains with corroded flange rings
-
Offset flanges used to “make it fit” (often fine, but alignment becomes touchy)
The common regret is assuming: “If a standard toilet worked, a smart toilet will also work.” Smart toilets often have larger footprints, tighter base geometry, and specific sealing hardware, so marginal conditions show up fast.
When a simpler bidet seat is the better choice (same hygiene upgrade, fewer plumbing/electrical dependencies)
If your main goal is hygiene and comfort, a bidet seat can be the lower-risk upgrade because:
-
You keep your existing bowl and flange (less chance of disturbing a marginal seal)
-
Many seats use a simpler water connection and may be more forgiving
-
If it fails, you can remove it without pulling a whole toilet
A DIY smart bidet toilet install is often easier than replacing the entire toilet—especially in small bathrooms where moving the bowl is physically awkward.
When hardwiring is the wrong project scope (rental limits, no permits, uncertain circuit capacity)
Hardwiring a smart toilet is usually the wrong first plan when:
-
You’re in a rental or a shared property with restrictions
-
You don’t know what else is on the circuit (hair dryer + heater + smart toilet is a common trip combo)
-
Local rules require permits for bathroom electrical changes
-
You want the option to swap or service the toilet without calling an electrician
In many homes, adding a correctly placed GFCI receptacle is the cleanest route. Hardwiring can be appropriate, but it raises the bar for code compliance and service access.
The trade-offs you accept with a smart toilet (what gets harder, not easier)
As you follow this Smart Toilet Installation Guide, it’s important to understand the trade-offs of choosing smart toilets—even with a smooth DIY smart bidet toilet install, proper electrical requirements for bidet, smart toilet plumbing setup, hardwiring a smart toilet, or installing bidet toilet with outlet. Unlike standard toilets, smart models come with unique challenges: from clogging risks despite advanced flush features to dependency on stable power for heated seats and warm water, tight mounting tolerances that demand proper installation, and pro-only repair needs for internal components. These trade-offs don’t diminish their comfort or hygiene benefits, but knowing them helps you prepare for a worry-free smart bathroom upgrade.
“Smarter” doesn’t mean clog-proof: paper habits and debris still create repeat blockages
Smart toilets can flush well, but they don’t change physics:
-
Too much toilet paper can still clog
-
“Flushable” wipes still cause problems
-
Kids still drop objects in bowls
If your household already fights clogs, a smart toilet won’t remove that. It may even add frustration because some designs are harder to plunge effectively without splashing or damaging features.
Comfort features add dependency: heated seat, warm water, auto lid/flush fail when power is interrupted
A standard toilet is always “on.” A smart toilet is a small appliance:
-
Heated seat draws real power
-
Water heating and drying can be significant loads
-
Sensors depend on stable voltage and clean surfaces
So power outages, tripped GFCIs, or a loose plug are not minor. They change daily use. In some designs, you can still flush manually; in others, you may need a backup method or a reset procedure.
Tight tolerances: minor misalignment can cause rocking, seal failure at the flange, or poor drainage
This is where smart toilet installation often becomes less forgiving than a standard toilet:
-
The base may not tolerate an uneven floor without proper shimming
-
The mounting system may require a precise alignment over bolts or a bracket
-
If the drain connection is even slightly off, the toilet can sit “almost flat,” then shift over time
Shimming isn’t a hack; it’s part of proper installation when the floor isn’t perfect. The mistake is shimming halfway, leaving gaps, and not locking the toilet solidly before sealing.
Service reality: when internal boards/valves fail, troubleshooting can escalate to pro-only repair
With a standard toilet, most parts are mechanical and cheap. With a smart toilet:
-
You may have solenoid valves, pumps, sensors, a control board, and a remote receiver
-
Some parts are not homeowner-serviceable
-
Diagnosing issues can require access panels, multimeter checks, or proprietary components
If you want “set and forget,” be honest about your tolerance for appliance-style maintenance in a wet environment.
Cost and retrofit constraints that decide DIY vs. professional
As a key part of your Smart Toilet Installation Guide, understanding cost and retrofit constraints is essential to decide between a DIY smart bidet toilet install and professional help—whether you’re dealing with electrical requirements for bidet, smart toilet plumbing setup, hardwiring a smart toilet, or installing bidet toilet with outlet. From ensuring your home has the right outlet, rough-in (12-inch or 10-inch), and stable water supply to budgeting for hidden costs like flange extenders or GFCI outlet relocation, this section breaks down when to install a smart toilet yourself and when to call a plumber or electrician, avoiding costly leaks, pipe damage, or code violations while maximizing comfort and hygiene.
When DIY is realistic: existing stop valve, correct rough-in, intact flange, nearby GFCI, no floor correction needed
DIY tends to be realistic when you can answer “yes” to all of these:
-
The shutoff valve fully stops water and doesn’t drip
-
The flange is solid and at the right height relative to finished floor
-
Your rough-in matches the toilet spec (often 12-inch)
-
You have a GFCI outlet within cord reach
-
You can lift and place the toilet safely (many smart toilets are heavy)
If any one of these is shaky, DIY can still be possible—but your “install” becomes a repair project.
When you need a plumber: flange replacement, persistent sewer odor risk, trap/drain mismatch, low pressure needing booster pump
Call a plumber when:
-
The flange is broken, loose, corroded, or set at the wrong height
-
You smell sewer gas now, or you’ve had odor issues after past toilet resets
-
The drain opening is offset or the toilet location has a history of poor performance
-
You measure weak flow/pressure and suspect you need a booster pump or supply correction
-
Your shutoff valve won’t shut off or the supply line is old and stiff
The big reason is risk: a bad seal or cracked flange can quietly damage flooring and subflooring before you notice.
When you need an electrician: no dedicated 120V 15–20A capacity, outlet relocation, code-compliant GFCI placement
Bring in an electrician when:
-
There’s no outlet within reach and you don’t want exposed cords
-
The bathroom circuit already trips with a hair dryer or space heater
-
You need a new receptacle placed to meet local code (GFCI protection, location rules, box fill, grounding)
-
You’re considering hardwiring a smart toilet and want it done correctly and serviceably
Hidden costs that surprise buyers: shims/leveling, new supply lines/adapters, flange extenders/offsets, permits and patching
Common “why is this costing more than the toilet?” items:
-
Quality supply line (correct length, correct ends)
-
New shutoff valve if the old one won’t close
-
Flange extender rings if the flange is too low after tile
-
New closet bolts and washers
-
Non-compressible shims and a leveling process
-
Caulk/silicone (and the time to do it neatly)
-
Electrical work (GFCI outlet addition/relocation, dedicated circuit)
-
Permits and wall patching after electrical changes
The key point is that smart toilet installation is often a bathroom system upgrade, not just a fixture swap.

Smart Toilet Installation Guide: Fit, rough-in, and clearance reality checks
As part of your Smart Toilet Installation Guide, checking fit, rough-in measurements, and clearance is crucial for a seamless install—whether you’re doing a DIY smart bidet toilet install, managing electrical requirements for bidet, hardwiring a smart toilet, installing bidet toilet with outlet, or fine-tuning your smart toilet plumbing setup. From ensuring your small bathroom has enough space for smart toilet lid and arm mechanisms to verifying 12-inch or 10-inch rough-in alignment, inspecting flange integrity, and checking floor levelness, these steps prevent post-install issues like rocking bowls, leaky seals, and lid malfunctions, ensuring your smart toilet fits perfectly and functions reliably for long-term comfort and hygiene.
Will this work in a small bathroom with door swing and sidewall constraints (lid/arm mechanisms need space)?
Clearance problems show up after the toilet is mounted:
-
Auto-opening lids can hit a tank shelf, ledge, or wall trim
-
Side-mounted controls or wash arms may need extra side clearance
-
Some bases flare outward and interfere with nearby vanity toe-kicks
Before you buy, measure:
-
Side-to-side space at the widest part of the toilet footprint
-
Front clearance from bowl edge to door swing path
-
Rear clearance for lid movement and cleaning access
If you’re tight on space, don’t assume “standard toilet space” equals “smart toilet space.” A few centimeters can be the difference between smooth lid operation and constant bumping.
What happens if my rough-in is 10-inch or not a clean 12-inch (tolerances, flange extenders, and “fits but binds” risks)?
Rough-in is measured from the finished wall (not baseboard) to the center of the flange/drain.
-
If you have a 10-inch rough-in and buy a 12-inch toilet, the bowl may physically contact the wall, or the mounting may bind. Even if you force it, you can end up with stress on the base, a poor seal, or a toilet that can’t sit flat.
-
If your rough-in is “almost 12” (like 11 1/2"), many toilets still fit, but smart toilets can be less forgiving because of rear housings and cord/water routing.
If you’re between sizes, the correct move is to buy a model designed for your rough-in, or be prepared for rework (which can include moving the flange—rarely worth it unless you’re remodeling).
Floor and flange integrity check: uneven floors, rocking bowls, loose bolts, and why shimming isn’t optional
A rocking toilet is not just annoying. It’s how seals fail.
Quick checks before removal:
-
Stand over the bowl and shift weight. Any movement suggests either:
-
loose bolts,
-
uneven floor,
-
or flange problems under the toilet.
-
After removal, inspect the flange:
-
It should be securely fastened to the floor.
-
The top surface should be clean and flat.
-
The bolt slots should not be cracked or blown out.
-
The flange height should be correct for your seal type.
If the floor is uneven:
-
Use non-compressible shims to stabilize the toilet.
-
Tighten bolts evenly.
-
Cut shims flush after final tightening.
-
Then seal the perimeter as appropriate (many installers leave a small gap at the rear to reveal leaks early; check local practice and your situation).
Skipping shims often leads to overtightened bolts, cracked bases, or a seal that fails months later.
Visual audit checklist: wall-to-flange center measurement, bolt alignment, and “cannot seal” misalignment warning signs
Before you commit to a purchase, do this audit:
-
Measure wall to flange center (rough-in).
-
Check if the flange centerline is square to the wall or visibly skewed.
-
Look for signs of past leakage: stained floor, soft spots, recurring caulk failure.
-
Verify the shutoff valve is reachable without removing the toilet.
Warning signs that a “proper installation” may be difficult:
-
Flange not centered in the cutout, or sitting partly under tile
-
Closet bolts that don’t align cleanly or sit at odd angles
-
A history of the toilet “always being a little loose”
Smart toilet plumbing setup: supply, pressure, and drainage conditions that cause failures
As a critical section of your Smart Toilet Installation Guide, smart toilet plumbing setup directly impacts install success—whether you’re tackling a DIY smart bidet toilet install, managing electrical requirements for bidet, hardwiring a smart toilet, installing bidet toilet with outlet, or ensuring proper water supply, pressure, and drainage. This part covers key plumbing essentials, from testing water flow and avoiding leaky connections to addressing drain/trap mismatches and low pressure that may require a booster pump, helping you prevent post-install failures and ensure your smart toilet functions reliably, with optimal flush performance and hygiene benefits.
Is this still a good idea if my water pressure or flow is low (e.g., under ~1 gal / 10 sec at the valve)?
Pressure and flow aren’t the same. You need enough of both.
A practical flow test you can do:
-
Turn off water at the stop valve.
-
Disconnect the supply line from the toilet (have a towel/bucket).
-
Aim the valve into a bucket.
-
Turn the valve on fully for 10 seconds.
If you can’t get close to about 1 gallon in 10 seconds, you may have a restriction (old valve, clogged supply, partially closed main, pipe scale). Some smart toilets—especially tankless types—are sensitive to low flow and may flush weakly or throw errors.
If your home has known low pressure (upper floors, long runs, well systems, old galvanized piping), plan for possible upgrades or choose a solution that’s less demanding.
Water supply connection realities: Teflon tape, hand-tight + 1/4 turn, leak checks, and adapter pitfalls
Most leaks I see after a smart toilet install come from rushed supply connections, not the drain seal.
Practical tips:
-
Use the correct connector type for your shutoff valve (compression vs threaded). Don’t force mismatched fittings.
-
Many toilet connectors seal with a rubber cone/washer, not tape. Teflon tape belongs on tapered pipe threads, not on every connection.
-
Tighten “hand-tight plus a small turn.” Overtightening can deform washers and create slow leaks.
-
After turning water on, dry every joint with a paper towel and recheck after 10–20 minutes.
Adapter pitfalls:
-
Some smart toilets include special tees or filters. If you cross-thread these, you may get a slow drip that only shows up later.
-
If the toilet includes a filter screen, clogged screens can mimic low flow over time (especially after plumbing work stirs debris).
Drain/trap mismatch and odor problems: when a “standard” setup still vents poorly or loses trap seal
A toilet relies on:
-
A proper seal at the flange
-
A working trap pathway (built into the toilet)
-
Proper venting in the plumbing system
If venting is poor or the drain path is marginal, you can get:
-
Gurgling
-
Slow clears
-
Odors that come and go
-
A bowl water level that seems unstable
These issues may not be caused by the smart toilet—but a new installation can expose them if the old toilet was “forgiving” or if the old wax ring had deformed to fill gaps. If you’ve had recurring odor or slow drains, factor that into the project and budget for a plumber to inspect venting/drain conditions.
Post-install flushing problems: weak siphon vs. user clogs, and when a booster pump is the only fix
When flushing is weak after install, sort it into three buckets:
-
Installation issue
-
Partial shutoff valve opening
-
Kinked supply line
-
Debris in filter/screen
-
Incorrect setup steps missed in the manual (some units require priming)
-
-
House plumbing issue
-
Low flow/pressure
-
Partial obstruction downstream
-
Venting problems
-
-
Usage issue
-
Too much paper
-
Non-dispersing products
-
If you’ve confirmed the valve is fully open, supply isn’t kinked, and filters are clean—but the flush is still weak—then a booster pump or supply correction may be the only real fix for a demanding toilet design. That’s not a fun surprise purchase, so it’s worth testing your water delivery before buying.

Electrical requirements for bidet: outlet placement, circuits, and hardwiring risks
As an essential part of your Smart Toilet Installation Guide, understanding electrical requirements for bidet is key to safe and reliable use—whether you’re doing a DIY smart bidet toilet install, installing bidet toilet with outlet, considering hardwiring a smart toilet, or fine-tuning your smart toilet plumbing setup. This section covers critical electrical details, from safe outlet placement and circuit capacity (120V 15–20A + GFCI) to the risks of extension cords and hardwiring pitfalls, ensuring your smart toilet’s electrical setup meets code, avoids safety hazards, and supports all functions like heated seats and auto flush.
Installing bidet toilet with outlet: why extension cords in bathrooms create real failure and safety risks
Using an extension cord in a bathroom is a common “temporary” move that becomes permanent. It creates problems:
-
GFCI nuisance trips if cords get damp or connections loosen
-
A cord path that gets kicked or pinched
-
A plug that slowly works loose, shutting down smart functions
-
A safety hazard if the cord or connection is not rated for the environment
If you need power, install power properly. That usually means a GFCI-protected receptacle in an appropriate location.
Dedicated 120V 15–20A + GFCI reality: shared circuits trip when heaters and other bathroom loads run together
Many smart toilets heat water and seats. That load can be enough to expose weak circuits.
Real household scenario:
-
Hair dryer on the same circuit + toilet heater active = trip
-
Space heater + toilet heater = trip
-
Older wiring or loose connections = voltage drop, weird behavior
You don’t always need a dedicated circuit, but you do need enough capacity and correct protection. If you already trip breakers in that bathroom, solve that first.
What if I don’t have an outlet within ~0.8 m (cord reach, routing, and why “temporary” solutions become permanent regrets)?
Most smart toilets assume the outlet is closed. If the cord can barely reach:
-
The plug sticks out and gets bumped
-
The cord rubs against the bowl or sharp edges
-
Cleaning becomes a cord management routine
-
You end up using an extension cord you didn’t plan on using
A good rule: the cord should reach the outlet with slack, without crossing foot space, without being pinched, and without being stretched tight.
Hardwiring a smart toilet: when it’s required, when it voids warranty/code expectations, and when to stop and hire out
Hardwiring comes up when:
-
The toilet is designed for it (some are)
-
You want a clean look with no visible cord
-
The outlet location is impossible without major wall work
Where people get into trouble:
-
Hardwiring a unit that’s meant to be plug-in can create service problems later and may conflict with the product requirements.
-
If you hardwire without a local disconnect method or proper junction access, repairs become expensive.
-
Bathrooms have strict rules around GFCI protection and safe wiring methods.
If you’re not fully confident here, stop and hire an electrician. It’s not just about “making it work.” It’s about making it safe and serviceable.
Long-term ownership: what fails first, maintenance load, and avoidable regrets
As an essential part of your Smart Toilet Installation Guide, understanding electrical requirements for bidet is key to safe and reliable use—whether you’re doing a DIY smart bidet toilet install, installing bidet toilet with outlet, considering hardwiring a smart toilet, or fine-tuning your smart toilet plumbing setup. This section covers critical electrical details, from safe outlet placement and circuit capacity (120V 15–20A + GFCI) to the risks of extension cords and hardwiring pitfalls, ensuring your smart toilet’s electrical setup meets code, avoids safety hazards, and supports all functions like heated seats and auto flush.
What fails first over time: deposits, slow leaks into bowl, and the hard-water maintenance you can’t scrub away
In normal homes, the early long-term issues are often water-quality issues:
-
Mineral scale building on valves and screens
-
Small drips that leave ghost trails or refill patterns
-
Spray nozzles that need cleaning cycles and occasional manual cleaning
If you have hard water, plan on periodic descaling per the manual. If you ignore it, the toilet may still “work,” but performance and reliability tend to drop.
Leak and odor escalation: how small flange/supply issues become persistent bathroom smell and subfloor damage
A slow leak at the supply connection can damage flooring over months. A slow leak at the flange can do worse because it can go unnoticed under the base.
What tends to happen in practice:
-
You smell “bathroom odor” that comes and goes
-
The caulk line stains or separates
-
The toilet starts rocking again
-
Eventually, you find soft flooring near the toilet
This is why flange integrity and bowl stability matter more than fancy features. If your floor is questionable, address it before installing a heavy, expensive fixture.
Power-related outages: loose plugs/outlets shutting down flush and hygiene functions (and how to prevent cord bumps)
The simplest failure is still common: the plug gets nudged, the GFCI trips, or the outlet is worn.
Prevent it by:
-
Using a solid, properly installed receptacle (not a loose, worn outlet)
-
Placing the outlet so the plug isn’t in a kick zone
-
Avoiding tight bends and pinched cord routing
-
Testing the GFCI monthly, so you know it works and resets reliably
If your toilet’s flush depends on power, make sure everyone in the home knows what a tripped GFCI looks like and where to reset it.
When troubleshooting ends: internal electronics/valves/boards that turn “DIY install” into “pro service call”
Most homeowners can handle:
-
Cleaning screens/filters
-
Resetting power
-
Checking for supply leaks
-
Basic nozzle cleaning and maintenance routines
But when you get into:
-
Persistent sensor errors
-
Internal valve failures
-
Control board problems
-
Intermittent heating that isn’t a GFCI issue
…that’s where smart toilets behave like appliances. Parts, access, diagnostics, and labor can be more like repairing a dishwasher than replacing a flapper.
Before You Buy checklist
-
Confirm your rough-in measurement matches the toilet spec (10-inch vs 12-inch).
-
Inspect the toilet flange: not cracked, not loose, correct height for finished floor.
-
Verify the floor is solid and flat enough to prevent rocking (or plan to shim properly).
-
Check you have a working shutoff valve that fully stops water (replace if it won’t).
-
Do a quick flow test at the valve (don’t assume pressure equals performance).
-
Confirm a GFCI-protected outlet is within safe cord reach without extensions.
-
Measure clearance for lid and body width, especially in tight bathrooms and near door swings.
-
Read the manual’s seal requirement: confirm whether it uses a wax ring or a supplied gasket.

FAQs
1. Do I need a plumber for a smart toilet?
Not always. DIY is realistic if the flange is solid, the shutoff valve works, and your rough-in and clearances match the smart toilet’s specs as part of a proper smart toilet plumbing setup. If the flange is damaged, the floor is soft/uneven, or you’ve had odors/leaks before, a plumber is usually cheaper than fixing water damage later, as they can also address underlying issues that might disrupt your smart toilet’s performance long-term.
2. How far should the outlet be from the toilet?
Close enough that the cord reaches without stretching, pinching, or crossing walking space. Many homeowners aim for roughly 0.8 m (about 2.5 ft) or less, but the right answer is “within the cord’s safe reach” while keeping the plug out of kick zones and ensuring GFCI protection—critical for the electrical safety of your smart toilet and avoiding common power-related failures.
3. Is a wax ring required for smart toilets?
Some use a traditional wax ring; others use a foam/rubber gasket supplied with the toilet. You should follow the installation guide for your specific smart toilet model to ensure a proper flange seal. Using the wrong seal can cause slow leaks or sewer odor, which can damage your flooring and compromise the overall integrity of your smart toilet plumbing setup.
4. Can I hardwire a smart toilet instead of using an outlet?
Only if the unit is designed for hardwiring and local electrical rules allow it, as part of meeting proper electrical requirements for bidet. Hardwiring a plug-in unit can create safety and service problems, including voiding warranties or failing to meet GFCI protection standards. If you’re unsure about the process or local codes, hire a professional electrician to ensure the smart toilet’s electrical setup is safe and serviceable.
5. What causes weak flushing right after installation?
Most often, weak flushing right after smart toilet installation stems from a partially closed shutoff valve, a kinked supply line, debris in a filter/screen, or low household water flow—common issues that can disrupt your smart toilet plumbing setup. If those check out and the toilet still flushes weakly, you may need a plumbing correction or a booster pump, depending on the toilet design, especially for tankless smart toilets that are more sensitive to flow issues.
References


Leave a comment
This site is protected by hCaptcha and the hCaptcha Privacy Policy and Terms of Service apply.