


Sink clips keep top‑mount and undermount sinks firmly attached to your countertop. They do two jobs at once: they hold the sink in place and they compress the sealant (caulk or plumber’s putty) so water cannot sneak through. If you’re fighting leaks, a rocking basin, or confusing hardware, you’re in the right place.
This guide starts with quick, plain answers so you can act fast. Then we go deeper with expert detail. You’ll learn which sink mounting clips to buy for your sink and countertop, how many you need, and how to install them the right way. We’ll cover drop‑in and undermount sinks, thickness and material issues for granite, quartz, and laminate, plus fixes for common failures like corrosion, stripped screws, or misalignment. You’ll also get step‑by‑step methods and real‑world tips that save time when working in tight spaces under the counter.
If you have ever asked, “How to install sink clips?” or “How to stop my sink from moving?” this page answers those questions with simple guidance you can use today.
Quick Answers for Sink Clips
Before diving into specifics, this section gives you fast, practical guidance so you can quickly understand what each type of sink clip does, when it’s needed, and how it affects your overall mounting setup.
What are sink clips and why they matter
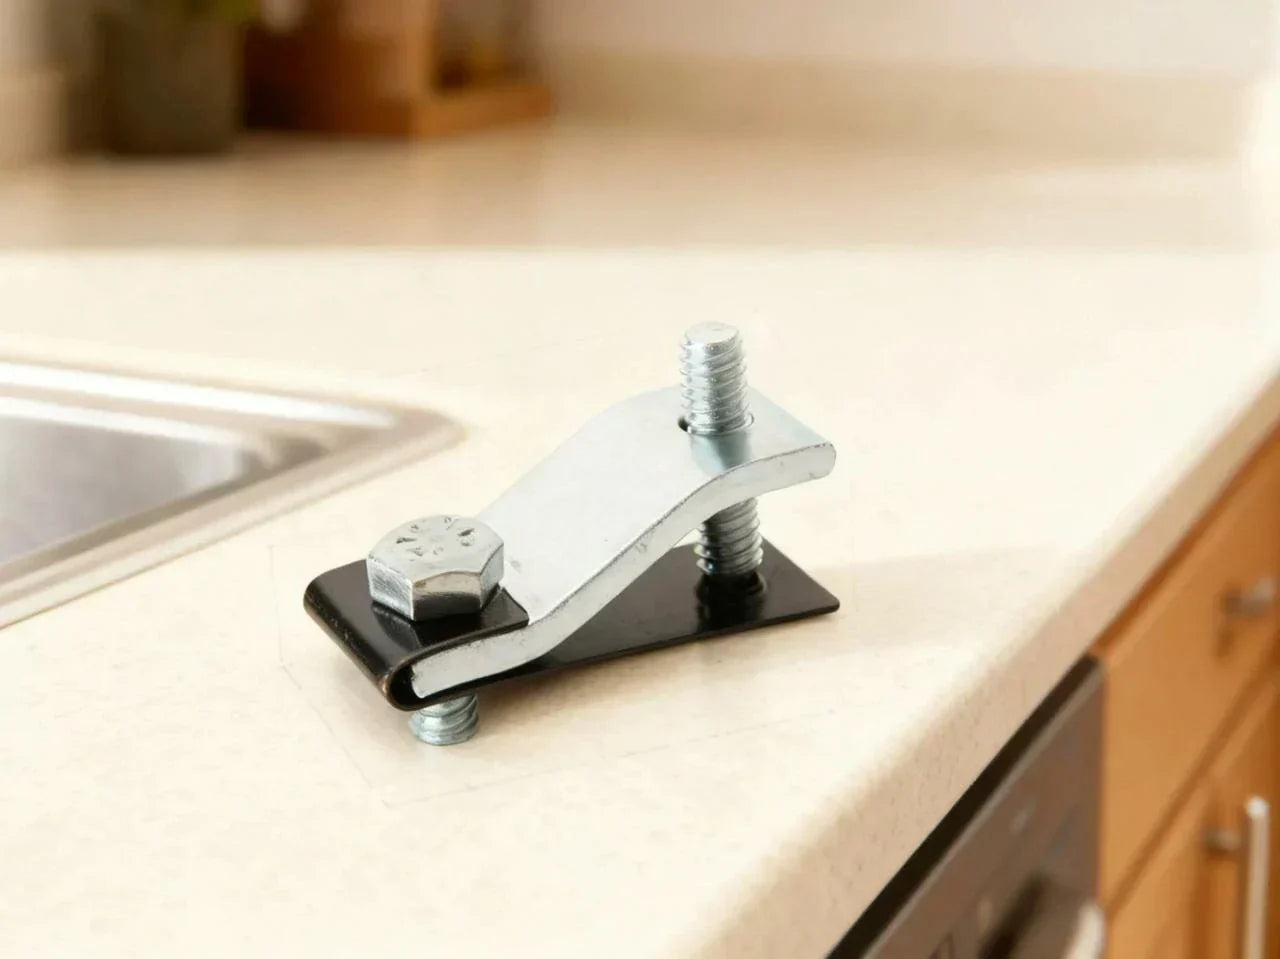
Sink clips are small pieces of hardware that fasten your sink to the countertop. They provide a mechanical hold and press the sealant to form a watertight seal. You’ll find them on both drop‑in (top‑mount) and undermount sinks. Most people rate the work as “moderate” because the space under the sink is tight and it’s easy to misalign a clip if you rush.
Without clips, sealant alone can fail. Water can leak. The sink can shift. That’s why clips matter.
How many clips do I need?
-
Drop-in sinks: 6–10 clips, spaced evenly.
-
Undermount sinks: 8–12 brackets or clips. Heavier sinks and stone counters often need the higher end of the range.
A good habit is to tighten in a “star” or criss‑cross pattern. This keeps pressure even and protects the seal.
Which clips fit my sink and countertop?
Match the clips to three things: your sink type (top‑mount vs. undermount), your countertop material and thickness, and the weight/size of the sink. Look for stainless steel or zinc‑plated, corrosion‑resistant hardware. If your old clips are rusted or weak, replace them during any reinstall.
Can you install a sink without clips?
You can try to rely on caulk alone, but it’s not recommended. Sealants are not structural. They can let go with vibration, heat, or weight. For a safe, stable, long‑term install, use proper sink mounting clips or brackets (ASTM, 2024). If your sink didn’t come with hardware, universal or retrofit kits are available that fit many counters.
Types of Sink Mounting Hardware (Top‑Mount vs Undermount)
To choose the right hardware, it helps to understand how top-mount and undermount systems differ. This section breaks down each mounting style so you can match the clip design to the sink style and countertop material.
Top‑mount (drop‑in) clip systems
Most drop‑in stainless steel sinks have built‑in rails or channels under the rim. The common styles are U‑channel rails, pivot clips, and track/slot designs. You insert each clip into the track, rotate it to get clearance, and then tighten the screw so the clip grabs the underside of the counter. This style is fast and clean once you learn the rotation step. If you search “drop in sink mounting clips,” you’re usually looking at this family of hardware.
Key idea: rotate clips for clearance during placement, then tighten once everything is centered.

Undermount brackets and machine‑screw systems
Undermount sinks hang from the underside of the counter. Because the rim is below the countertop, they rely on brackets, studs, or machine screws attached to the stone or solid surface. For granite, quartz, and solid surface, you’ll often use specialty brackets spaced at 8–12 points around the rim. Heavy sinks (cast iron, fireclay, or deep double bowls) may need more anchors, plus a temporary support while the adhesive cures.
Some systems use epoxy‑mounted studs or anchors set into the stone’s underside. Others use a rail or “dog bone” bracket that clamps the stone without drilling. The right choice depends on your countertop and access.
Universal/adjustable clip kits and retrofit options
Retrofit kits help when the original channels no longer fit, the rails are damaged, or the sink and counter were mismatched. Universal clips adjust for different thicknesses. Some require drilling for screws; others clamp without holes. Always confirm the thickness range and anchor style before you buy. If a track system is missing, universal sink mounting clips can save a reinstall.
Material choices and corrosion resistance
Old clips often rust, especially under a kitchen sink where moisture lingers (CDC, 2024). Stainless steel clips and zinc‑plated parts resist corrosion far better than plain steel. If you’re pulling a sink for any reason, it’s smart to upgrade the hardware to corrosion‑resistant material. It costs little and prevents future failures.
Choose the Right Clips for Your Project
Once you know your sink type, the next step is selecting clips that provide the right strength, reach, and compatibility. This section guides you through making the correct choice based on installation conditions and project goals.
Selection criteria (sink type, weight, and bowl size)
Start with your sink type: drop‑in or undermount. Then look at the bowl size and weight. A heavy double‑bowl sink or a farmhouse‑style bowl needs more support. Many double bowls need the high end of the clip count and tighter spacing at the corners and mid‑spans. If you have a garbage disposal, expect more vibration; solid hardware matters even more.
When you see “undermount sink clips,” think brackets with screws that pull the sink rim tight to the stone. For “top‑mount sink clips,” think rotating clips in a rail.
Countertop material and thickness
Laminate and wood counters usually accept standard drop‑in rails and clips. Stone and solid surface (granite, quartz, marble, acrylic solid surface) often need brackets, studs, or clamp‑style systems. Thickness matters a lot. Most adjustable clips list a thickness range. Make sure your counter falls inside that range. Also check for a plywood backer under stone; it changes the effective thickness and the grip point for the clip.
Environment, access, and tool constraints
Is the cabinet shallow? Do you have a disposer and lots of pipes in the way? Tight spaces change your plan. Pre‑fit hardware on the sink before you set it in. Stage a stubby screwdriver, a nut driver, and a small ratchet. Good lighting helps. A headlamp or work light beats guessing in the dark. The cleaner and dryer the underside of the counter, the better the clips will hold.
Step‑by‑Step Installation Guide (DIY and Pro Tips)
Before you start, read through the steps once. Work methodically. Ask yourself: do I have to remove the disposal first for access? Do I need a second person to help lift or support?
Prep and sealing (both sink types)
-
Dry-fit the sink to check the opening and hardware reach. Clean the countertop and sink rim. Remove old caulk and wipe with alcohol so the new sealant bonds.
-
Apply a continuous bead of kitchen/bath-grade silicone caulk to the rim for drop-in sinks. For some metal drains, you’ll use plumber’s putty at the drain body. Follow your sink and drain manufacturer’s guidance.
-
Center the sink in the opening. Press down evenly to bed the rim in the sealant. Wipe away squeeze-out later—don’t smear it now.
Tip: if the sink shifts as you work underneath, place a few strips of painter’s tape across the rim to hold position until clips are snug.

Top‑mount install sequence
-
Load the clips in the rail or track. Rotate them sideways so they clear the counter during placement.
-
From underneath, turn each clip so it catches the underside of the counter. Make sure every clip reaches the counter and is aligned.
-
Finger‑tighten all screws first. Do not fully tighten one side and then the other. Keep the sink centered.
-
Tighten in a star pattern: front, back, left, right, then the mid‑points. Add a quarter‑turn at a time. Watch for even squeeze‑out of sealant around the rim. This tells you the seal is uniform.
-
Stop when the sink is snug and the sealant is compressed. Do not wrench down hard. Over‑tightening can warp a thin stainless rim or damage a laminate edge.
-
Trim excess sealant with a plastic scraper or your fingernail once it skins. Smooth the edge with a damp finger for a clean line.
Tip: some tracks are stubborn. Rotating the clip fully before final tightening often makes the difference in tight spaces. A stubby screwdriver helps under a sink deck.
Undermount install sequence
-
Dry‑fit the sink under the countertop opening. Check the reveal (the visible counter edge inside the bowl). Many people aim for a small even reveal. Mark positions lightly with tape if it helps.
-
Pre‑position brackets or studs around the rim. Plan for 8–12 attachment points. Place extra brackets near corners and where a disposal will hang.
-
Apply a continuous bead of silicone to the underside of the countertop where the sink rim will meet. Keep it even.
-
Support the sink. Use a jack, a support frame, or a helper. Do not let the sink hang by the clips before they are snug.
-
Tighten brackets gradually and evenly in a star pattern. Pull the sink rim up to the stone a little at each point. Check the reveal as you go. Adjust support to keep the rim tight and even.
-
After tightening, wipe squeeze‑out inside the bowl edge clean. Leave the temporary support in place until the silicone cures as directed (often overnight).
-
Test stability by gently pushing up on the bowl. It should not move. If it does, add brackets or snug the screws a small amount across the pattern.
Tip: many failures happen when the sink is not supported during install. Always support the bowl until the adhesive has cured.
Compatibility and Fitment Table
To simplify decision-making, the following table shows which installation methods fit different sink and countertop combinations at a glance.
Brand/model considerations and universal kits
Some sinks come with tracks that don’t align with your cabinet cutout or with a counter that is thicker than expected. When original channels don’t work, universal kits are a safe path. Many adjustable kits list exact thickness ranges and whether they require drilling. If you must drill into stone, follow stone safety guidelines and understand the risk of chipping. Many pros prefer clamp‑style brackets that avoid drilling for granite and quartz.
Compatibility matrix and spacing diagram
| Sink type | Countertop | Recommended clip system | Clip spacing |
| Drop-in | Laminate/wood | Rail/track U-channel clips | 6–8 in |
| Drop-in | Stone with backer | Long-reach pivot or universal clamps | 6–8 in |
| Undermount | Granite/quartz | Stone brackets or stud systems | 6–8 in (corners tighter) |
| Undermount (heavy) | Any stone | Brackets + extra supports | 4–6 in near strain points |
Note: for double‑bowl sinks or sinks with disposers, tighten spacing near the divider and disposer location.
Troubleshooting, Repairs, and Retrofits
If your sink is loose, sagging, or leaking, this section helps you diagnose common clip-related problems and choose effective repair or retrofit solutions for both drop-in and undermount installations.
Common problems and causes
-
Leak at rim: not enough clip pressure or uneven sealant compression.
-
Rocking or movement: uneven tightening, too few clips, or clips not reaching the counter.
-
Corrosion: old steel clips rust, weaken, and snap.
-
Stripped screws: over‑tightening or misaligned clips damage threads.

Fixes in tight spaces and tricky channels
Work in stages. Rotate clips fully into place before tightening. Stage tools where you can reach them with one hand. A stubby screwdriver and a small ratchet help under low decks. If a clip won’t catch, loosen it, rotate, and reseat it against the counter edge. Light upward pressure on the sink rim from below can help the clip bite.
Retrofit workflows
-
Remove old rusted clips. Clean the underside of the counter and sink rim.
-
If the original rails are damaged, switch to universal adjustable clips that match your counter thickness. Confirm whether they clamp or need screws.
-
For undermount sinks that sagged, support the sink from below first. Then add new brackets spaced closer than before. Use fresh silicone at the rim.
-
If you must drill for anchors, practice on a scrap and use the right bit for stone or solid surface. Keep dust out of the cabinet and wear eye protection.
Why do sink clips rust and how do I prevent it?
Moisture under the sink is common, and metal that isn’t protected will corrode. Humidity, cleaning sprays, and small leaks speed it up. To prevent rust, use stainless steel or zinc‑plated clips, keep the area dry, and check hardware yearly. Replace damaged clips before they fail.
Expert Tips and Real‑World Case Studies
Here you’ll find practical advice from installers plus real-world examples showing how proper clip choice and mounting technique make a long-term difference in stability and performance.
Pro insights on even pressure and seal compression
Start every job by finger‑tightening all clips with the sink centered. Then tighten in a star pattern with small turns. Watch the bead of sealant. An even, slight squeeze all around means the load is balanced. After the first set, re‑check in 30–60 minutes. Sealant may relax and clips can loosen slightly. A small re‑snug often stops tomorrow’s leak.
Case study: drop‑in stainless install
A DIYer replaced an old drop‑in sink on a laminate counter. The new sink had U‑channel rails and pivot clips. The first try led to a small leak in the back corner. Why? They fully tightened the front clips first, shifting the sink slightly and starving the back corner of sealant. The fix was simple. They reset, finger‑tightened all clips, then went around in a star pattern with small turns. The seal squeezed evenly, and the leak stopped. Lesson learned: tighten evenly and slowly, and rotate clips into position before you pull them tight.
Case study: undermount on stone
A heavy double‑bowl undermount on quartz sagged near the disposer. The original install used only six brackets, with wide spacing. The repair added four more brackets concentrated near the divider and disposer, applied fresh silicone, and supported the bowls from below during cure. The reveal became even again, and the sink held firm. Takeaway: heavy sinks on stone need more contact points, closer spacing at high‑stress spots, and bowl support while curing.
How tight should I make sink clip screws?
Aim for “snug plus a quarter‑turn.” The sealant should compress, and the sink should not shift when pressed. If metal starts to flex or wood starts to crush, you’ve gone too far. Always tighten gradually across the sink, not in a circle.

Maintenance, Safety, and Long‑Term Performance
Finally, this section covers how to maintain your mounting hardware, prevent corrosion or loosening, and ensure your sink remains safe, stable, and leak-free for years.
Periodic inspection and re‑tightening
Check your sink clips once a year or any time you notice a drip or movement. Run your fingertips under the rim and look for moisture. If the sink rocks, re‑snug the clips in a star pattern. Add clips if there are large gaps in spacing, especially near a disposal.
Replacement indicators and hardware upgrades
Replace clips if you see corrosion, stripped screws, or bent rails. Upgrading to stainless or zinc‑plated kits during any maintenance is a small cost that prevents repeat work later. If a rail system is failing, switch to universal adjustable clips that match your thickness.
Leak testing and countertop protection
After any install or repair, fill the basin and let it sit. Look under the rim and at the cabinet bottom. A dry paper towel placed under the rim can reveal tiny drips. Protect stone and laminate by wiping spills quickly and keeping the underside dry. For stone tops, avoid harsh cleaners that can attack the silicone joint.
What sealant should I use with sink clips?
Use kitchen/bath‑grade silicone for the rim seal on most modern sinks. For metal drain bodies, plumber’s putty is common unless the maker says silicone only. Always follow the manufacturer’s instructions for your specific sink and drain.
FAQs
1. Are sink clips necessary?
Yes—sink clips are necessary because sealant alone is not structural. A sink relies on sink mounting clips to hold steady under daily use, vibration, and weight. Without each clip, the rim can lift, water can leak, and the bowl may shift over time. This applies to both drop-in and undermount sinks. Drop-ins use drop in sink mounting clips to pull the rim tight to the countertop, while undermount sink clips keep the bowl supported from below. Even with strong silicone, mounting hardware is what prevents long-term loosening. Many sink failures come from either missing clips or clips that were never tightened evenly. So yes—proper mounting hardware is essential for a stable, long-lasting sink install.
2. How do you install sink mounting clips?
To install sink mounting clips, start by dry-fitting the sink and cleaning the rim and countertop. For drop-ins, load each clip into the rail, rotate it for clearance, and follow a cross-pattern when tightening. For undermounts, support the bowl and position undermount sink clips or brackets every 6–8 inches. Apply silicone before tightening. A key part of how to install sink clips is avoiding over-tightening; you want “snug plus a quarter-turn,” which compresses sealant without bending the rim. Using a star pattern keeps the pressure even, preventing gaps that cause leaks. Whether you’re installing drop in sink mounting clips or stone brackets, the main steps are: center, finger-tighten, check alignment, and tighten gradually.
3. How do I stop my sink from moving?
A moving sink almost always means loose sink clips or uneven sealing. First, re-center the bowl and remove any failing caulk. Then add or re-position sink mounting clips to fill gaps in spacing—especially at corners or where a disposal vibrates. Tighten in a star pattern to pull the rim down evenly. If the old clip hardware is rusted or stripped, replace it with new stainless sets. For undermounts, add more undermount sink clips and support the bowl while tightening. Understanding how to install sink clips correctly—in small, even increments—is the key to stopping movement. Once the clips are snug, apply fresh silicone around the rim and wipe clean. With proper mounting pressure and sealant, the sink stays locked in place.
4. How to secure a drop-in sink without clips?
If your drop-in sink lacks hardware, you can temporarily rely on silicone, but it’s not a permanent fix. A heavy bead under the rim plus weights on top will hold while curing, but the sink may shift again because there’s no mechanical clip force. The real solution is to install proper drop in sink mounting clips or a universal retrofit kit matched to your countertop thickness. These let you install sink mounting clips securely, tighten in a star pattern, and get even compression. Without clips, vibrations, heat, and cleaning eventually break the seal. So while silicone alone works for emergencies, only true mounting hardware creates a safe, stable long-term sink install.
5. Do all sinks come with clips?
Not all sinks ship with sink clips. Most stainless drop-ins include rails with drop in sink mounting clips, but some budget or specialty models do not. Many undermount sinks include brackets, yet they may not match your countertop thickness, especially on stone with plywood backers. When hardware is missing or incompatible, you can buy universal sink mounting clips or clamp-style systems. The important part is making sure the mounting range fits your counter and that you know how to install sink clips correctly. If you are reinstalling an old sink, always inspect each clip; if it’s corroded, replace it before you reinstall.
6. Are undermount sink clips universal?
No—undermount sink clips are not fully universal. Stone, solid surface, laminate, and plywood-backed counters each use different mounting methods. Some systems rely on epoxy-bonded studs; others use clamp-style brackets that avoid drilling. Universal kits exist, but they still require matching the countertop thickness and the sink’s weight. If your installer doesn’t choose the right clip, the sink may sag, especially near a garbage disposal. When learning how to install sink clips for undermounts, remember that support during curing is essential. Universal kits are helpful, but checking the spec range is what makes the install reliable.
7. How do sink mount clips work?
Sink mounting clips work by pulling the sink tight to the countertop while compressing the silicone seal. As you tighten the clip, it grabs the underside of the counter and applies upward or downward pressure depending on drop-in or undermount style. This mechanical hold stops movement, keeps the rim level, and maintains a watertight joint. Drop-ins rely on drop in sink mounting clips to pull the rim downward, while undermount sink clips pull the bowl upward. The principle is the same: even, gradual tightening. Understanding how to install sink clips—finger-tightening first, then star-pattern snugging—prevents leaks and ensures a strong, durable mounting bond.
References


Leave a comment
This site is protected by hCaptcha and the hCaptcha Privacy Policy and Terms of Service apply.