


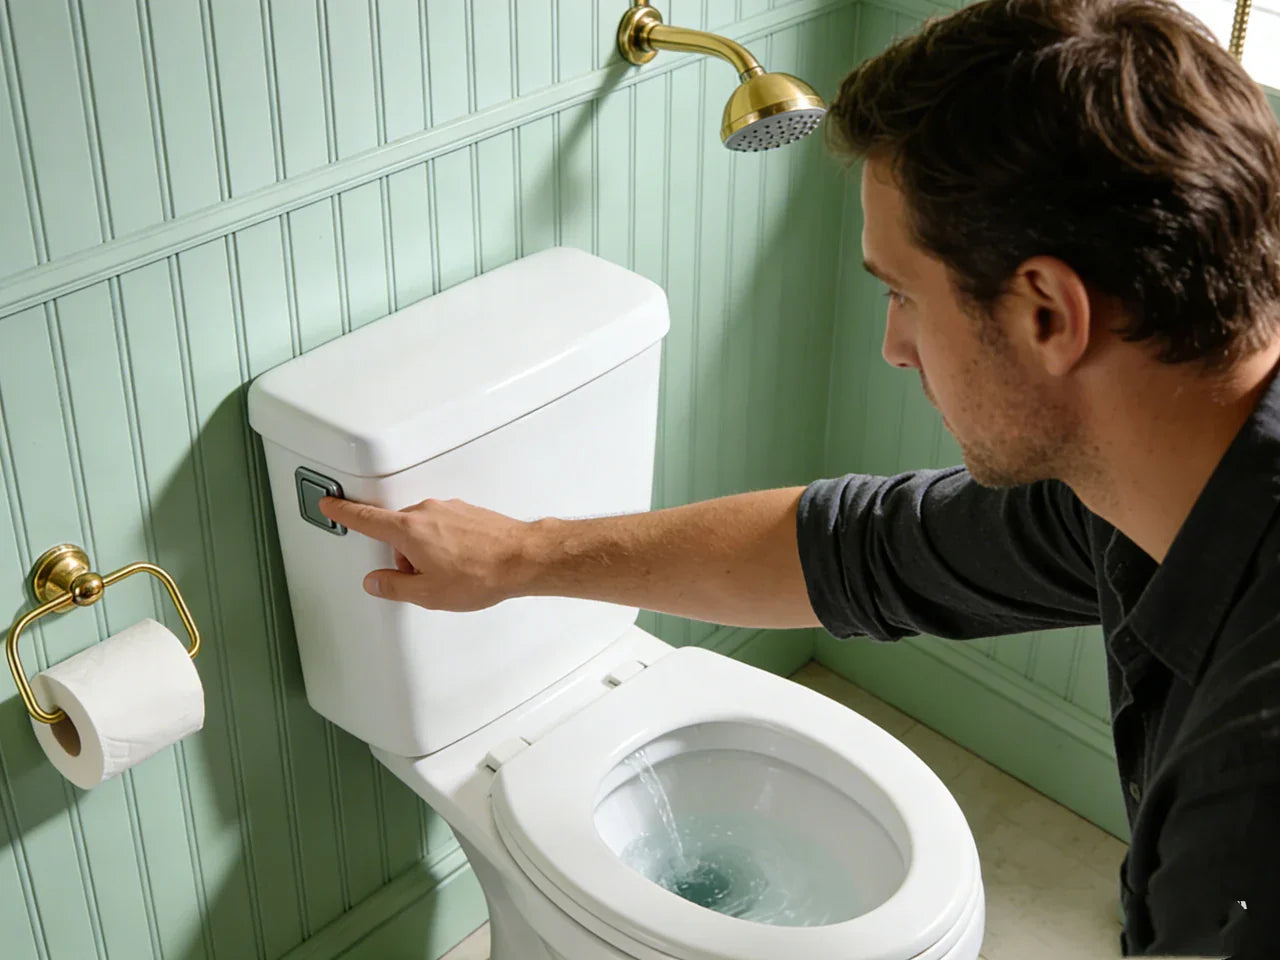
A single flush toilet with a side button can be a clean, simple setup for daily use. But it’s also one of the easiest toilet choices to get wrong in a real home—mostly because the side button depends on tight alignment between the button housing, the lid hole, and the internal actuator/flush valve.
When it works, it works quietly and predictably. When it doesn’t, you usually don’t get a dramatic failure—you get the annoying kind: weak flushes, a button that sticks, a toilet that “ghost runs” (silent water loss), or a lid/button that won’t sit right after you service it.
Who Should Choose a Single Flush Toilet With Side Button
Understand the conditions where a side-button toilet works well and when it may cause problems.
Decision Snapshot: When It Works and When to Avoid It
Homeowners should also consider water efficiency when selecting a toilet. According to the U.S. Environmental Protection Agency (EPA) WaterSense program, a modern single-flush toilet that meets WaterSense criteria can reduce water usage by 20% or more compared to older models, helping to lower water bills while conserving resources.
A single flush toilet with a side button is a good fit when:
-
You can access the button side of the tank easily (both to press it and to service it).
-
You have a working local shutoff valve in the toilet and it actually turns.
-
You are buying a complete toilet (bowl + tank + lid + factory-matched button/valve), or you can match the lid hole and actuator to the exact valve style already in the tank.
-
For homeowners looking for a complete solution, single-flush toilets designed as one piece toilets or two piece toilets with side buttons often meet these accessibility and maintenance requirements.
Avoid it (or plan for extra parts/labor) when:
-
The toilet sits tight against a vanity/tub/wall on the button side, so you can’t press the button straight in or remove the lid without twisting.
-
You’re retrofitting a side flush button into an existing tank/lid that wasn’t built for it.
-
You can’t isolate water at the toilet (or the shutoff is seized/hidden), because even “small” button jobs can turn into draining, detaching, and replacing internal parts.
The regret pattern is consistent: people choose the side flush button because it seems like a simple “button swap” from a traditional lever commode. In practice, side-button flush toilets are less tolerant of mismatched parts and imperfect alignment. If your bathroom is tight or your tank parts are older, assume you may end up replacing more than the button.
Choose It When Side Access and Button Alignment Are Correct
This design is most homeowner-friendly when three conditions are true:
-
Side access is open and permanent. Not “I can reach it if I stand sideways,” but “I can remove the lid without scraping a wall or fighting a cabinet.”
-
You can shut off water in the toilet. A side-button toilet is not inherently riskier, but servicing the button often involves lifting the lid and sometimes loosening internal parts. If the shutoff valve doesn’t work, you’re forced into shutting down the house or risking uncontrolled refills.
-
The button/lid/actuator matches. Side-button systems vary in how far they need to travel, how they mount, and how they connect to the flush valve (rod, cable, sliding actuator, etc.). If you can’t match them, you’ll end up with partial flushes or a valve that doesn’t reseat fully.
Avoid It in Boxed-In Layouts or Mismatched Retrofits
Here’s where people usually run into trouble:
-
Boxed-in toilets: If the button side is tight to a vanity, your hand presses at an angle. Angle-pressing doesn’t just feel awkward—it can stop full button travel, leading to weak flushes.
-
Service requires tank movement: Some layouts force you to shift the tank or work “blind” behind/around it to remove the button housing nut. If you can’t reach the nut cleanly, a basic repair can turn into tank removal.
-
Mismatched retrofit parts: A button that “almost” fits the lid hole will wobble or bind. That wobble transfers to the actuator and creates intermittent flush problems you can’t diagnose from the outside.
If you’re replacing an older toilet and want fewer headaches, a traditional side lever commode (lever handle) is often more forgiving. Not prettier—just more tolerant of real-world wear and imperfect parts.
Design Trade-Offs vs Traditional Lever Toilets
Compare side-button mechanisms with lever toilets to understand alignment, sealing, and performance trade-offs.

Side Button Mechanisms Require Precise Alignment and Sealing
A side lever mechanism is basically a handle, a simple arm, and a chain (or strap) lifting a flapper or seal. It’s forgiving: if the chain is slightly long, you still flush. If the lever loosens a bit, you tighten it.
A side flush button is less forgiving because it typically relies on:
-
A button housing seated squarely in the lid hole
-
Correct travel distance (the amount the button moves)
-
A straight push or aligned rod/cable motion
-
A flush valve that drops and seals perfectly after the push
If travel is too short, you get a weak flush (you press, it “half lifts,” waste clears poorly, family starts double-flushing).
If travel is too long or the rod is misadjusted, the valve may not drop fully and you get silent running.
In real homes, the most common “side button regret” isn’t that it breaks—it’s that it becomes slightly misaligned after maintenance, and you don’t notice until the water bill rises or the toilet randomly refills at night.
Access Trade-Offs in Tight Side-Clearance Bathrooms
Side buttons can be easier for some people to use because you’re pushing, not pulling a lever. A single flush toilet with side button can be particularly convenient for seniors or anyone with grip issues. That matters for some seniors or anyone with grip issues.
But service access is the trade-off:
-
A lever toilet can often be serviced from above with the tank lid off and the handle nut reachable from inside the tank.
-
A side button toilet may require reaching the button’s retaining nut and housing at the side, which is exactly where small bathrooms tend to have a vanity, tub, or tight wall.
So the “easier to use” part may be true day-to-day, but the “easier to maintain” part depends almost entirely on bathroom clearance.
Is a Lever Toilet Actually Easier and Cheaper to Fix?
“Easier to fix” is true only if you have:
-
Easy access to the button side
-
A button assembly that’s still available and matches your lid/valve
-
No corrosion on tank bolts or internal fasteners
In older installs, lever systems win on repair simplicity because you can replace universal parts cheaply, and the mechanism tolerates small variations. Side-button assemblies are more specific: the button diameter, thread pitch, housing depth, and actuator geometry matter. When you can’t match them, you end up replacing the flush valve or the whole toilet sooner than planned.
If your goal is the least fussy toilet over 10–15 years, “traditional style toilet with lever” remains the low-drama option in many homes.
Extra Cost, Tools, and Downtime to Expect
Understand hidden costs and additional tools or time required for side-button replacements or retrofits.
Why Button-Only Replacements Often Fail
A common homeowner plan is: “The button sticks, I’ll replace the flush button.”
The problem: the symptom (sticky button or inconsistent flush) is often caused by a combination of:
-
Mineral buildup on the button housing
-
A worn flush valve seal (or “doughnut”/gasket)
-
A slightly warped or dirty valve seat
-
A rod/cable that’s out of adjustment
So a button-only swap can “work” for a day and then start ghost-running or weak-flushing again because the underlying seal wasn’t addressed.
Budget reality (typical ranges, not promises):
-
Button assembly: often modest cost
-
Flush valve/seal kit: moderate cost
-
Full internal rebuild (fill valve + flush valve + hardware): more, but sometimes the only way to stop repeat callbacks
-
Professional service: adds labor, and labor goes up fast if tank bolts are corroded or access is tight
If you’re retrofitting, plan time and budget as if you might need the seal/valve too, not just the flusher button.
Hidden Costs From Corroded Tank Bolts and Hardware
This is where DIY jobs go sideways.
If the toilet is older, the tank-to-bowl bolts and nuts may be corroded. Once you disturb them (even slightly), you can get:
-
A slow leak at the tank gasket
-
A bolt that spins freely (won’t tighten, won’t loosen)
-
A nut that rounds off or snaps
At that point, “replace the flush button” turns into “remove the cistern,” and that can force a full tank rebuild or even bowl removal if you can’t safely separate parts in place.
If the bathroom is small and you can’t lift/tilt the tank without hitting a wall or cabinet, downtime goes up because you can’t reassemble quickly after an unexpected hardware failure.
Water Shutoff Risks That Increase Repair Downtime
A side-button toilet doesn’t require more shutoffs than any other toilet. But it does tend to lure people into “quick fixes” that still require draining the tank.
If your supply valve:
-
Is painted over
-
Is stiff and won’t turn fully off
-
Is hidden behind the toilet and hard to reach
-
Doesn’t exist (some older setups)
…then you may have to shut water off to the whole home. That turns a one-hour repair into a day project, especially with family use and only one bathroom.
Practical advice: before you commit to a side flush toilet (or retrofit), confirm you can isolate water locally and that the valve actually stops flow. If it doesn’t, factor in replacing the shutoff valve as part of the job.
Bathroom Layout and Clearance Checks Before You Buy
Ensure your space allows proper operation and servicing before committing to a side-button toilet.
Minimum Side Clearance for Small Bathrooms

Small bathrooms are where side buttons are most likely to annoy you.
You need two types of clearance:
-
Use clearance: enough room to press the flush button straight in, without your hand wedged at an angle.
-
Service clearance: enough room to remove the lid without twisting it, and enough access to reach and remove the button housing if needed.
Rule of thumb from what tends to happen in practice: if the toilet tank is close enough to a vanity that you can’t comfortably fit your hand flat on the button, you will eventually hate it. The button may still “work,” but guests will miss the press, kids will half-press it, and you’ll see more repeat flushes.
Also, lid handling matters more than people think. Dropping a lid once can crack it. In tight spaces, you’re more likely to bump the lid on a wall while removing it.
Rear Clearance Limits for Tank and Button Service
Even though the button is on the side, rear clearance still matters when you service the toilet.
If you have less than about 4–6 inches behind the tank, tasks like:
-
lifting the tank straight up (if separation becomes necessary)
-
reaching around for fasteners
-
repositioning a tank gasket evenly
…become frustrating or impossible without pulling the whole toilet.
This is one reason side-button toilets cause longer downtime in tight remodels: you can’t “wiggle” the tank or tip it safely onto towels without hitting the wall. If anything goes wrong mid-repair, you’re stuck with parts half removed and a bathroom out of service.
Common Side Button Interference Points to Check
Side buttons fail in a very specific way when something blocks them: the button still moves a little, but not enough to lift the flush valve fully.
Before buying, check for:
-
Vanities with overhanging lips that sit close to the tank
-
Tub edges or shower glass that crowds the tank side
-
Towel bars or toilet paper holders placed where your hand must twist
-
Sloped walls (common in attic baths) that reduce side clearance near tank height
Also consider who uses the bathroom. A side flush button that is “fine” for an adult may be awkward for kids who can’t get leverage in a tight gap, leading to habitual partial flushes.
Button, Lid Hole, and Mechanism Compatibility Risks
Proper fit and alignment between lid hole, button, and actuator are essential for reliable flushing.
Cistern Lid Hole Tolerance and Seating Risks
If you’re not buying a complete toilet and you’re trying to retrofit a side flush button into an existing cistern lid, this is the most common failure point.
The lid hole must match:
-
Diameter (too small: won’t fit; too large: won’t clamp tight and can wobble)
-
Depth/shape (some lids have a recessed or stepped hole)
-
Thread engagement (some housings need more “meat” to clamp securely)
If the button doesn’t seat squarely, two things happen:
-
The button binds or doesn’t return smoothly.
-
The housing can leak or allow moisture into places that accelerate mineral crust and sticking.
Even a slight wobble can become “intermittent no-flush,” where you press, feel movement, but the actuator doesn’t transmit enough force to lift the valve.
Housing Stability and Intermittent Flush Failures

Stable housing matters more than people expect. If the housing isn’t locked in (or the shroud/clips don’t match the lid thickness), you get:
-
A button that feels spongy
-
A button that sometimes flushes and sometimes doesn’t
-
A need to press harder over time, which accelerates wear
This shows up in family homes quickly: one person presses “just right” and thinks it’s fine; another person presses slightly off-center and it fails. That’s not a user problem—it’s usually housing stability and alignment.
Hard Water Effects on Side Button Longevity
Hard water changes the long-term service cost.
Mineral buildup can lock the button housing in place. When you later try to unscrew the retaining nut or housing, you end up applying more force than the plastic lid or housing wants to take.
What tends to happen:
-
The housing threads seize
-
You twist harder
-
The lid flexes
-
The lid cracks (or the housing snaps)
If you know you have hard water, assume periodic cleaning and gentler disassembly. Also assume that “quick button replacement” might not be quick once mineral crust is involved.
Plumbing Conditions That Affect Single Flush Performance
Water supply, pressure, and venting can all impact flush effectiveness.
Supply Line Routing Issues That Cause Refill Problems
Side flush toilets don’t require a special supply line, but the tank geometry can change the hose routing.
Check:
-
Is the shutoff valve directly under the fill valve location, or offset?
-
Will the hose bend sharply and kink?
-
Do you have room to hand-tighten without twisting the fill valve shank?
A kinked hose causes slow refills, which can look like a flush problem. And if the hose routing forces torque on plastic fittings, you get drips that are hard to notice until the floor shows staining.
If your shutoff valve sits very close to the wall and you have a large tank, you may need a different hose length to avoid a tight bend. That’s a small cost, but it’s the kind of detail that prevents leaks.
Low Water Pressure Effects on Flush Performance
Proper installation and supply line routing are critical for maintaining efficient flush performance. The U.S. Department of Energy (DOE) notes that water-efficient toilets require careful attention to tank fill mechanisms and supply line layout to ensure consistent performance and optimal water savings.
Low water pressure mainly affects refill speed, not the immediate flush force (the flush uses stored tank water). Even a single flush toilet with side button can feel weak or inconsistent under low-pressure conditions. But in real homes, low pressure still creates complaints:
-
The tank refills slowly, so the next user gets a weak flush if they go soon after.
-
Some fill valves become noisy or inconsistent at low pressure.
-
Families start “holding the button” or repeat flushing, which cancels out any water savings you thought you were getting.
If you already have pressure issues—top-floor bathrooms, older supply lines, or known low PSI—be cautious about any toilet setup that requires precise valve action and full tank levels to feel “normal.”
Also note: some side-button mechanisms require a clean, full-travel push. If the flush feels weak, people push multiple times quickly, which can leave the valve unseated and cause running.
Drain and Venting Issues That Reduce Flush Effectiveness
A toilet can “fit” physically and still perform poorly due to the home’s drain conditions.
If you have:
-
Older cast iron drain lines with internal scaling
-
A history of slow drains or frequent clogs
-
Long horizontal runs with marginal slope
-
Questionable venting (gurgling, siphoning traps)
Then a single flush toilet with side button may still struggle under these drain conditions, and it can make issues more noticeable. Any toilet that doesn’t clear reliably causes users to flush twice, which raises water use and frustration.
If your current toilet only struggles occasionally, that might be an early sign of drain restriction. Installing a new toilet without addressing the drain can produce “new toilet is worse than the old one” complaints, when the real issue is downstream.
Common Long-Term Failures and Maintenance Costs
Know which components fail first and how side-button toilets compare to lever systems.
Seal and Valve Failures That Cause Silent Running
The most expensive toilet problem is often the quiet one: constant running.
Side-button setups are sensitive to the flush valve reseating cleanly. Common failure modes:
-
The seal doesn’t sit flat after you reassemble (a small fold, bump, or debris).
-
The replacement seal is close-but-not-correct size, so it “almost” seals.
-
The valve seat has mineral crust, so the seal can’t fully contact.
-
The tank-to-bowl gasket (“doughnut”) or related seals start weeping after you disturb the tank.
What you notice at home:
-
The toilet refills randomly when nobody used it.
-
You hear short fill bursts at night.
-
The bowl water level may slowly change.
-
Water bills creep up.
This is where a side lever commode tends to be more forgiving: a flapper and chain often show obvious wear and are easy to match. Side-button flush valves vary more, so mismatches happen more often in retrofits.
Linkage and Rod Misalignment Over Time
Side-button toilets often use an actuator rod or linkage that must be adjusted.
If it’s set too long, the valve can be held slightly open. That creates:
-
Continuous trickle into the bowl
-
A tank that never fully stops refilling
-
A toilet that seems to “flush by itself” because the fill valve keeps cycling
If it’s set too short, you get incomplete lifts and weak flushes.
Adjustment drift can happen after:
-
lid removal and reinstallation
-
cleaning inside the tank
-
replacing the button housing
-
someone pushing the button hard at an angle repeatedly
In other words: normal household use plus occasional maintenance.
Also watch overtightening. Plastic nuts and housings crack when tightened like metal plumbing. Once cracked, you wobble again, and the cycle repeats.

Long-Term Hard Water Maintenance Compared to Lever Toilets
Hard water is where side-button toilets can become “more maintenance than expected.”
Mineral buildup affects:
-
the button return spring action
-
the sliding surfaces inside the housing
-
the actuator rod movement
-
the flush valve sealing surface
A lever toilet can also suffer mineral issues, but it’s usually easier to free up a chain/flapper or replace a simple handle. A side flush button assembly may require more careful disassembly and cleaning, and you’re working through a side opening with less room.
If your home has hard water and you don’t use any softening/conditioning, plan for periodic cleaning and the possibility that button parts become semi-disposable over time. That doesn’t mean you must avoid it—it means you should avoid tight-clearance installs where servicing is miserable.
Pre-Purchase and Pre-Install Checks to Avoid Regret
Simple measurements and inspections can prevent installation headaches and future repairs.
10-Minute Measurement Checklist Before Purchase
Do these checks before you buy a toilet or commit to a side-button configuration:
-
Rough-in distance (wall to closet bolts). This decides whether the toilet will physically fit without crowding the tank against the wall.
-
Closet bolt condition and spacing. Bent or corroded bolts can turn install into a hardware extraction job.
-
Flange height relative to finished floor. Too low can cause rocking and seal issues; too high can prevent the toilet from seating.
-
Floor level. If the floor is out of level, you’ll be shimming. Shimming is normal, but it affects how the tank sits and can contribute to misalignment stress over time.
-
Side clearance on the button side. Confirm you can press and service without obstruction.
If any of these are borderline, a traditional style toilet with lever is usually easier to live with because the flush mechanism tolerates small misalignments better.
Dry-Fit Checks Before Draining or Disassembly
If you’re retrofitting a side flush button or replacing button parts:
-
Test-fit the button in the lid hole before you drain anything.
-
Confirm the housing clamps firmly with no wobble.
-
Confirm the button can be pressed straight in (not forced sideways by a nearby vanity).
-
With the lid on, confirm the button travel feels consistent and returns smoothly.
-
Inside the tank, confirm the actuator/rod aligns without rubbing or flexing.
If the button binds during a dry-fit, it won’t get better after you fill the tank. Water and mineral residue tend to make binding worse, not better.
When to Abandon the Side Button Plan
Stop and reconsider if any of these are true:
-
You can’t remove the tank lid safely without scraping a wall or lifting at an angle.
-
The shutoff valve doesn’t fully stop water or is not accessible without moving the toilet.
-
The lid hole doesn’t match the button housing securely (wobble, poor clamp, uneven seating).
-
You see heavy corrosion on tank bolts/hardware and you’re not prepared to replace tank internals if something snaps.
-
The bathroom is so tight that servicing the button requires moving the toilet or tank.
This is not about being “handy” or not. Tight clearances and mismatched parts defeat skilled DIYers too. The simplest toilet is the one you can service without removing half the bathroom.
Before You Buy: Final Checklist
-
Confirm clear side access on the button side: you can press straight in and remove the lid without twisting.
-
Verify you have a working local shutoff valve at the toilet that fully stops flowing.
-
If retrofitting, measure the cistern lid hole diameter and thickness and confirm the button housing clamps firmly (no wobble).
-
Check rear clearance: if the tank is very close to the wall (about under 4–6 inches), assume tank servicing may be difficult.
-
Inspect tank hardware condition: heavy rust/corrosion means higher chance a “small” job becomes a tank rebuild.
-
Consider hard water: if mineral buildup is common in your home, plan for periodic cleaning and harder disassembly later.
-
Think about who uses it: in tight layouts, kids and guests often under-press side buttons, causing repeat flushes.
FAQs
1. Is a side flush button easier to use for seniors than a lever?
Often yes—a push action generally requires less grip strength than a lever pull, which can be more comfortable for seniors or users with limited hand mobility. A single flush toilet with side button can feel more intuitive because it relies on a straight press rather than wrist rotation or finger strength.
That benefit only holds if reach and clearance are good. If the button is tight against a vanity or wall, users are forced to press at an angle, which increases effort and reduces effective travel. In those layouts, a traditional lever—despite needing a pull—may actually be easier and more consistent to use day to day.
2. Can I upgrade a single flush toilet with a side button to dual flush?
Sometimes, but it’s rarely a simple button swap. Even for a single flush toilet with side button, upgrading to dual flush usually requires a matched flush valve and actuator designed for two distinct volumes.
The lid hole, button housing depth, and internal linkage all need to be compatible.
If your tank and lid weren’t designed for dual flush from the start, upgrading a single flush toilet with side button often means replacing most of the internal components—and in some cases, the entire toilet. From a cost and reliability standpoint, it’s usually smarter to choose a factory-built dual flush model rather than retrofitting.
3. Why is my side flush button sticking?
The most common causes are mineral buildup inside the button housing, a mis-seated or wobbling button assembly, or friction in the internal actuator/rod. Any of these can prevent smooth returns after pressing.
Cleaning can help in the short term, but if the housing doesn’t sit squarely in the lid or the mechanism is worn, the problem often comes back. In hard-water areas, sticking buttons tend to recur unless the housing and actuator are properly cleaned or replaced together.
4. Are side buttons more reliable than top buttons?
Neither design is automatically more reliable. Reliability depends on part quality, alignment, and how easy the mechanism is to service. Side buttons work well when installed with proper clearance and matched components.
In tight bathrooms, side buttons can be more frustrating because accessing and servicing the housing is harder. Top buttons may be easier to reach from above, while side buttons can suffer if maintenance requires working in cramped side clearances.
5. Does this style come in ADA compliant height?
Many side-button toilets are available in ADA or “chair height” configurations, meeting the Americans with Disabilities Act (ADA) 2010 Standards for Accessible Design, which ensures comfortable and safe access for users with limited mobility.
Yes. Many toilets with side flush buttons are available in ADA or “chair height” configurations. Always verify the bowl height specification and confirm it matches the user’s needs and local code requirements.
Height compliance affects comfort and accessibility, but it doesn’t change the underlying service considerations—clearance, alignment, and part compatibility still matter just as much.
References


Leave a comment
This site is protected by hCaptcha and the hCaptcha Privacy Policy and Terms of Service apply.