


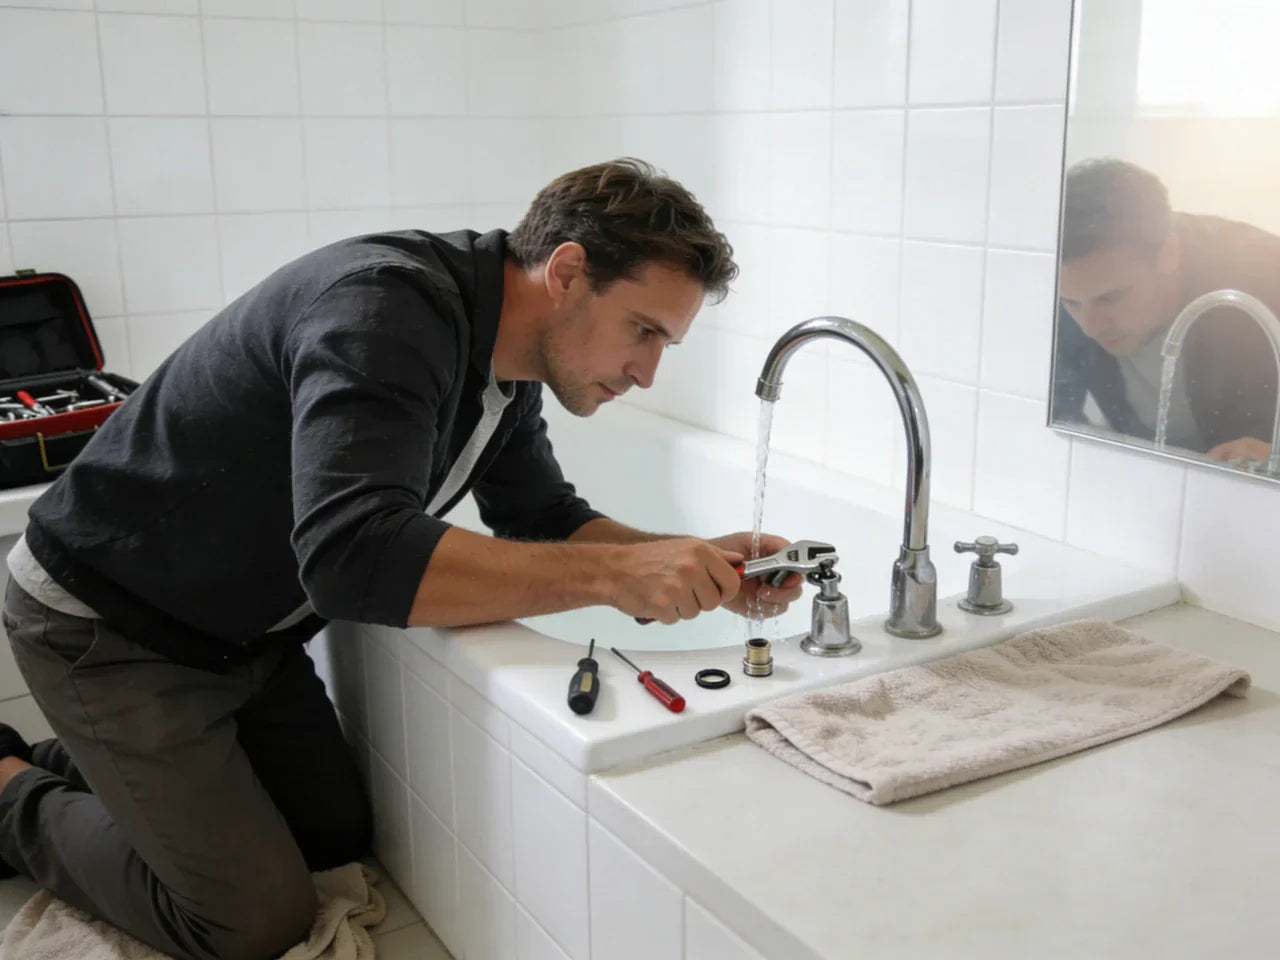
A leaky faucet tubbase problem often starts as “just a drip” at the spout, handle, or base plate, but wastes water and increases the risk of damage over time. What seems minor on an old bathtub can quickly turn into moisture behind the wall, peeling paint, or a musty smell—especially when parts are loose or broken and quietly causing the leak. Even a small bathtub leaking from faucet wastes water, and many homeowners don’t realize that most leaks can be fixed without removing tile or replacing the entire valve. According to the U.S. Environmental Protection Agency (EPA), household leaks can waste more than 1 trillion gallons of water annually nationwide if not repaired.
In this step-by-step guide, you’ll be able to see everything you need to diagnose and repair a bathtub faucet without guesswork, whether you’re dealing with a worn faucet stem, a failing cartridge, or a single-handled faucet that won’t fully shut off. We explain how to fix a leaky bathtub spout, when to remove the decorative cap and screw the faucet components back correctly, and how to replace the cartridge or fix a leaking single-handle valve safely. You’ll also learn which tools and materials matter most, practical tips for preventing future drips, realistic 2025 DIY and plumber costs, when you need professional assistance, and how to know when it’s time to call a pro.
Leaky faucet tubbase: quick triage & safety first
When you’re trying to stop the drip from a leaky faucet tub, speed matters—but safety matters more. A tub/shower faucet is tied to hot water, slippery surfaces, and (sometimes) hidden pipes in a wall. That’s why learning how to fix a leaky bathtub faucet should always start with staying calm and careful, especially if you’ve ever leaned over a tub and felt your foot slide in those first few minutes.
Shut off water the right way (valves, main shutoff, pressure relief)
Some tubs have local shutoffs, many don’t. If you can’t find fixture shutoffs, you’ll use the main water shutoff for the home.
Start by turning the faucet handle(s) to the “off” position. Then:
-
Look for an access panel behind the tub/shower wall (often a closet or adjacent room). If there are two small shutoff valves, turn both clockwise.
-
If there are no local valves, shut off the home’s main water valve (often near where the water line enters the house).
-
After shutting off water, open the tub faucet to relieve pressure. Then open a lower faucet (like a basement sink) to drain a bit more pressure if you can.
If you’re doing a cartridge or valve repair, pressure relief is what keeps you from getting sprayed when you loosen a nut holding the stem or pull a cartridge.
5-minute drip control: temporary steps before repair
If you can’t repair right away, you can often quickly fix the worst dripping for a day or two. This won’t solve the root cause, but it can reduce water waste and noise.
-
Handle tightening check: If a handle feels loose, gently tighten the set screw (often hidden under a small decorative cap). A loose handle can keep a valve from fully closing.
-
Packing nut snug (two-handle styles): If the leak is around the handle when water is running, a small snug on the packing nut can slow seepage. Do not crank it down—over-tightening can make the handle hard to turn and damage packing.
-
Bucket test (confirm it’s real dripping): Dry the spout and place a bucket or cup under it for 10 minutes. If you collect water, you have a true valve seep, not leftover shower water draining from the pipe.
Temporary control is helpful, but if your tub faucet is dripping when off, you’ll still need to repair the sealing surface: usually a washer, O-ring, cartridge, or valve seat.
Safety checklist (plug drain, protect finishes, scald prevention, electrical/wall risks)
A bathtub repair can go from simple to stressful if a tiny screw falls into the drain or a tool chips the finish. Before you start:
-
Plug the drain so small parts can’t drop in.
-
Lay down a towel to protect the tub surface from tools.
-
Shut off water and test both hot and cold are truly off.
-
Watch for scald risk: hot water can linger in lines.
-
Be cautious near any wall switches or outlets. If you see active dripping inside a wall opening, stop and consider turning off power to that area.
Visual: “Emergency shutoff map” diagram + printable checklist
Use this simple map to decide where to shut water off.
EMERGENCY SHUTOFF MAP (TUB FAUCET)
Is there a local shutoff near the tub?
-
YES → Turn OFF both local valves (hot + cold) → Open tub faucet to relieve pressure
-
NO → Turn OFF home MAIN water valve → Open tub faucet to relieve pressure
If leak continues, it may be draining from the pipe (not active supply)
Printable checklist:
PRINTABLE QUICK CHECKLIST (tear-off style) [ ] Water OFF (local or main) [ ] Pressure relieved (faucet opened) [ ] Drain plugged [ ] Tub protected with towel [ ] Tools ready (screwdriver, adjustable wrench) [ ] Photo taken before disassembly (helps reassemble the faucet) [ ] Small parts container ready
Diagnose the leak location (spout, handle, tub base, wall)
Before you buy parts, confirm where the leak is coming from. Many people replace a part, reassemble the faucet, and still see water—because the issue wasn’t the valve at all, but a leaky faucet tub problem coming from the tub spout at the wall or from behind the escutcheon plate.

Leak-source flowchart: spout drip vs. handle seep vs. tub spout leak at wall
LEAK-SOURCE FLOWCHART
Is water dripping from the spout when the faucet is OFF?
-
YES → Likely worn washer/cartridge, dirty seat, or mineral buildup
-
NO → Is water leaking around a handle when water is ON?
-
YES → Packing nut/packing/O-ring issue (handle area)
-
NO → Is water appearing at the tub spout where it meets the wall?
-
YES → Spout pipe seal issue OR water running inside wall to spout opening
-
NO → Is water coming from behind the trim/escutcheon?
-
YES → In-wall valve leak or failed seal; may need pro access
-
-
-
Common symptoms → likely cause (O-ring, washer, faucet cartridge, valve seat, diverter)
A clear symptom-to-part match prevents wasted trips to the hardware aisle. Here’s the practical way to think about it: the leak happens where water is supposed to be blocked. If it’s not blocked, the sealing part is worn-out, dirty, or sitting crooked.
| Symptom you see | Most likely cause | What it usually needs |
| Dripping tub spout when off | Worn washer or cartridge, debris on seat | Replace washer/cartridge, clean seat |
| Water around handle when on | Worn O-ring or packing | Replace O-ring/packing, snug packing nut |
| Water at tub spout where it meets wall | Spout connection seal, cracked spout, pipe nipple issue | Re-seal threads, replace spout if cracked |
| Wet behind escutcheon/trim | In-wall valve leak, worn seals | Cartridge/valve repair; may need wall access |
| Weak diverter or showerhead drips after shutting off | Diverter wear or mineral buildup | Clean/replace diverter parts |
Why is my tub faucet dripping when off?
If you’re asking why is my tub faucet leaking even when the handle is “off,” it’s almost always because the water is still slipping past a worn sealing surface. In a two-handle setup, that’s usually a rubber washer at the end of the stem assembly or a damaged faucet seat. In a single-handle bathtub faucet, it’s commonly a worn cartridge. Hard-water mineral buildup can make this worse by scratching parts and keeping the valve from closing fully, even if the piece isn’t completely worn out yet.
Identify your bathtub faucet type (so you buy the right parts)
Buying the wrong part is the fastest way to turn a one-hour DIY faucet repair into a weekend headache, especially when you’re dealing with a leaky faucet tub. The key is identifying whether you have a compression valve (common with two handles) or a cartridge/ball/ceramic system (common with single-handle faucets).
Type matrix: single-handle vs. two-handle; compression vs. cartridge vs. ball/ceramic
| What you have | Quick ID | Common leak cause | Typical fix |
| Two-handle compression | Hot and cold handles, each turns multiple rotations | Worn washer, worn seat, stem packing | Replace washer, inspect/replace seat, refresh packing |
| Single-handle cartridge | One handle controls temp + flow | Worn cartridge, nicked O-rings | Replace cartridge, grease O-rings |
| Single-handle ball/ceramic style | One handle; internal cam/ball parts (varies) | Worn seals/springs, mineral buildup | Rebuild kit or internal parts swap |
How to find brand/model fast (trim plate clues, cartridge stamping, manuals)
Even without a model number, you can usually identify the right cartridge by removing the handle and looking for markings on the cartridge or valve. A simple habit helps here: before you remove anything, take a clear photo of the handle, trim plate, and spout. Then take another photo after removing the handle. Many cartridges have numbers stamped on the side.
If you can’t find stamps, measure the cartridge length and note how it locks in place (clip, nut, or twist-lock). Those details are often enough to match parts.
What “tub/shower” adds: diverter, mixing valve, wall access complexity
A tub-only faucet is often exposed and simple. A tub/shower setup adds a mixing valve and sometimes a diverter that sends water up to the showerhead. That’s why bathtub repairs can cost more than sink repairs: the important parts may be behind tile or a wall, and you may have to remove an escutcheon plate and work in a tight cavity.
Mini parts-matcher quiz (quick self-check)
If you’re standing in the bathroom asking, “What do I even have?” answer these in order:
-
Does it have one handle or two?
-
If two handles, do they take several turns to fully shut off? If yes, it’s likely compression.
-
If one handle, does the handle control both temperature and water flow? If yes, it’s usually a cartridge or ball/ceramic style.
This is often enough to buy the right tools and replacement parts the first time.
Step-by-step DIY fixes (by failure point)
You can often fix a leaky bathtub faucet yourself if you’re comfortable with simple tools, patient with small parts, and willing to shut off the water supply—especially for a leaky faucet tub that’s dripping but otherwise in good condition. If you’re nervous, start by reading the full set of steps first—many mistakes happen because people discover a clip or hidden screw halfway through and force parts.
Spout drip repair (most common): washer/O-ring/seat cleaning + mineral buildup removal
A dripping tub spout is the classic complaint. The most common cause of a leaky tub faucet is a worn sealing part—usually a washer (two-handle compression) or a cartridge (single-handle). But don’t skip the seat and mineral buildup check, because a brand-new washer can still leak if it’s sealing against a rough seat.
Checklist + steps (compression-style spout drip):
-
Shut off the water supply valve (local if possible, otherwise main).
-
Plug the drain and cover the tub with a towel.
-
Pry off the decorative cap on the handle, remove the screw, then pull the handle.
-
Use an adjustable wrench to loosen the packing nut and unscrew and remove the stem assembly.
-
Inspect the end washer. If it looks flattened, cracked, or stiff, replace the washer.
-
Look into the valve body at the faucet seat. If it’s pitted or rough, clean it gently or replace it with a seat tool.
-
Reassemble the faucet, turn on the water, and test.
Descaling options (for mineral buildup):
If you see white crust or gritty debris, soak removable parts (not decorative finishes) in warm vinegar for 20–30 minutes, then brush with an old toothbrush. Mineral buildup can keep the valve from fully closing and can also scratch a new washer the first time you tighten it. If you have very hard water, this step often makes the difference between “fixed” and “still dripping.”
Seat inspection tip: Run a finger lightly over the seat edge (careful—metal edges can be sharp). If it feels like sandpaper or has visible pits, the seat is a leak path. A seat in bad shape can make the faucet seem faulty even after you replace the washer.
If your goal is simply, “How do I get my bathtub faucet to stop dripping?” this washer/seat check is the fastest route for many two-handle tubs.

Cartridge replacement (single-handle shower faucet drip fixes)
A single-handle bathtub faucet that drips when off is often a cartridge issue. Cartridges wear from friction, grit, and pressure changes. The good news is that once you get the old one out, the fix is usually straightforward.
Tools + steps:
-
Shut off water (local or main). Open the faucet to relieve pressure.
-
Remove the handle. Look for a small set screw under a cap or on the side of the handle.
-
Remove the escutcheon/trim plate so you can access the cartridge area.
-
If there’s a retaining clip, remove it carefully and store it safely.
-
Pull the cartridge straight out. If it’s stuck, a cartridge puller helps you remove the valve cartridge without cracking the valve body.
-
Clean the valve opening with a soft cloth to remove grit.
-
Install the new valve cartridge in the same orientation (this matters for hot/cold direction and full shutoff).
-
Apply a small amount of silicone plumber’s grease to O-ring areas if recommended for your cartridge style.
-
Reassemble the faucet and test.
A common frustration is thinking “the faucet isn’t shutting off,” when the real issue is that the cartridge is slightly misaligned or the retaining clip isn’t seated. If water still seeps, don’t keep tightening random parts—take it back apart and confirm the cartridge is fully seated and facing the right direction.
Compression valve rebuild (two-handle): washer + valve seat + stem packing
With a double-handled faucet, you’re usually dealing with a stem assembly that presses a washer against a seat. Over time, washers wear out, seats pit, and packing dries up. Rebuilding addresses all three so you’re not repairing the same leak again next month.
Steps:
-
Shut off water and relieve pressure.
-
Remove the handle (cap → screw → pull the handle).
-
Loosen the packing nut and remove the stem.
-
Replace the rubber washer at the end of the stem.
-
Inspect the seat. Clean light buildup; replace the seat if it’s damaged.
-
Replace or refresh stem packing (or the O-ring if your stem uses one).
-
Reinstall the stem and snug the packing nut just enough to stop handle-area seepage while keeping smooth turning.
-
Turn on the water and test hot and cold.
When to replace the stem instead of re-seat:
If the stem threads are badly worn, the stem is bent, or corrosion is heavy, rebuilding may not last. At that point, you may need to replace the stem assembly. It costs more than a washer, but it often saves time and repeat leaks.
Base/escutcheon leaks (tubbase area): seal/caulk vs. internal valve leak
A leaky faucet tubbase area can be confusing because “base” leaks can be cosmetic or serious. Sometimes water is only escaping around the trim because shower spray is running behind it. Other times, water is leaking inside the wall every time you turn the faucet on.
Here’s the simplest decision tree:
BASE / ESCUTCHEON LEAK DECISION TREE Is water present only after showering (not after filling tub)? YES → Likely splash/caulk failure around trim → Dry, reseal carefully NO → Water appears when faucet runs OR when off When running → Could be valve stem packing or cartridge O-ring leak When off → Could be in-wall valve body issue (urgent)
Cosmetic leak (reseal):
If water is clearly from outside—like spray getting behind a loose trim—remove the escutcheon, dry everything fully, and reapply a thin, neat bead of bathroom-rated sealant around the top and sides (many people leave the bottom unsealed so any future in-wall leak can escape and be noticed). If you reseal everything airtight, you could trap water where you can’t see it.
In-wall leak (internal):
If water shows up behind the trim while the faucet is running, the leak may be a failed O-ring, a loose bonnet nut, or a cracked cartridge. If water appears even when the faucet is off, treat it as urgent. That’s when calling a plumber can prevent hidden damage.
Cutaway visual (cosmetic vs. in-wall):
CUTAWAY VIEW (simplified) [Tile wall] | [Escutcheon plate] ← cosmetic water may slip behind here from shower spray | [Valve body] ← internal leak here can drip inside wall cavity | [Pipe to spout] ← water can travel and show up at spout opening
2025 cost to fix vs. replace (DIY vs. plumber)
People often wait because they fear the bill. In reality, the cheapest fix is usually the early fix—especially with a leaky faucet tub, where costs rise when a drip becomes corrosion, then becomes a seized part, and eventually turns into wall damage.
National cost ranges for bathtub faucets (repair vs. replacement) + why tubs cost more
Bathtub faucets tend to cost more than sink faucets because access is harder and parts can be behind the wall.
| Service (2025 typical) | Typical range | Notes |
| Bathtub faucet repair | $60–$400 | Common band $100–$300 |
| National average repair (all-in) | ~$270 | Varies by access and parts |
| Bathtub faucet replacement | $200–$600 | Higher if valve/trim is complex |
So, how much does it cost for a plumber to fix a leaky tub faucet? In many homes, it lands around $100–$300 for a standard repair, but it can climb toward $400 if the valve is hard to reach, corroded, or needs extra time for disassembly.
Parts price breakdown (washers/O-rings vs. cartridges)
DIY is often inexpensive if the valve isn’t damaged.
| Part | Typical DIY parts cost (2025) |
| O-rings / washers | $1–$5 |
| Cartridge | $10–$100 |
| Replacement hardware/trim (when needed) | $150–$400+ |
Labor pricing realities (hourly + minimums + emergency fees)
Plumbers don’t just charge for turning a wrench. You’re also paying for diagnosis, travel, and the risk of stuck parts. Typical labor pricing ranges:
-
$45–$200 per hour, depending on region and demand
-
Many companies have minimum charges even for short visits
-
After-hours or emergency calls often add $50–$150
If your tub faucet is leaking late at night and you can shut off the water safely, waiting until normal hours can save money.
How much does it cost to fix a leaky bathtub faucet?
A realistic answer is: DIY often costs $5–$100 if you only need a washer or cartridge, while a professional repair often costs $100–$400 all-in. Replacement commonly runs $200–$600, especially if the valve body or behind-wall work is involved.
The real risks of ignoring a drip (water waste + damage)
It’s tempting to ignore a slow drip because it seems harmless. But a drip is a warning that parts are wearing and water is escaping where it shouldn’t.
Water waste math: ~1 drip/second ≈ 3,000 gallons/year
A steady drip adds up fast. A common estimate is that one drip per second wastes about 3,000 gallons per year. Even if your water bill doesn’t spike right away, that’s treated water you paid for and never used.
| Drip rate | Approx. waste per year |
| 1 drip/second | ~3,000 gallons |
| Faster drip / thin stream | Can be much higher |
This is why people searching “stop the drip” often care about water bills as much as the annoyance.
Hidden costs: mold, drywall, framing, tile failure (cost ranges + warning signs)
The larger risk is what you can’t see. Water can travel along a pipe, soak insulation, and feed mold where there’s little airflow. Drywall can crumble, wood can swell, and tile can loosen as adhesive breaks down.
Water damage restoration commonly ranges from $500–$5,000+, depending on how long it went on and how far water traveled.
Warning signs that your bathtub faucet leak may be doing hidden damage include a musty smell, soft drywall near the tub, bubbling paint, loose baseboards, or dark staining near the trim plate.
Mini case studies (what “small” leaks can turn into)
A neighbor once told me they ignored a slow tub drip because “it’s just going into the tub.” What they didn’t notice was water also seeping behind the wall trim when the handle was used. After a few months, they found moldy drywall on the other side of the wall. The final fix wasn’t just faucet repair—it included wall work too. That’s a common pattern: the first repair might have been simple, but waiting made it a bigger project.
Another common story is the “repeat repair.” Someone swaps a washer, but the faucet seat is already pitted. The drip stops for a week, then returns. A proper early fix (washer + seat) would have cost a bit more in parts, but far less time and frustration.
Can a leaky tub faucet cause water damage?
Yes. Even if most drips land safely in the tub, leaks around the faucet handle, behind the escutcheon, or at the spout connection can send water into wall cavities. That’s when damage grows quietly, and repairs get expensive.
Prevention & maintenance (keep it from coming back)
After you fix your faucet, prevention is what keeps it fixed. Most repeat leaks come from three things: mineral buildup, high water pressure, or rough handling (cranking handles too tight).
Annual inspection routine for bathtub/shower valves (calendar-style checklist visual)
A quick once-a-year check can catch seepage before it turns into a wall repair.
ANNUAL TUB/SHOWER VALVE CHECK (10 minutes) [ ] Check spout: any drip after 5 minutes “off”? [ ] Check handle area: any moisture when running? [ ] Check trim plate: dry tissue test around edges [ ] Check caulk line: cracks or gaps? [ ] Listen: hissing sound when off (can hint at seepage) [ ] Look at nearby wall/ceiling: stains, bubbling paint, musty smell
Hard-water strategy: mineral buildup prevention
If you have hard water, mineral buildup is not just a cosmetic issue—it can shorten the life of washers, cartridges, and diverters. A simple routine helps: wipe the spout after use, and descale exposed parts on a schedule. You don’t need fancy chemicals; plain vinegar works for many deposits when used patiently.

Pressure & wear reduction tips
High pressure makes every small weakness leak sooner. If your home pressure is high, seals wear faster and cartridges can fail earlier. Gentle handle use also matters. Many people crank a two-handle faucet tight, thinking tighter means more closed. In reality, it can deform a washer and scar the seat.
Also watch temperature cycling. If you constantly swing from very hot to very cold, parts expand and contract more often. Normal use is fine, but extreme swings every day can add wear.
When upgrades prevent repeat leaks
If your tub is older, a modern pressure-balancing valve (often used for anti-scald protection) can improve safety and sometimes reduce stress on seals. Upgrades cost more upfront, but they can prevent repeat problems—especially if parts are hard to find or the valve body is corroded.
Troubleshooting and when to replace instead of repair
Sometimes you do everything “right” and it still leaks. That doesn’t mean you failed—it usually means there’s a small detail that needs correction.
Troubleshooting ladder: “Still leaking after repair?”
Use this simple ladder in order. Don’t skip steps.
-
Confirm water is fully on again and the handle is assembled correctly. A mis-seated handle can prevent full shutoff.
-
If you replaced a cartridge, confirm it’s the correct one and installed in the correct orientation.
-
Check for a nicked O-ring. A tiny cut can cause a steady seep.
-
Look for debris in the seat area. A grain of grit can hold the valve slightly open.
-
Make sure you didn’t overtighten. Overtightening can deform washers and crack plastic parts.
-
If the valve seat is pitted or the valve body is corroded, the leak may continue until those parts are replaced.
Replace vs. repair rules (simple and realistic)
Repair makes sense when the valve body is sound and parts are available. Replacement starts making more sense when the faucet is older and keeps failing.
A good rule is that it may be time to replace instead of repair if the fixture is over 10 years old and you’ve had repeated leaks, if corrosion is heavy, or if parts are no longer available. It also makes sense to replace the entire faucet when the valve body is damaged, because no washer or cartridge can seal a cracked or badly pitted valve surface.
FAQs
1. How do I get my bathtub faucet to stop dripping fast?
If you need the drip to stop as quickly as possible, the first step is always to shut off the water supply—either at local shutoff valves or the home’s main valve. Once the water is off, the fastest real fix is dealing with the sealing part inside the faucet. On two-handle setups, that usually means replacing a worn rubber washer. On single-handle faucets, it’s more often a cartridge swap. While you’re in there, check the faucet seat for mineral buildup or rough spots, because even new parts can leak if the surface isn’t smooth.
2. What is the most common cause of a leaky tub faucet?
In most cases, a leaky tub faucet comes down to simple wear and tear. The parts designed to block water—like washers or cartridges—slowly degrade over time. Every time you turn the handle, those surfaces rub, compress, and release under pressure. Add grit, sediment, or hard-water minerals, and the damage happens faster. Once the sealing surface is worn or scratched, water can slip through even when the faucet is “off.” That’s why leaks often start as an occasional drip and slowly turn into a constant one.
3. Why is my tub spout dripping when the water is off?
When a tub spout keeps dripping after the handle is fully closed, it usually means the valve isn’t sealing completely inside the wall. Water is sneaking past because the washer or cartridge is worn out, the valve seat is rough or pitted, or debris is trapped where the seal should close tight. Hard-water buildup can make this worse by preventing full contact between parts. Even a tiny gap is enough for water to keep slipping through, which is why the drip doesn’t stop on its own.
4. How much does it cost for a plumber to fix a leaky tub faucet?
For most homes, professional repair costs in 2025 typically land between $100 and $300. Simpler jobs—like replacing a washer or cartridge with easy access—tend to be on the lower end. Costs rise if parts are corroded, stuck, or hidden behind a wall or tight trim. Some situations push totals closer to $400, especially if extra time is needed for disassembly. If the repair happens after hours or as an emergency visit, extra fees of $50 to $150 are common.
5. Can I fix a leaky faucet myself?
Yes, many homeowners can handle basic fixes themselves, especially washer or cartridge replacements. The tools are simple, and the steps are straightforward if you take your time and follow them carefully. DIY works best when the leak is clearly at the faucet and parts come apart without force. However, if the leak is inside the wall, parts are seized, or the valve body shows heavy corrosion, stopping and calling a professional is usually safer. Forcing stuck components can quickly turn a small repair into a much bigger problem.
References

Leave a comment
This site is protected by hCaptcha and the hCaptcha Privacy Policy and Terms of Service apply.