


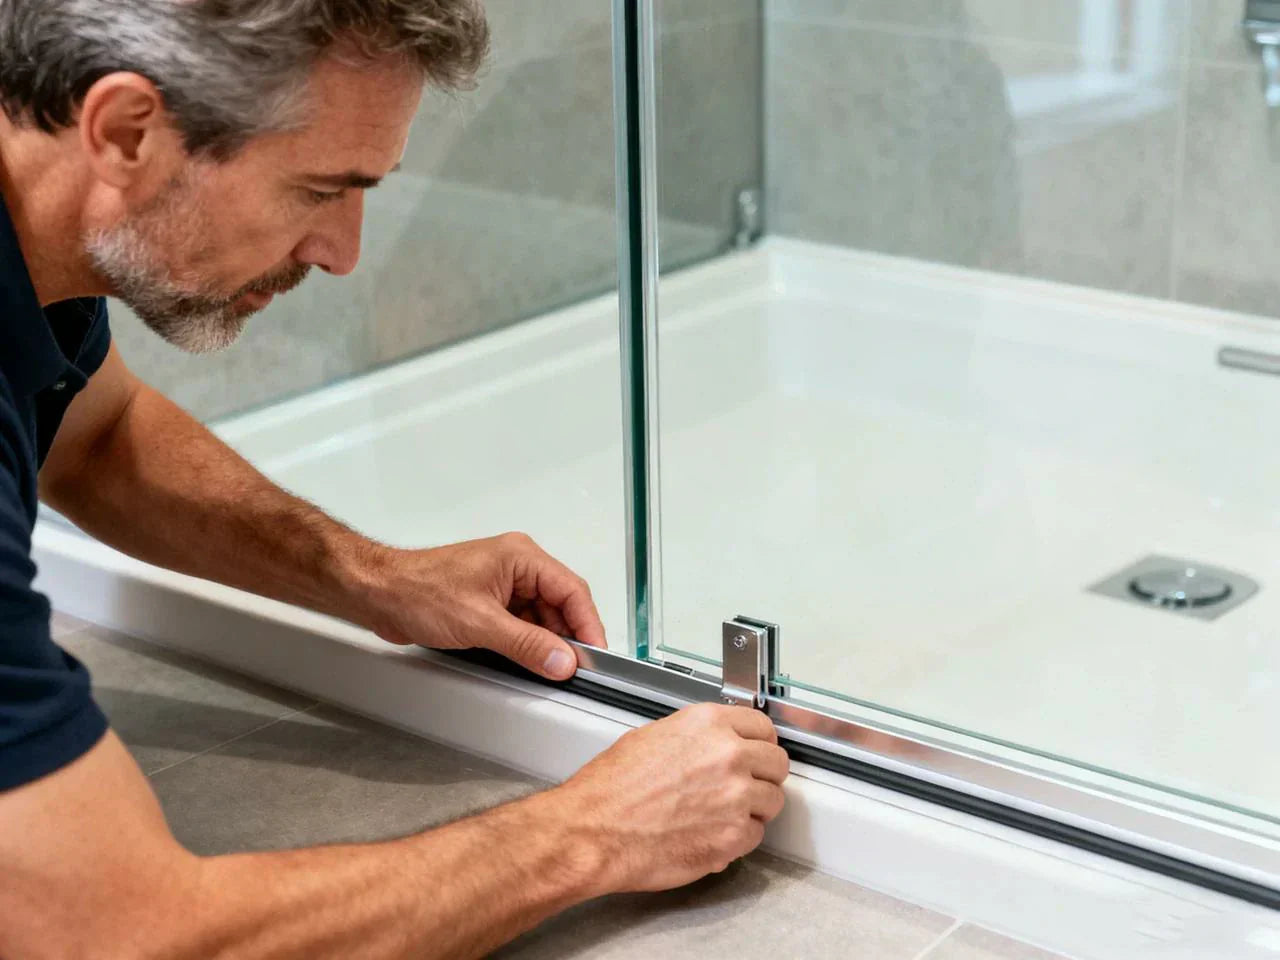
If water keeps leaking onto your bathroom floor every time you shower, the shower door bottom seal is almost always the first part to check. That clear (or sometimes white) strip at the bottom of a shower door is a simple piece of plastic or rubber, but it does a crucial job. It blocks water, guides it back into the shower, and helps stop slippery floors and mold.
The good news? You can replace the seal on the bottom of a shower door yourself in about 5–15 minutes, with only basic tools. You do not need special skills, and you usually do not need a plumber or glass installer.
This guide explains how to select the right shower door bottom seal, measure and install it, and stop water leaking from the bottom of a shower door step by step. You will also learn when a seal is not enough and what to do next.
Quick Answers: Fixing Shower Door Leaks in Minutes
Before you dive into the details, here’s a quick snapshot of what to expect. Replacing a shower door bottom seal is fast, simple, and surprisingly effective—often fixing leaks in just minutes. The breakdown below gives you the key tips you need so you can pick the right seal and decide whether DIY or a pro is the better move.
Key takeaways about shower door bottom seals
-
Typical install time: 5–15 minutes for most homeowners
-
When measured and fitted correctly, a new seal can reduce leaks by about 95%
-
Average lifespan: 1–3 years for vinyl, longer for rubber seals
-
DIY difficulty: easy, with basic tools like a knife, tape measure, and scissors or utility knife
So if you are wondering, “Can you replace a shower door bottom seal yourself?” the practical answer is yes. Most people can replace shower door bottom seal strips without help, as long as they measure carefully and follow a few simple steps.
At-a-glance specs: lifespan, cost, install time
Here is a quick comparison of common types of seal used at the bottom of a shower door.
| Material / Type | Typical Cost (US$) | Typical Lifespan | Temperature Tolerance | Ease of Cutting / Fitting |
| Clear vinyl sweep | $10–$25 | 1–3 years | Up to ~60°C / 140°F | Very easy (scissors/knife) |
| Rubber sweep / gasket | $15–$35 | 3–5+ years | Better than vinyl | Medium (stiffer to cut) |
| Magnetic seal strip | $20–$40 | 3–5+ years | Good | Easy–medium |
| Silicone / hybrid strip | $15–$30 | 3–5+ years | Very good | Easy |
These are average home-center prices for a single shower door bottom seal strip long enough for a standard glass door. Custom lengths and heavy-duty shower door parts may cost more.
Who should DIY vs. call a pro for shower door leak repair
Most people can replace the bottom seal on a shower door themselves if:
-
The glass is standard size and not extremely heavy
-
The gap at the bottom of the door is even and there is no frame damage
-
The leak is clearly coming from the bottom seals, not from cracked tile, grout, or plumbing
It makes more sense to call a pro when:
-
The door is very large, thick, or heavy frameless glass and hard to handle
-
The frame or track is bent or the door will not close square to the curb
-
There is visible damage to tile, grout, or the shower pan
-
You suspect water in walls or subfloor, not just a surface leak
If your door opens and closes smoothly and you can see an old, yellowed, cracked door sweep for shower door, DIY is a safe and smart first step.

What Is a Shower Door Bottom Seal and Why It Matters
A shower door bottom seal is one of the simplest parts of a glass shower, yet it plays a big role in keeping water inside, preventing drafts, and reducing moisture that can lead to mold. Based on guidance from the EPA’s Indoor Air Quality (IAQ) program, controlling moisture is one of the most important steps in maintaining healthy indoor air inside homes. Even small water leaks can contribute to poor indoor air conditions if ignored. The section below breaks down exactly how it protects your bathroom—and why replacing a worn seal makes such a noticeable difference.
How bottom seals stop leaks, drafts, and mold in glass showers
A shower door bottom seal is a long strip of plastic, vinyl, rubber, or silicone that clips, slides, or screws to the bottom of the door. Its job is simple: prevent water from leaking out by:
-
Filling the gap between the glass and the curb or threshold
-
Guiding water back into the shower instead of onto the floor
-
Blocking tiny drafts that can blow spray out of the enclosure
When that strip cracks, hardens, or shrinks, water flows under the bottom of a shower door, across the bathroom floor, and into corners. That is not just annoying. It raises the risk of slips and falls and can add to mold and mildew growth around baseboards and walls.
Health agencies like the CDC and EPA warn that damp areas and mold can irritate lungs and worsen asthma, especially in children and older adults. Keeping leaks under control is one small but real way to keep indoor air healthier.
You can think of the bottom seal as a flexible gasket that forms a soft edge between hard surfaces. Once it wears out, water will find every small gap.
Anatomy of a glass shower door sweep or drip rail
Even though it looks like a simple strip, a shower door seal often has several parts:
-
A U-channel or “C-channel” that slips over the edge of the glass
-
One or more flexible fins or a sweep that hangs down to close the gap
-
A drip lip or ridge that sends water back toward the inside of the shower
-
In some models, a magnetic strip that snaps to a frame or another glass panel
-
On adhesive types, an adhesive zone where a sticky backing grips the door or frame
On frameless shower doors, the channel often grips the glass without screws. On framed doors, a metal drip rail can hold the seal with small screws.
The key point is that every part of the seal lines up with a surface where water would otherwise escape: the bottom of the door, the front lip of the curb, and sometimes the vertical side where the door meets a fixed panel.
Case study: 95% leak reduction after simple replacement
Here is a simple, real-world style example.
A homeowner had a frameless glass door with a clear vinyl sweep that had turned yellow and stiff after a few years. Every shower left a puddle outside the opening corner of the door. Towels on the floor were part of the routine.
They decided to replace their shower door bottom seal:
-
They measured the thickness of the glass (8 mm) and the gap to the curb (about 1/2 inch).
-
They bought a clip-on vinyl shower door bottom seal strip rated for 8–10 mm glass and a 1/2 inch gap.
-
They cut it to the width of the door with a sharp knife, installed the new sweep in one piece, and ran a quick water test.
The installation took about 10 minutes. After that, water outside the shower dropped by around 95%. A small drip at the hinge side was fixed by trimming one end of the sweep at a slight angle so it matched the tile.
Their story matches what many DIY guides and user comments report: when you get the right seal, measure the gap well, and fit it properly, almost all leaks at the bottom disappear without any other work.
Can a new shower door seal really stop all leaks?
A new shower seal at the bottom can solve most—but not every—leak.
A bottom door sweep for shower door is usually enough if:
-
Water is only leaking directly under the door
-
The tile curb or threshold is straight and not warped
-
The door closes fully and the glass is not twisted in the frame
You may still see leaks even with a brand-new shower door bottom seal if:
-
The floor or curb slopes the wrong way, toward the bathroom
-
The door is misaligned, leaving a large, uneven gap
-
There are cracks in grout, gaps along the wall, or issues with the shower pan
-
Water sprays directly at corners or hinges where there is no seal or dam
So, a new seal is often the right first move – quick, cheap, and simple. If you still have leaks after shower door sweep replacement, then it is time to look at the frame, track, tile, and walls more closely.
Types of Shower Door Seals and Materials (Comparison)
Not all shower door seals work the same—some clip on, some slide into rails, and others rely on magnets or adhesive. The overview below breaks down the main types so you can quickly identify which one fits your door, your gap size, and the way your shower is built.
U-channel, sweep, fin, T-seal, and magnetic strips explained
When you shop for a shower door bottom seal, you will see many names for what seems like the same part. The shape and type of seal are important because they must match both your door and the gap.
Common types include:
-
Bottom sweep or shower door water strip: A U-shaped piece that clips over the edge of the glass and has one or more fins hanging down. This is the most common shower door sweep for frameless glass.
-
T-seal or bulb seal: Has a T-shaped or round “bulb” profile. Often used at vertical edges or where the glass meets a wall or panel.
-
Magnetic strips: Used where a glass door meets another glass panel or a metal frame. Magnets help keep the door tight and reduce leaks at the latch side.
-
Screw-on sweeps with metal rails: Common on framed doors. A metal “drip rail” screws to the bottom of the door, and a flexible strip slides into the rail.
-
Adhesive-backed strips: Stick directly to glass or frame where clip-on parts do not fit.
In general, sweeps and U-channel seals are best for the bottom of a shower door. Magnetic and T-shaped seals are more common on the sides. According to ASTM international standards for building materials and glass components, properly sized and well-fitted seals help ensure safe operation, reduce water intrusion, and maintain structural performance in residential shower enclosures.
A simple rule: match the shape of your old seal if you can. If you do not have it, take clear photos of the door bottom, frame, and track before you buy.
Vinyl vs. rubber vs. magnetic vs. silicone: pros, cons, longevity
Most bottom seals are made from one of four main materials. Each has trade-offs.
-
Vinyl (PVC) seals are clear or slightly frosted and common in home stores. They are easy to cut with scissors or a knife, low in cost, and flexible. Their downside is that they can yellow, harden, or crack after 1–3 years, especially with hot water.
-
Rubber seals are usually more opaque, thicker, and more durable. They form a strong gasket and can last 3–5 years or more. They may be harder to cut and can add a bit of resistance when closing the door if the gap is tight.
-
Magnetic seals combine vinyl or rubber plus magnets. They are great for glass-to-glass or glass-to-frame edges where you want a tight close. They cost more but give a very clean, waterproof fit when aligned well.
-
Silicone or hybrid seals stay flexible at higher heat, resist warping above ~60°C (140°F), and do not yellow as fast. They are often used for higher-end glass and in steam showers.
If you use very hot water often, vinyl can warp sooner. For that reason, many people upgrade to rubber or silicone when they do their next shower door sweep replacement.

Framed vs. frameless shower door seals and gap sizes
The type of door matters just as much as the material.
-
Frameless shower doors: The thickness of the glass is key. Many frameless tubs and showers use 6 mm, 8 mm, 10 mm, or 12 mm glass. Your shower door bottom seal must match that thickness so it grips firmly. A mismatch can slip off or leak.
-
Framed doors: The bottom strip may slide into a metal rail or attach with screws. In this case you match the rail profile and width, not just the glass.
Gap size is the other big factor. Product labels often say something like “for 8–10 mm glass and 1/2–3/4 in. gap.” The gap is the distance from the bottom of the door to the top of the curb or threshold when the door is closed.
If the fins are too short, water escapes. If they are too long, the door drags, hits the curb, or does not close.
Special situations: sliding doors, curved glass, and thresholds
Some showers are less standard and need extra care when you select the right seal.
-
Sliding doors often have a different door sweep for shower door that runs along the inside of the sliding panel or within the track. The seal must not catch when the door slides.
-
Curved glass showers need seals that can flex along a curve. Some channels are soft enough to bend, but very stiff plastic may kink.
-
Showers with low thresholds or flat floors sometimes need an extra threshold strip or dam to block splashes. A small, raised strip on the floor can work together with the door seal to prevent water reaching the bathroom.
In these cases, it helps to measure the gap, take photos from several angles, and compare them to the product drawings when you purchase your new shower door seal strip.
How to Choose the Right Shower Door Bottom Seal
Choosing the right bottom seal comes down to a few key numbers—your door’s width, glass thickness, and the size of the gap at the bottom. The guide below walks you through each measurement so you can pick a seal that installs easily, stays in place, and actually stops leaks.
Step-by-step measuring guide for glass thickness and gap
If you want to get the right size the first time, take a few minutes to measure. Here is a simple step-by-step guide.
-
Measure the width of the door Close the door and measure across the bottom from one corner to the other with a tape measure. This is the length you will cut your new strip to. Add a small extra (2–3 mm) so you can trim for a perfect fit.
-
Measure the thickness of the glass On frameless doors, use a small caliper if you have one, or place a ruler across the glass edge and read the thickness (often marked in millimeters). Common sizes are 6, 8, 10, and 12 mm.
-
Measure the gap at the bottom Close the door. Use a tape measure or even stacked coins to estimate the gap between the bottom of the door and the curb. Measure at several points to see if the floor is even.
-
Check the old seal or take photos If your old seal is still on, look at how it attaches. Does it clip on, stick on, or screw on? Take clear photos of the channel, track, and frame. This helps match the type of seal.
-
Inspect for damage While you are there, inspect the tile, grout, and frame. If you see large cracks or gaps, you may need more than a new seal.
These steps are simple but crucial. A few minutes with a tape measure can save you from buying a seal that does not fit your shower door.

Matching compression rating, clamping force, and door type
Many people skip this part, but it matters on frameless glass.
A bottom sweep must grip the glass firmly without cracking. Some manufacturers list a compression rating and a suggested clamping force. A 50 N or higher clamping force helps ensure that the seal will not slip off during normal opening and closing of the door.
You will also see advice about leaving about a 1/8 inch expansion gap at each end of the seal. This small gap gives the material room to move with temperature changes and helps reduce the chance of the seal buckling or popping off.
On a framed door, focus instead on how the seal fits the metal rail or frame. It should press in snugly without loose spots.
What size shower door sweep do I need?
When you read a product label, you will see something like:
-
“For 8–10 mm glass, fits 1/2–3/4 in. gap”
-
“For framed doors, fits 1–1/2 in. rail width”
Here is how to read that:
-
Match the thickness of the glass first. If your glass is 8 mm, choose the 8–10 mm option, not a 6 mm one.
-
Match the gap range so the fins touch the curb with a slight bend but do not press so hard that closing the door is difficult.
-
If your gap is larger than any seal rating, you may need to raise the curb with a threshold strip or check if the door has sagged.
Common mistakes include guessing the glass thickness, ignoring an uneven floor, or choosing a seal that is “close enough.” When in doubt, measure again.
Interactive tools: seal selector quiz and compatibility checklist
Many good DIY sites offer tools like:
-
A seal selector quiz that asks about your door type (sliding vs. pivot), gap size, glass thickness, and frame style, then suggests a few matching seals
-
A compatibility checklist you can print and fill in with your own measurements and notes
Even if you do not have these online tools, you can make your own quick checklist: door width, glass thickness, bottom gap, door type, and photos. Take that list with you when you shop or when you compare online options.
How to DIY Replace Bottom Seal on Shower Door(Step-by-Step)
Wondering how to install shower door bottom seal from start to finish? Here is a clear, practical path.
Tools, safety gear, and prep checklist
You do not need many tools, but a few basics will make the job easier and safer:
-
Tape measure
-
Utility knife or sharp knife
-
Scissors (for fine trimming)
-
Fine sandpaper or a small file (to smooth cut edges)
-
Screwdriver (for screw-on rails)
-
Mild detergent, warm water, and a damp cloth
-
Rubbing alcohol or vinegar for final cleaning
-
Dry towel
For safety:
-
Safety glasses
-
Cut-resistant gloves
Lay a towel or mat under the door so dropped tools do not chip the edge of the glass.
Removing the old seal and cleaning the glass edge
-
Open the door and support it if needed so it does not swing freely.
-
Remove the old seal. On a clip-on channel, grip one end and pull gently along the length. On screw-on rails, remove the screws with a screwdriver and slide out the old strip.
-
Check for adhesive residue along the bottom or sides. If there is sticky film left, scrape it lightly with a plastic scraper or your fingernail. Avoid metal blades on glass if you can.
-
Clean the glass edge and frame with warm soapy water and a damp cloth. Rinse, then wipe with rubbing alcohol or vinegar to remove any grease.
-
Dry the glass completely with a towel. A seal installed on wet or dirty glass may slip or fall off.
Taking time to clean and dry the edge is key. Many users who say their new seal “popped off” later find there was soap scum or film left in the channel.
Cutting, fitting, and installing clip-on, adhesive, and screw-on sweeps
The exact installation depends on the type of seal you bought.
Clip-on (frameless glass shower door seal)
-
Hold the new shower door bottom seal up to the door and mark the length at one end.
-
Use a sharp utility knife or scissors to cut along your mark. Cut slowly to keep the end straight.
-
Dry-fit the seal on the glass to check that it covers from corner to corner.
-
Starting at one end, push the U-shaped channel onto the bottom of the glass. Press gently but firmly along the length until it snaps or grips into place.
-
Check that the fins or sweep point the right way – usually angled slightly inward so they prevent water from going out, not in.
Adhesive-backed vinyl seals
-
Measure and trim the strip to the width of the door.
-
Clean the mounting surface again to be sure it is free of residue.
-
Peel a small part of the backing from one end, line up the strip with the edge or frame, and press it in place.
-
Work along the door in short sections, peeling and pressing so bubbles do not form. Some people use a little soapy water on the frame for a few seconds of adjustment time before the adhesive fully grabs.
-
Once it is aligned, press firmly along the full length.
Screw-on aluminum drip rails
-
Remove the old metal rail if there is one.
-
Hold the new rail and seal against the bottom of the door and mark screw holes with a pencil.
-
Drill pilot holes if required (only if the door design allows – do not drill frameless glass).
-
Screw the rail on straight, then slide the rubber or vinyl strip into its channel.
-
Trim the ends clean with a sharp knife.
Whichever type you install, always stand back and check the line of the sweep. The fins should touch the threshold with a slight bend, but the door should still move without scraping.
Testing for leaks: water test, 50 N tug test, and 1/8" gap adjustment
After you install the new seal, it is time to test.
-
Tug test: Take hold of one end of the seal and pull gently. It should resist a light tug (around what you might feel with 50 N of force) and stay in place.
-
Door motion test: Open and close the door several times. It should not bind, catch, or hit the curb hard. If it does, trim the fins slightly.
-
Water test: Run the shower or spray water at the door for a few minutes. Watch the area just outside the door.
-
If you see a small leak in one spot, try adjusting the position of the seal or trimming one corner at a slight angle.
-
Check that there is still a small 1/8 inch gap at the very ends so the seal can expand and contract without buckling.
If the effectiveness is not what you expect and water still flows under the door in several spots, review your measurements. The gap may be too big for the seal you chose, or the floor may be uneven.

Troubleshooting, Maintenance, and Common Mistakes
Even the best sweep won’t work if the door is misaligned, the gap is uneven, or the wrong seal type was installed. The section below walks you through the most common issues, simple adjustments that solve most leaks, and the maintenance habits that keep your seal working for years.
Why is my new shower door seal still leaking?
If you just did a shower door sweep replacement and still see water on the floor, one or more of these issues may be the cause:
-
The wrong profile or type of seal for your door and gap
-
The seal is misaligned, leaving a gap at one corner or along the hinge side
-
The threshold is uneven or slopes toward the bathroom
-
The gap is too wide for the fins to reach the curb
-
The seal is not gripping the glass well because of dirt or soap film
In some cases, the leak is not from the bottom at all, but from a missing vertical seal, bad grout, or cracks higher up.
Fixing misalignment, loose seals, and seals that pop off
If your new seal looks crooked or keeps sliding off, you can often save it.
-
Remove the seal, clean the glass again with alcohol, and dry it fully.
-
Lightly sand or scrape any rough spots inside the channel of the seal so it grips better.
-
On some clip-on seals, a tiny bit of clear silicone inside the channel can add grip. Use only a thin bead so you do not glue the door shut.
-
Reinstall, pushing firmly along the full length.
-
If the seal still falls off with a gentle tug, it may be the wrong size for the thickness of the glass, and you may need to replace it with a better match.
Alignment issues often show up as small leaks at one end. Here, you may need to trim one end of the strip at an angle so it matches the slope of the tile or curb.
Cleaning, yearly inspection, and when to replace (1–3 year cycle)
To maintain your new shower door bottom seal:
-
Wipe it once a month with warm water and mild detergent to remove soap scum.
-
Avoid harsh solvents like strong bleach, paint thinner, or abrasive cleaners. These can weaken plastic and rubber.
-
Once a year, inspect the seal for yellowing, hardening, or cracks. Check that it still touches the threshold along its full length.
-
Plan to replace a shower door bottom seal every 2–3 years for vinyl and about every 3–5 years for rubber or silicone, depending on use and water temperature.
Regular cleaning also slows mildew growth along the edges, which keeps your bathroom looking better and supports a healthier space.
Using silicone, thresholds, and secondary seals without causing damage
Silicone and extra parts can help, but you should use them carefully.
-
Use a small bead of silicone only to fill tiny gaps where the seal does not fully touch the curb. Do not seal every edge tightly, as you can trap water inside the frame or track.
-
If your gap is too big for any standard sweep, consider adding a threshold dam on the floor to raise the level under the door.
-
Do not screw or drill into frameless glass to mount a rail unless the door was made for that. You can cause cracks or even a glass accident.
Think of silicone and extra strips as helpers, not as a fix for a badly matched or damaged door.

Buying Guide, Brands, and Market Trends in 2025
Shower door bottom seals are inexpensive on their own, but costs vary depending on material, durability, and whether you DIY or hire a pro. The breakdown below gives you a quick snapshot of 2025 pricing, where to shop, and the trends shaping the newest seal designs.
How much does a shower door bottom seal replacement cost?
Here is a simple cost breakdown for replacement in 2025:
| Option | Typical Cost (US$) | What It Includes |
| Budget vinyl bottom seal | $10–$20 | Single clip-on or adhesive strip |
| Mid-range rubber or silicone seal | $15–$35 | Longer life, better flexibility |
| Magnetic strip set | $20–$40 | For glass-to-glass or glass-to-frame |
| DIY tools (if you do not own them) | $10–$25 | Knife, tape measure, gloves, cleaner |
| Professional install | $75–$200+ | Labor, travel, often includes the part |
Most homeowners only pay for the strip itself and maybe a cleaner or knife. So, DIY can save a large share of the cost compared to calling a pro for such a small job.
Comparing big-box, online, and specialty glass suppliers
Where should you purchase your new shower door parts?
-
Big-box home centers: Good for common sizes, instant pickup, and easy returns. The selection may be limited to standard vinyl sweeps and a few rails.
-
Online stores: Wide range of profiles and materials, including seals tailored to specific thicknesses and gap sizes. It is easier to compare technical details and reviews, but you need to wait for shipping.
-
Specialty glass suppliers: Best for custom showers, curved glass, very thick glass, or unusual frame systems. They may cut the exact length you need and help ensure everything fits your door.
When you shop, look for clear drawings or photos that show the channel, fins, and dimensions so you can match them to your measurements.
New trends: anti-microbial, eco-friendly, and clear vs. frosted seals
In 2025, more shower seals come with added features, such as:
-
Anti-microbial treatments to resist bacteria and mold on the seal surface
-
Eco-friendly materials, such as PVC-free plastics or seals made with recycled content
-
Low-odor compounds that reduce off-gassing in small bathrooms
-
Style options, like clear, frosted, or lightly tinted strips to suit different glass and tile
A clear, simple bottom seal often disappears visually, which many people prefer. Frosted or colored seals can hide dirt a bit better.
Global market snapshot and demand for DIY waterproofing
Market research reports up to 2033 show a steady rise in shower door bottom seal sales worldwide. A few patterns stand out:
-
More people are choosing frameless glass doors, which rely heavily on good bottom seals and side seals.
-
DIY home improvement has grown, helped by online video tutorials and guides. Views in the hundreds of thousands for “how to replace shower door bottom seal” show strong interest.
-
There is growing demand for longer-lasting, safer materials and for products that help reduce water waste and home damage.
This trend means better options for homeowners: more seal shapes, more materials, and more clear information.
Safety, Building Codes, and Quality Standards
Even though replacing a bottom sweep is a small DIY task, the materials you choose—and how they handle heat, moisture, and chemicals—directly affect safety, durability, and compliance. The section below breaks down the key guidelines, material limits, and technical specs every homeowner should know.
Relevant standards for glass shower seals (ASTM, CE, local codes)
While a shower door bottom seal itself is a small part, it is part of a larger system that must be safe.
-
Glass doors in many countries follow standards for tempered safety glass and impact resistance set by groups like ASTM or regional bodies.
-
Some building codes also refer to waterproofing and moisture control in bathrooms, since leaks can affect structural materials and indoor air.
When you replace a shower door bottom seal in an existing home, you usually do not trigger code inspections. Still, it is smart to respect the intent of the rules: keep water where it belongs and avoid changes that might weaken the door or frame.
Heat, chemical exposure, and safe temperature limits
Most seals are tested to hold shape below about 60°C (140°F). Long, hot showers above that can cause vinyl to warp over time.
To extend the life of your seal:
-
Try not to run water at extreme temperatures all the time.
-
Avoid harsh chemicals like strong solvent cleaners, which can break down plastic and rubber.
-
Use mild bathroom cleaners and rinse the seal well.
This protects both your bottom seal and your skin and lungs from strong fumes.
Is PVC or rubber safer for a shower door seal?
Both PVC (vinyl) and rubber can be safe when used as a door sweep for shower door, but there are small differences.
-
PVC / vinyl: Often has plasticizers and additives. Some people with chemical sensitivities prefer to limit exposure to soft vinyl products indoors.
-
Rubber or silicone: Often have less odor and fewer additives, and they usually perform better in hot water.
If you are sensitive to smells or trying to reduce certain plastics at home, a rubber or silicone seal may be a better choice. When possible, check for safety notes, low-odor claims, and any environmental or health certifications on the product.
How to read technical datasheets and warranty terms
Many seals come with technical sheets that list terms like Shore hardness, compression set, and UV resistance. In simple words:
-
Shore hardness tells you how stiff or soft the material is. Lower numbers are softer and flex more.
-
Compression set shows how well the seal springs back to shape after being squeezed. Lower values mean it stays springy longer.
-
UV resistance matters if the shower gets sunlight. Better UV resistance means less yellowing and cracking.
Warranty terms may cover cracking, splitting, or major defects for a limited time. They usually do not cover wear from harsh cleaners, improper install, or damage from tools. Reading them for a minute can help set your expectations.
Final checklist: 10-step action plan for a leak-free glass shower
You can follow this simple plan:
-
Look for leaks and confirm they come from the bottom of the door.
-
Measure door width, glass thickness, and measure the gap at several points.
-
Take clear photos of the frame, track, and old seal.
-
Choose the right type of seal (clip-on, adhesive, or screw-on) and material.
-
Buy a seal that matches your thickness of the glass and gap.
-
Gather tools: tape measure, knife, scissors, cleaner, screwdriver if needed.
-
Remove the old seal and clean the glass and frame thoroughly, then let them dry.
-
Cut the new seal to the correct length, then attach it, starting from one end.
-
Test the fit by closing the door, then perform a tug test and water test.
-
Set a reminder to inspect and clean the seal monthly and yearly.
Follow these steps, and you can stop most leaks without calling a pro.
FAQs
1. What is the strip at the bottom of a shower door called?
It is usually called a shower door bottom seal, shower door sweep, or shower door seal strip. People also casually refer to it as the “rubber strip under the door.” Its job is simple but super important — it blocks water from splashing out and helps guide water back into the shower. Without it, even a perfectly installed glass door can leak like crazy.
2. Is a shower door seal strip necessary?
Yes. Without a bottom seal, water will escape under the door and can lead to slippery floors and moisture damage.
A good seal keeps puddles from forming outside the shower, protects the subfloor, and even cuts down on drafts and rattling noises when the door moves. It’s one of those small, inexpensive parts that saves you from big repairs later, so it’s definitely worth having in place and in good condition.
3. How do I know what shower door seal I need?
Measure the width of the door, the thickness of the glass, and the gap to the curb. Then choose a seal labeled for that glass thickness and gap range, and match the attachment style (clip-on, adhesive, or screw-on) to your door.
It also helps to look at your current seal (if it’s still there) to match its shape — some have drip rails, some have fins, and some are more like simple clear vinyl strips. If you’re unsure, most homeowners just bring a photo of the door edge to a hardware store and compare it to the available options.
4. How to stop water leaking from the bottom of a shower door fast?
The fastest fix is to replace the bottom seal on the shower door with a correctly sized sweep, then test and adjust the fit. If leaks remain, check for uneven floors or missing side seals.
You can also temporarily angle the shower head away from the gap, but that’s more of a band-aid. A new sweep is usually cheap, fast to install, and gives you the biggest improvement right away. If everything still leaks after replacing the seal, that’s usually a sign your door needs leveling or the threshold isn’t aligned correctly.
5. How do you install a sweep on a glass shower door?
Cut the sweep to the length of the door, clean and dry the glass, press or clip the channel onto the bottom edge, make sure the fins touch the threshold, then test for leaks and trim as needed.
Most sweeps are simply push-on types, so installation is beginner-friendly. If the sweep feels too tight, warming it with a hairdryer for a few seconds can make it more flexible. After installing, open and close the door a few times to make sure it moves smoothly and doesn’t drag too hard on the curb.
References


Leave a comment
This site is protected by hCaptcha and the hCaptcha Privacy Policy and Terms of Service apply.