


Removing a bathtub drain stopper should be simple, fast, and safe. This guide shows you how to remove any stopper type with clear, step-by-step instructions—often in under a minute. We start with the quickest method, help you identify your stopper in seconds, then walk you through proven techniques seen in recent video tutorials and manufacturer guidance. You’ll also get tool and safety tips, fixes for stuck parts, and pro advice on cleaning, unclogging, and replacement. Expect practical notes, like why about 80% of clogs are hair wrapped under the stopper, and when a small tweak like loosening a hidden set screw is all you need.
Whether you have a lift-and-turn, push-pull, toe-touch (push-push), pop-up, or a trip-lever with a plunger in the overflow drain, you’ll leave with a smooth-draining tub and a plan to prevent future clogs. If you’ve ever wondered “How do I remove the drain stopper from my bathtub?” or “Why won’t my bathtub drain unscrew?”, this is your one-stop how-to.
Quick answer: remove tub drain stopper in 60 seconds
If you want the fastest path, start here. Most tubs use either a lift-and-turn or a push-pull stopper. Both come out in a few simple moves.
Most common steps
Lift-and-turn:
-
Lift the stopper slightly and turn the knob counterclockwise.
-
If it spins but doesn’t rise, pop off the top cap to check for a set screw (small Phillips or hex). Loosen it, then unscrew the stopper by hand.
Push-pull:
-
Hold the body and unscrew the top knob or cap by hand (counterclockwise).
-
With the cap off, you’ll see either a flathead slot or a set screw. Turn the internal stem counterclockwise or loosen the set screw, then lift the stopper out.
If it resists: check hidden set screw or under-cap threads
Many stoppers hide a tiny screw under a decorative cap. If your bathtub drain won’t unscrew, it’s often because of that hidden fastener. Also look for rough or knurled cap edges; these caps typically unthread by hand. If the finish is slippery, wrap the cap with a cloth and use channel locks gently.
Tools at a glance
-
Hand twist
-
Phillips screwdriver
-
Flathead screwdriver
-
Channel locks or a strap wrench (protect finish with cloth or painter’s tape)

Identify your bathtub stopper
Unsure what you have? Identification takes seconds when you match the action you feel at the tub with a few visual cues. You don’t need to know the brand. Just focus on how it opens and what’s visible at the drain opening.
Which tub stopper do I have?
Ask yourself:
-
Does it have a knob you twist? That points to a lift-and-turn.
-
Does it open by pulling a knob up and pushing down? Likely push-pull.
-
Do you press the top with your toe to open/close? That’s toe-touch.
-
Do you unthread a cap and see an internal piece you can turn with a flathead? Often pop-up.
-
Is there a lever on the overflow plate with no visible stopper? That’s a trip-lever with a plunger.
Clues to confirm your type
Rough or knurled cap edges often mean the cap unthreads by hand. If you feel a springy “click” when you press the top, it’s a toe-touch or push-push style. If a lever is on the overflow plate, the stopper action lives behind the wall of the tub, not in the drain opening.
Tools, safety, and tub protection
If you can open a jar, you can remove most tub drain stoppers. The right tools help you work faster without damage. You do not need special tools to remove a stopper—screwdrivers and hand strength do most of the work.
Essential tools and safe alternatives
-
Phillips screwdriver and flathead screwdriver
-
Channel locks wrapped with a cloth, or a strap wrench
-
Rubber jar gripper or latex gloves for better grip
-
Needle-nose pliers for small screws and hair removal
-
Painter’s tape or masking tape to protect the drain opening and cap finish
-
Flashlight and a small mirror to find hidden set screws
Protect finishes and avoid damage
Lay a towel in the tub to prevent scratches and to catch tiny screws. Tape around the drain opening and around the cap if you plan to grip it with pliers. Avoid metal-to-metal contact. If you must use channel locks, wrap the cap with a cloth or tape first and use slow, steady pressure.
Safety notes and special cases
Work with dry hands so you have a secure grip. Old or historic tubs can have fragile parts around the overflow plate; support plates as you remove screws and don’t overtighten on reassembly. Skip aggressive chemicals at first; they can harm finishes and gaskets. If the overflow gasket looks brittle or cracked, handle it gently.
Pro tip for reassembly
A pea-sized dab of silicone faucet grease on threads and O-rings makes the next removal easy. This quick step prevents squeaks, sticking, and early wear.
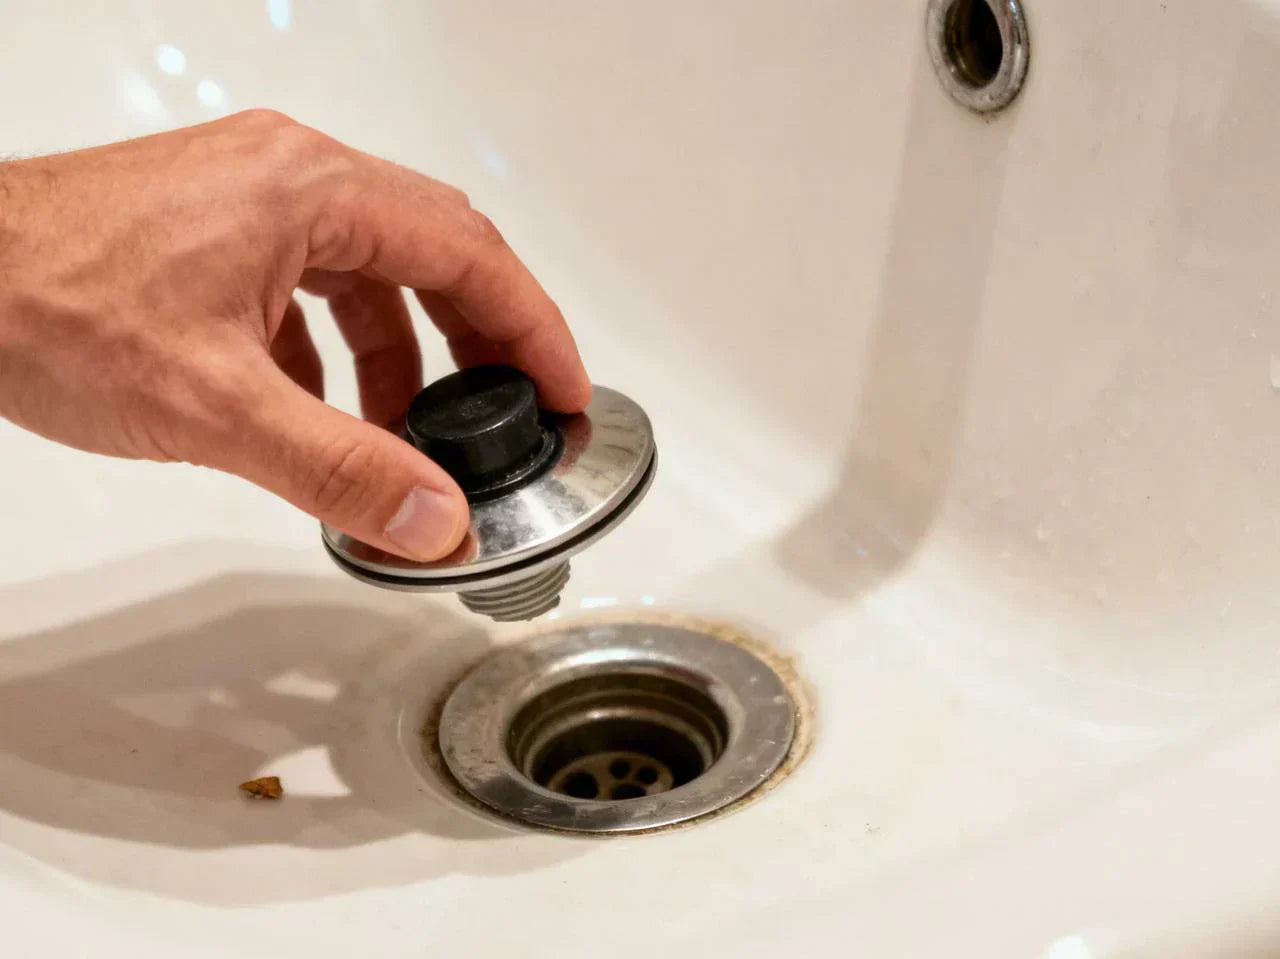
Step-by-step: lift-and-turn and push-pull removal
Many people search “how to remove bathtub drain stopper” and find they have one of these two types. Here are the exact moves that work on most models.
Lift-and-turn removal steps
-
Put the stopper in the open position and try to lift slightly while turning the knob counterclockwise. If it unscrews, lift it out.
-
If it spins but won’t rise, pry up the decorative cap gently with a fingernail or a plastic pry tool. Do not scratch the finish.
-
Look for a small set screw under the cap. It may be Phillips, flathead, or a tiny hex. Loosen it two to three turns; you don’t need to remove the screw fully.
-
Hold the stopper body and unscrew it counterclockwise by hand. If mineral buildup makes it stubborn, wrap it in a cloth and use a strap wrench or protected channel locks.
-
Lift the stopper out, along with any stem that threads into the crossbar inside the drain.
-
Place small parts in a cup so nothing rolls away.

Push-pull removal steps
-
Open the stopper (pull up). Grip the body and unscrew the top knob or cap counterclockwise by hand. If it’s slick, use a rubber jar gripper.
-
With the cap off, you’ll see a flathead slot or a small set screw. If you see a slot, insert a flathead screwdriver and turn the internal stem counterclockwise to loosen. If you see a set screw, loosen it two to three turns.
-
Lift the stopper straight up. If it feels stuck, wiggle gently—don’t pry against the tub surface.
-
If the cap is seized, use a drop of penetrating oil, wait a few minutes, then try again with a cloth-wrapped tool.
Troubleshooting these types
-
Hidden set screw: rotate the cap to expose it, use a flashlight and a small mirror to see under the cap edge.
-
Stuck cap: grip with a rubber jar opener, add a drop of penetrating oil, and use gentle rocking. Avoid hard prying that could mar the finish.
-
Spinning but not releasing: the set screw may still be tight or the threads are clogged. Back the screw off more, then twist and lift.
Step-by-step: toe-touch and pop-up removal
Toe-touch and pop-up styles use a push-to-open motion, but they remove in slightly different ways.
Toe-touch (press/lock release) removal
-
Put the stopper in the open position. Press and release until it stays open.
-
Grip the body and unthread the entire drain stopper assembly counterclockwise from the drain basket. Many toe-touch designs remove as one piece.
-
If the top separates first, remove the upper cap, then unthread the remaining body from the drain. Protect the finish with a cloth if you use pliers.
-
Lift the assembly out and set aside.
Pop-up/push-push removal
-
Unscrew the cap counterclockwise by hand. If it’s tight, use a rubber gripper.
-
With the cap off, insert a flathead screwdriver into the internal mechanism and turn it counterclockwise. This releases the stem from the crossbars inside the drain.
-
Lift out the stem and stopper. Keep any small springs or washers together.
How do I remove a toe-touch bathtub drain stopper?
Confirm it opens and closes with a press. Put it in the open position. Then simply turn the entire body counterclockwise to unthread it from the drain. If it’s stuck, protect the finish with tape and use a strap wrench or cloth-wrapped pliers. That’s it—no special tool needed.

Visual: side-by-side mechanism comparison table
| Type | How it opens | Where it loosens | Typical tool | Time to remove |
| Lift-and-turn | Twist knob | Under-cap set screw or stem threads | Phillips/flathead | 1–2 minutes |
| Push-pull | Pull up/push down | Cap unthreads; stem loosens | Hand + flathead | 1–2 minutes |
| Toe-touch | Press to open/close | Whole body unthreads from drain | Hand/strap wrench | 1 minute |
| Pop-up | Press or flip | Cap unthreads; internal stem releases | Hand + flathead | 1–2 minutes |
Step-by-step: trip-lever/plunger assemblies
Trip-lever setups look different. You won’t see a standard stopper in the drain opening. A lever on the overflow raises and lowers a plunger hidden behind the tub wall. Removal happens at the overflow plate, not at the drain.
Remove overflow plate and linkage
-
Set the lever in the open position so the plunger is retracted.
-
Remove the screws holding the overflow plate. Hold the plate as you remove the last screw so it doesn’t drop and chip the tub.
-
Gently pull the plate straight out. The lever, linkage rods, spring, and plunger will come with it. Note the order and length as you pull it free.
-
If it sticks, give small twists and steady pulls. Do not yank. A swollen plunger can bind inside the tube.
Service and re-seat the mechanism
-
Clean hair, soap scum, and buildup from the plunger and linkage. Wipe it down and check for corrosion or broken parts.
-
Adjust the linkage length if the stopper didn’t seal well before. Shorten or lengthen by a few turns, then test later.
-
Carefully reinsert the assembly. Aim the plunger straight down the overflow, then guide the rods in. Do not force it.
-
Reattach the overflow plate and screws. Test the lever to make sure the drain opens and closes smoothly.
Why won’t my trip lever stopper come out?
Common causes are a corroded linkage, a swollen rubber plunger, or misaligned rods. Add a tiny bit of penetrating oil at the overflow and let it sit. Twist gently while pulling. Patience helps here. If it still won’t budge, this is a good time to call a pro to avoid cracking an old overflow tube or gasket.
Troubleshooting stuck, stripped, or corroded stoppers
Sometimes a bathtub drain won’t unscrew because of mineral buildup, corrosion, or a tiny screw you can’t see. Here’s a safe escalation plan that protects your tub and the drain.
Escalation ladder for seized parts
-
Rubber grip + hand torque: Put on latex gloves or use a jar opener. Try a steady, even twist counterclockwise.
-
Penetrating oil: Apply a small amount around threads or under the cap. Tap lightly with the handle of a screwdriver to help the oil penetrate. Wait a few minutes, then try again.
-
Strap wrench or protected channel locks: Wrap the cap in cloth or painter’s tape. Use slow, even pressure. Avoid sharp jerks.
-
Heat not advised: Avoid open flame or heat guns on enamel or acrylic. Do not use a pipe wrench; it can crush thin parts.
If none of the above works and you’re attempting to remove the entire drain basket, a dedicated tub drain extractor can help—but only for the basket, not the simple stopper on top.
Stripped set screw or threads
Use the correct driver size and keep the tool straight. Add a drop of penetrating oil and try again. If the set screw head is stripped, precision extractor bits can remove it. If threads on the stopper are chewed up, replacement is usually quicker than repair. This is common on older types of bathtub drain stoppers.
When to stop and call a pro
Stop if the stopper spins forever but won’t release, the drain body cracks, the overflow plate is loose, or you see signs of leak or water damage. A typical service visit might cost around $75–$150, which is cheaper than repairing a damaged tub or drain pipe.

Data bites and user wins
Most people can remove a tub drain stopper with simple tools. Hidden set screws are the top reason a stopper won’t budge. After removal, many find the main clog is right under the cap or caught at the crossbars in the drain opening. Cleaning that hair alone often restores flow.
Clean, inspect, and prevent bathtub drain clogs
Why clean after you remove the stopper? Because the fastest way to restore flow is to clear hair from the top of the drain. In fact, the biggest win is usually right there, not deep in the drain pipe.
Remove gunk and hair (biggest win)
-
Put on gloves. With the stopper out, shine a light into the bathtub drain. You’ll likely see hair wrapped on the crossbars and stem.
-
Pull hair and debris out by hand or with needle-nose pliers. A small plastic hair hook works well if you have one.
-
Rinse with hot water. If the water still pools, use a small drain snake to clear the first foot or two.
-
Use an enzyme-based cleaner if needed. These are gentler on finishes than harsh chemicals.
-
Run the tub to confirm a strong swirl. If flow is weak, repeat the quick pull-and-rinse. Because up to about 80% of tub clogs are hair and soap film, this step usually solves it fast.
Inspect for damage and wear
Check the stopper threads, the set screw, and any O-rings or gaskets. Look for cracks or corrosion. Inside the drain, check that the crossbars are solid. On trip-lever setups, inspect the overflow screws and gasket; replace brittle parts before they fail.
Preventive maintenance
A simple hair catcher can stop most clogs. Clean it weekly. Once a month, remove your stopper, clear hair, and wipe threads. Add a tiny bit of silicone grease to the threads. Avoid harsh chemicals that can discolor finishes and break down rubber parts.
Replace or upgrade your stopper
Sometimes you remove a bathtub stopper and find it’s worn, missing parts, or hard to clean. Replacing the stopper can be a low-cost upgrade that prevents future problems.
Choosing a new stopper
Think about fit first. Some stoppers are universal, while others fit a specific type of drain or thread size. Match finish to your tub hardware. If frequent cleaning matters to you, choose a style with an easy-off cap. If you have limited hand strength, a push-push or toe-touch can be simpler to operate than a tight lift-and-turn. If you manage rentals, a universal cap-style plug can be a quick fix, but it may trap more debris.
Quick install overview (all major types)
-
Clean the drain opening and crossbars. Remove old thread sealant if present.
-
Test the new stopper fit dry. Confirm the threads engage smoothly and the cap sits flat.
-
If your stopper uses a post that threads into the crossbars, start it by hand and do not cross-thread.
-
Place any required gasket or O-ring in the correct spot. A tiny bit of silicone grease helps them seat.
-
Snug the parts by hand. Do not overtighten. Test the open/close action and confirm the tub holds water.
-
Run water to check for leaks and proper draining.
Are universal bathtub stoppers any good?
They’re great for quick use. Pros: simple, low cost, and no tools needed. Cons: they can trap more debris and may not be as durable. They’re best as a short-term fix or for a guest bath. For a main bath, a model that matches your existing drain assembly will perform better over time.

FAQs
1. How do I remove the drain stopper from my bathtub?
To remove the drain stopper from your bathtub, first identify the type of drain stopper you have—lift-and-turn, push-pull, toe-touch, pop-up, or trip-lever. Open the stopper fully; don’t leave the stopper in place when working. Most models come off by gripping the cap and turning the stopper counterclockwise. If it spins but doesn’t rise, check for a hidden set screw under the cap. Loosen it a few turns, then lift to remove tub drain stopper cleanly. For toe-touch styles, the entire body unthreads. For trip-lever styles, you remove the overflow plate instead of the visible drain. Once the stopper is out, you can close the drain temporarily with a test plug if needed. This process doesn’t require deep plumb skills—just patience, basic tools, and gentle pressure to safely remove the bathtub drain parts.
2. Why won’t my bathtub drain unscrew?
If you can’t remove tub drain stopper parts because the bathtub drain won’t unscrew, the most common cause is a hidden set screw locking the stopper in place. Many lift-and-turn and push-pull models spin freely but won’t lift until that screw is loosened. Mineral buildup, corrosion, or old plumber’s putty can also bind the threads, making attempts to turn the stopper feel useless. Apply penetrating oil, wait a few minutes, then try again. Wearing rubber gloves helps grip the cap without slipping. In some cases, the issue isn’t the stopper at all but the threaded post inside the drain basket. Identifying the type of drain stopper helps you choose the right fix. Most jams don’t require advanced plumb work—just careful technique. Once loosened, you can safely remove drain from bathtub components without damaging the finish.
3. Can I remove a drain stopper without special tools?
Yes—most people can remove tub drain stopper mechanisms using only their hands and a basic screwdriver. Nearly every type of drain stopper uses simple threads or a small set screw. Grip the cap, turn the stopper counterclockwise, and if needed, use a flathead to loosen the internal stem. Rubber gloves improve grip and prevent scratches. Even if you plan to eventually remove the bathtub drain basket, it’s fine to start with simple techniques before reaching for specialized plumb tools. For stuck parts, a strap wrench wrapped in cloth is a safe addition. You don’t need a drain extractor unless you’re removing the entire basket, not just the stopper. With patience and gentle pressure, almost anyone can remove drain from bathtub hardware without damage and without owning professional tools.
4. How do I identify my bathtub drain stopper type?
To identify the type of drain stopper, operate it and observe how it behaves. If you must twist to open or close the drain, it’s likely a lift-and-turn. If you pull up to open and push down to close, it’s push-pull. If your toe clicks the top, it’s toe-touch. If you can remove a cap and see an internal stem you can turn the stopper with a screwdriver, it’s pop-up. And if there’s a lever on the overflow plate with no visible stopper in the drain, you have a trip-lever with a concealed plunger. Correct identification ensures you use the right steps to remove tub drain stopper parts safely. Knowing the type also helps diagnose why a stopper in place may stick and whether you’ll need extra plumb steps to eventually remove drain from bathtub components.
5. How to use a bathtub drain extractor?
A drain extractor isn’t for removing the visible stopper—it’s for when you want to remove the bathtub drain basket entirely. After you first remove tub drain stopper hardware based on the type of drain stopper, insert the extractor into the drain opening and seat it firmly against the inner walls. Attach a wrench and turn counterclockwise steadily to remove drain from bathtub threads sealed with old putty. This tool provides strong grip without damaging the tub if used carefully. It’s not needed to turn the stopper or fix the typical stopper in place issues. Only use it when resealing or replacing the entire basket as part of larger plumb maintenance. Once removed, clean the surface and reinstall the new drain with fresh putty before closing the system.
6. Is it safe to remove a bathtub drain myself?
Yes, it’s generally safe to remove tub drain stopper assemblies yourself, as long as you work gently and protect the finish. Most stoppers remove by hand, loosening a set screw, or unthreading the cap, so no special plumb expertise is required. Avoid excessive force when you turn the stopper, and always check for hidden screws before pulling. If you intend to remove the bathtub drain basket, ensure you have the right extractor and proceed slowly to avoid cracking fragile drain fittings. For the majority of homeowners, identifying the type of drain stopper and following the correct steps is enough to avoid damage. Stop if the stopper in place spins endlessly, the drain shifts, or corrosion is severe. Done properly, it’s a safe way to remove drain from bathtub hardware.
7. What tool is used to remove a tub drain?
For most people, the primary tools to remove tub drain stopper parts are your hands, a screwdriver, and sometimes a strap wrench. These handle nearly every type of drain stopper, from lift-and-turn to pop-up. You usually grip the cap and turn the stopper counterclockwise, or loosen a tiny set screw holding the stopper in place. For deeper plumb work—such as when you want to remove drain from bathtub entirely—a tub drain extractor or drain wrench is required. This tool grabs inside the drain basket so you can unscrew it without damaging the tub surface. For routine cleaning or quick maintenance, however, no special tools are needed; most users can safely remove the bathtub drain stopper with basic household items.
References


Leave a comment
This site is protected by hCaptcha and the hCaptcha Privacy Policy and Terms of Service apply.