


Undermount sink choices can feel overwhelming—materials, mounting methods, countertop compatibility, and long-term maintenance all matter. This guide cuts through the noise with an F-shaped, quick-scan structure: instant answers first, deep dives second. We clarify differences between undermount, drop-in, and farmhouse styles; compare stainless steel, granite composite, and fireclay; and outline installation, care, and troubleshooting. You’ll get pro tips to avoid leaks or separation, plus buyer checklists, sizing charts, and simple tools to ensure your new undermount kitchen sink fits your cabinet and countertop. Finish confident with the right size, reveal style, and accessories for your cooking habits, budget, and design goals.
Undermount Sink at a Glance
What it is and how it compares to drop-in and farmhouse
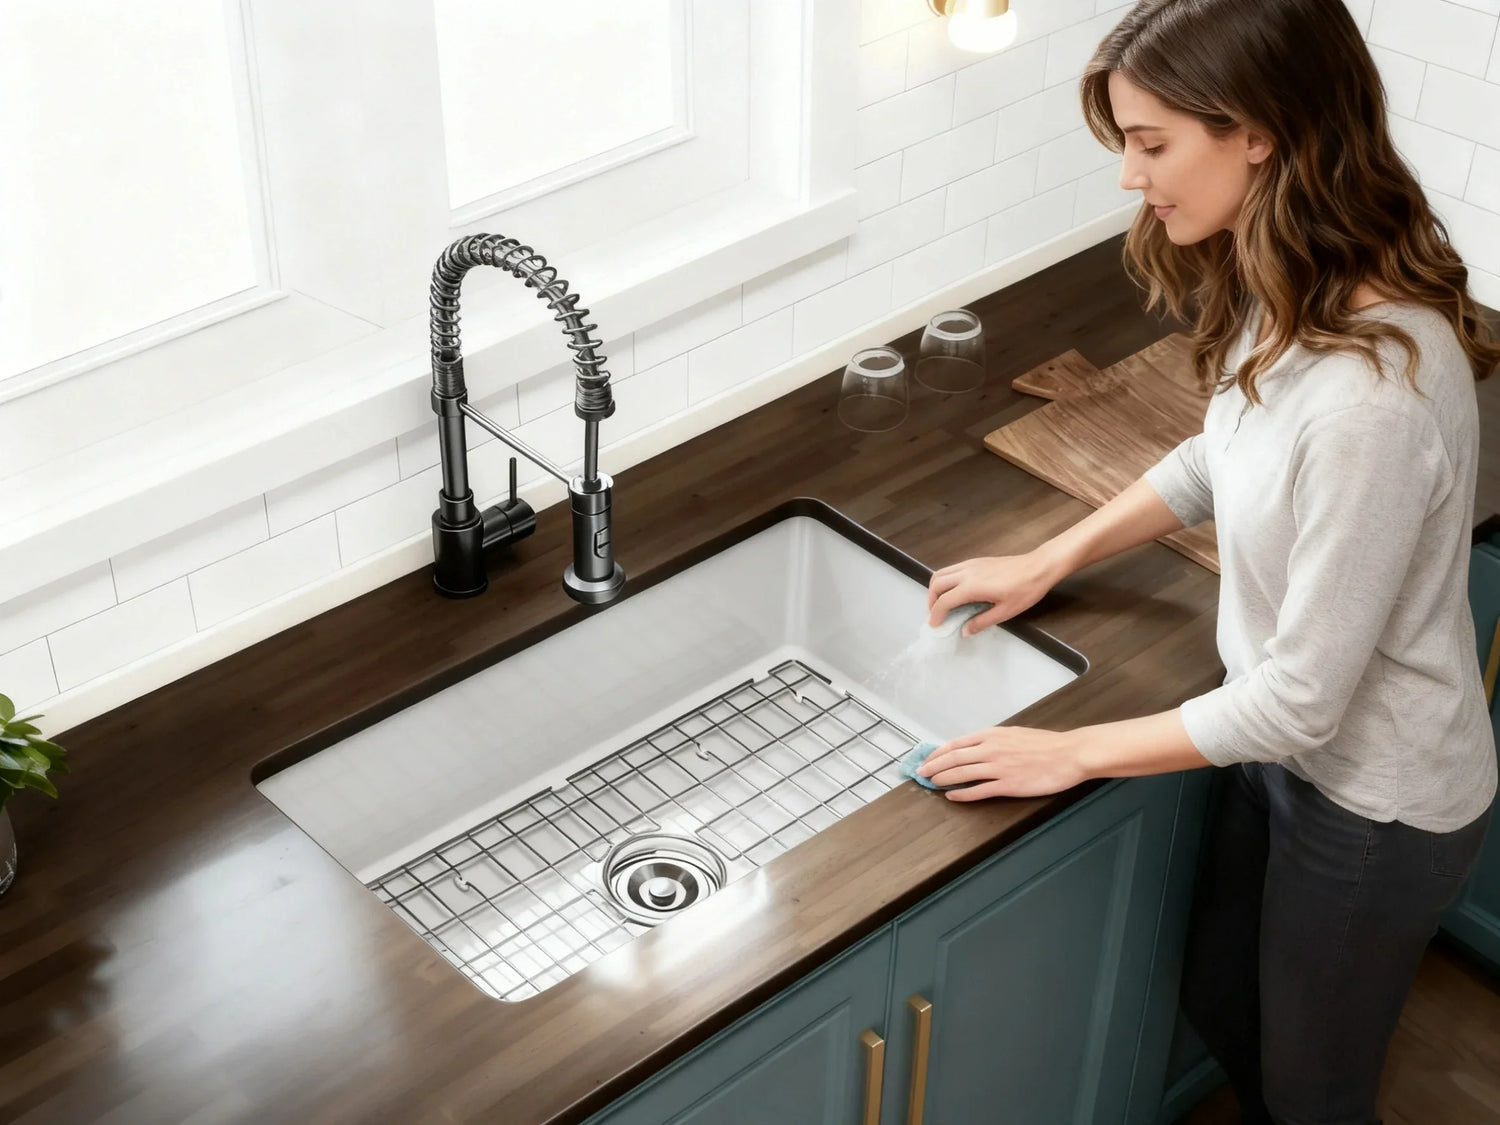
An undermount sink (sometimes called an underslung kitchen sink) is mounted from below the countertop. The rim sits under the stone or solid surface, so you see only the cutout edge and the bowl. This creates a seamless transition from counter to sink. By contrast, a drop-in sink rests on top with a visible rim, and a farmhouse sink (apron-front) exposes the front face.
The practical result is simple: with an undermount, you can wipe crumbs and spills straight into the bowl. No raised rim catches debris. It looks sleek and modern and gives you a clean line across the counter.
Quick pros and cons of undermount sink for busy households and small kitchens
Undermounts are loved for easy cleaning and a seamless look. In small kitchens they free up usable counter space because there’s no top rim. The tradeoffs are higher installation needs, careful sealing, and solid structural support. If your family cooks every day, this style rewards you with simple cleanup. If you prefer a quick, low-cost upgrade or have laminate counters, a drop-in sink might make more sense.
Best use cases: modern aesthetics, easy cleaning, seamless edges
If you like clear counters and a modern style, this mount is a strong match. It shines in kitchens with quartz, granite, or solid surface countertops. It also tends to pair well with single-bowl layouts and workstation sink features, like ledges for cutting boards and roll-up racks.
Is an undermount sink worth it for most kitchens?
For many homeowners, yes. If your counters can support it and you’re okay with professional installation, the benefits are real: an uncluttered look, simpler cleaning, and better use of space around the bowl. If you have laminate countertops, want the lowest install cost, or plan to DIY, a drop-in may be the better value.
Mounting styles comparison table (install complexity, cleaning, cost)
| Mounting style | Install complexity | Cleaning ease | Typical look | Relative cost* |
| Undermount | Medium–High (pro recommended) | Easy (no rim) | Modern, seamless | $$–$$$ |
| Drop-in (top-mount) | Low (DIY-friendly) | Moderate (rim traps crumbs) | Classic, versatile | $–$$ |
| Farmhouse (apron-front) | High (cabinet mods) | Easy–Moderate | Statement piece | $$$ |
*Relative cost includes sink + typical install. Actual prices vary by material, size, and region.
Materials and Build Quality (stainless steel, granite composite, fireclay)
Stainless steel essentials: 16 vs 18 gauge, sound-dampening pads, ASME/CSA compliance
A stainless steel under mount sink remains the top pick for most kitchens. It’s light, durable, easy to clean, and forgiving with heavy pots. Gauge measures thickness: lower numbers are thicker. 16-gauge is thicker than 18-gauge. Both can be excellent when made to standard. Thicker bowls feel more solid and can run quieter, especially when paired with sound-dampening pads and undercoating.
Look for sinks that meet recognized standards such as ASME A112.19.3/CSA B45.4. These standards help ensure proper performance and material quality. Many models also carry cUPC certification, which signals compliance with plumbing codes when listed.
Pro tip: a good 18-gauge sink with full sound pads and a proper undercoat can sound and feel better than a bare 16-gauge bowl. Review both thickness and sound features rather than relying on gauge alone.

Granite/quartz composite: heat and scratch resistance, colorfastness, maintenance
Granite composite (or quartz composite) sinks mix stone and resin. They bring a matte look, color options, and good heat and scratch resistance. They also soften noise well due to dense material. Composites can resist stains when cleaned regularly. For mineral spots, use a gentle cleaner and a soft cloth. Darker colors can show limescale if water is hard, so add a weekly wipe to your routine. Avoid harsh abrasives; use non-scratch pads.
Because composites are heavier, support matters. For undermounts, solid rails or a plywood subtop help keep the bond stable.
Fireclay, cast iron, copper: weight, chip resistance, patina, care
- Fireclay: Fired at high heat with a glass-like glaze. It delivers a smooth, bright finish with classic style. It’s heavy and needs strong support. Chips can happen if cast iron cookware hits an edge. Clean with soft sponges and avoid metal scouring pads.
- Cast iron (enameled): Similar to fireclay in weight and shine. Very durable surface, but like fireclay, can chip under impact. Support rails and careful installation are key.
- Copper: Warm, living finish that patinas over time. Softer metal; may dent if struck. Requires gentle cleaning (mild soap and water). Many love its changing look; others prefer a stable color.
Is 16-gauge better than 18-gauge for undermount kitchen sinks?
Usually, but not always. 16-gauge is thicker and often quieter, which many see as premium. Yet a well-built 18-gauge with full padding and undercoating can perform almost the same in daily use. Quality of steel, sound treatment, and design matter as much as gauge. For heavy use, 16-gauge feels great; for value, a padded 18-gauge is a smart buy.
Material comparison chart (durability, noise, care, price, design fit)
| Material | Durability | Noise level | Care difficulty | Heat resistance | Price tier | Design fit |
| Stainless steel (16/18 ga) | High | Low–Medium (with pads) | Easy | High | $–$$$ | Modern, all styles |
| Granite/quartz composite | High | Low | Easy–Moderate | High | $$–$$$ | Modern/Transitional |
| Fireclay | High (may chip on impact) | Low | Easy–Moderate | High | $$–$$$ | Traditional/Transitional |
| Cast iron (enameled) | High (may chip) | Low | Easy–Moderate | High | $$–$$$ | Classic/Traditional |
| Copper | Medium (soft metal) | Low | Moderate | High | $$–$$$ | Rustic/Artisan |
Fit, Sizing, and Compatibility (cabinet base, countertop, reveal)
Countertop compatibility: quartz, granite, solid surface vs laminate; sealants and support
Undermounts pair best with quartz, granite, and solid surface counters because these materials have strong edges and resist swelling. The sink is bonded with epoxy or two-part adhesive and sealed with silicone. Stone fabricators often add clips or rails for extra safety.
Traditional laminate counters have a particleboard core that swells when wet. That makes classic undermount installs risky. Some special laminates or compact laminates can work with engineered systems, but most pros steer homeowners to a drop-in if counters are laminate.
Cabinet base sizing: 24–36 in bases, bowl depth, cutout templates, corner radius (R0/R10)
The base cabinet limits how wide your sink can be. Manufacturers publish a minimum base width. A common rule of thumb:
- 24 in base: often fits 21–22 in overall sink width
- 27 in base: often fits 24–25 in overall
- 30 in base: often fits 26–27 in overall
- 33 in base: often fits 29–31 in overall
- 36 in base: often fits 32–34 in overall
Depth also matters. Typical bowl depths range from 8 to 10 inches. Deeper bowls are great for pots but may reduce knee room and disposal clearance. Corner radius—R0 (tight, square corners) vs R10 (slightly rounded)—affects cleaning and fit. R10 or R15 corners are easier to wipe; R0 corners give a crisp look.
Your fabricator will use a cutout template. Always confirm the template matches your model and any reveal style (zero, negative, or positive) you plan to use.

Reveal options: zero, negative, positive—hygiene, splash, and crumb control
“Reveal” describes how much of the sink rim you see when looking down:
- Zero reveal: Counter edge aligns with bowl wall. Clean, modern look.
- Negative reveal: Counter slightly overhangs the bowl. Good at hiding the rim and stopping splash. Less chance of grime on the rim.
- Positive reveal: Shows a small lip of the sink rim. You can see the rim and wipe it clean; crumbs might catch there more than with zero or negative.
For families who want the easiest daily wipe-down, zero or negative reveal is popular. Positive reveal makes the rim accessible for cleaning but shows more metal.
Plumbing planning: drain location, garbage disposal clearance, ADA height, P-trap alignment
Check drain placement (center vs rear offset). Rear drains leave more under-sink space for bins and disposals. Make sure a garbage disposal will clear shelves and doors. If you need ADA-compliant access, plan bowl depth and counter height to meet knee and toe clearance, and target a finished counter height of up to 34 inches. According to ADA 2010 Standards, kitchen countertops must allow sufficient knee and toe clearance for wheelchair accessibility. Align the P-trap to the drain location to avoid sharp angles or strain on the pipe.
Sizing chart + reveal diagram; interactive base-cabinet fit checker
| Base cabinet width | Typical max overall sink width (guideline) | Common bowl depth range | Notes |
| 24 in | 21–22 in | 8–9 in | Tight space for disposal |
| 27 in | 24–25 in | 8–10 in | Check faucet clearance |
| 30 in | 26–27 in | 9–10 in | Popular single-bowl sizes |
| 33 in | 29–31 in | 9–10 in | Room for workstation ledge |
| 36 in | 32–34 in | 9–10 in | Best for large workstations |
Guideline only—always check your cabinet’s inside width, the sink spec sheet, reveal choice, and your fabricator’s rules.
Installation: DIY vs Pro Setup (clips, rails, epoxy, silicone)
Step-by-step overview: dry-fit, support rails/clips, epoxy/silicone, cure times
Here is a high-level process you can review with your installer:
- Dry-fit the sink and confirm reveal style with the countertop template.
- Clean the underside of the counter edge and the sink rim with alcohol; let dry.
- Install support: sink clips, rails, or a plywood subtop (especially for heavy fireclay or cast iron).
- Apply two-part epoxy or manufacturer-approved adhesive to the sink rim.
- Position the sink under the counter, align shims, and clamp lightly in place.
- Tighten clips/rails to hold full contact without bowing the counter.
- Run a smooth silicone bead along the seam inside the bowl.
- Wipe excess silicone for a clean line.
- Allow full cure per adhesive and silicone directions (often 12–24 hours).
- Install faucet, garbage disposal, drain fittings, and test for leaks.
Structural support: plywood subtop, sink rails, studs, reinforcements for heavy basins
Heavy sinks need real support. A plywood subtop bonded under stone, steel sink rails tied into side panels, or custom brackets mounted to cabinet walls distribute weight evenly. Don’t rely on adhesive alone. For fireclay or cast iron, support should carry the full sink weight filled with water and dishes.
Cost, timelines, warranty implications; code/certification notes (cUPC, IAPMO/UPC)
Undermount installs often take longer and cost more than drop-ins because they require precise leveling and strong supports. Some sink warranties require professional installation and adherence to the published template, adhesive type, and support methods. Look for cUPC listing (from IAPMO) and compliance with applicable standards (such as ASME A112.19.3/CSA B45.4 for stainless steel fixtures). Local code officials may also expect that drains, traps, and air gaps meet the Uniform Plumbing Code or your local code.
Can you install an undermount sink on laminate countertops?
Traditional laminate with a particleboard core isn’t a good match for undermounts because the exposed core can swell if moisture gets in. Most pros recommend a drop-in sink for laminate. There are specialized methods and compact laminates that can work with engineered supports, but they’re not common in home kitchens. If you’re set on an undermount, switch to quartz, granite, or solid surface.
Exploded diagram of undermount assembly and support systems
- Countertop
- Plywood subtop (optional, for heavy sinks)
- Adhesive/epoxy at sink rim
- Sink bowl
- Mounting clips or rail system
- Silicone bead at inner seam
- Drain assembly and strainer
- Garbage disposal (if used)
- P-trap and plumbing

Maintenance, Care, and Troubleshooting (cleaning, leaks, separation)
Daily/weekly cleaning by material: limescale control, non-abrasive methods, stainless grain
- Stainless steel: Rinse daily. Wipe with a soft cloth along the grain. For water spots, use a mild dish soap or a vinegar-and-water mix, then rinse and dry. Avoid steel wool and bleach.
- Granite/quartz composite: Wipe daily. For limescale, use a gentle, non-abrasive cleaner. Dry after use if you have hard water to avoid white spots.
- Fireclay/cast iron: Use a soft sponge and a non-abrasive cleaner. Avoid hard impacts at the edges to prevent chips.
- Copper: Mild soap and water. Do not strip the patina unless you prefer a bright finish; then follow the maker’s guidance.
A quick daily rinse and dry prevents build-up. Weekly, give the seam a careful wipe so the silicone stays clean.
Do undermount sinks get moldy? Any damp seam can grow mildew if water sits. The rim and silicone line are not special risks by themselves, but poor cleaning or a failing bead can trap moisture. Keep the seam clean and intact. If the seal looks loose or dark, re-seal it.
Leak and separation prevention: resealing, re-epoxying, bracket tightening, periodic checks
Inspect the silicone bead every few months. If you see gaps or dark spots that don’t clean off, remove the old bead and reapply a fresh, continuous line. For clips or rails, gently tighten hardware once a year. If you notice sagging or a gap opening between counter and rim, pause use, support the sink from below, and call a pro to re-bond the rim with the correct adhesive.
Can you replace an undermount sink without replacing the counter? Yes, but it’s a careful job. The counter must be supported, the old adhesive cut, the sink lowered out, and a new sink matched to the exact cutout and reveal. A pro fabricator may need to adjust the cutout slightly. It’s common, but plan for downtime and precise work.
Scratch, stain, and noise mitigation: grids, bottom racks, pads, polish, silicone bead renewal
A sink grid or bottom rack guards the bowl from scratches and lets dishes drain cleanly. Use a basket strainer to catch food. Silicone bumpers reduce clatter. For stainless, a non-abrasive polish can restore shine. Replace the silicone seam when it looks worn to keep the joint sanitary and neat.
How do you keep an undermount sink from falling or sagging?
- Use proper supports (rails, brackets, or a subtop) sized for the sink’s full weight.
- Follow the adhesive type and cure times on the spec sheet.
- Add clips and tighten them evenly. Do not overtighten.
- Avoid loading the front edge with heavy weight (like leaning full-body on the counter over the bowl).
- Check hardware yearly; re-seal the seam as needed.
Why would an undermount sink fall? Usually due to poor support, wrong adhesive, rushed cure times, water damage to a subtop, or heavy loads (like a person standing inside the bowl). A vibrating disposal can speed up failure if the attachment is weak. Good supports and correct installation prevent it.
Real-World Performance and Buyer Insights (durability, noise, satisfaction)
What owners love vs dislike: cleaning ease, noise, bowl space, accessory utility
Most owners love the clean wipe-in edge and the open space around the bowl. Large single bowls fit sheet pans and stock pots, which makes cleanup faster. The only common dislikes are noise with thin steel (solved by pads), water spots in hard-water areas, and the need to keep the silicone seam neat.
Longevity drivers: water chemistry, gauge/thickness, adhesive quality, usage patterns
- Water chemistry: Hard water leaves mineral spots; soft cloth drying and weekly gentle cleaning extend the finish life.
- Gauge and density: Thicker stainless steel and dense composites dampen noise and resist denting.
- Adhesive and supports: Quality adhesive, correct cure time, and strong rails mean fewer issues over the years.
- Usage patterns: Heavy cooking? Choose a deeper bowl, thicker steel, or composite with a good grid. Light use? A slim bowl may be fine.
Case snapshots: small galley kitchen, family of five, avid home chef workstation setup
- Small galley kitchen: A 27-inch single-bowl undermount with a roll-up rack doubles as drying space. Zero reveal and a rear drain free up cabinet space for bins.
- Family of five: A 33-inch composite undermount with a grid handles nightly dish loads. Negative reveal hides the rim and keeps splash under control.
- Avid home chef: A 36-inch workstation sink with two ledges supports a cutting board, colander, and drying rack. Prep stays in the sink zone, leaving the counter clear.

Satisfaction by material (qualitative)
| Material | Reported satisfaction (qualitative) | Notes |
| Stainless steel | High | Best all-around value; pick good sound pads |
| Granite/quartz composite | High | Quiet, strong; watch for limescale on dark colors |
| Fireclay/cast iron | High | Classic look; needs sturdy support and gentle handling |
| Copper | Variable | Loved for patina; requires care for consistent look |
Industry associations report undermounts remain a popular choice in modern kitchen planning. Always confirm local installer practices and standards.
Accessories and Workstation Upgrades (grids, ledges, colanders)
Must-haves: sink grid, basket strainer, drain covers, cutting boards, roll-up racks
A bottom sink grid protects the finish and improves draining. A basket strainer or drain cover stops clogs. A cutting board that fits the bowl turns your undermount into a prep station. Roll-up racks sit over the bowl for drying or rinsing produce, then store flat.
Workstation ledges: prep efficiency, space-saving for compact kitchens
Workstation sinks add one or two ledges that hold boards, colanders, and trays. They shine in compact kitchens by moving prep into the bowl. If you cook often, this design keeps the counter clean and reduces steps. Choose accessories made for your ledge profile for a snug fit.
Integrations: garbage disposal, air switch, water filter, soap dispenser hole planning
Plan your garbage disposal size and power, and allow room for the P-trap. An air switch on the counter makes disposal use easy and keeps electrical off the backsplash. If you want a water filter or soap dispenser, verify hole locations and reach. Aim for enough flat counter behind the bowl for faucet and accessories, and check for backsplash clearance.
Accessory compatibility matrix by sink size and ledge type
| Sink width (overall) | Typical grid size | Typical cutting board length | Notes |
| 24–27 in | 21–24 in | 16–18 in | Compact kitchens, single ledge |
| 30 in | 27–28 in | 18–20 in | Common workstation starter size |
| 33 in | 30–31 in | 20–22 in | Room for multiple accessories |
| 36 in | 33–34 in | 22–24 in | Full workstation kits fit best |
Check the manufacturer’s accessory spec for exact fits.
Buying Checklist and Comparison Tools
10-point pre-purchase checklist: base cabinet width, reveal style, gauge, corner radius, warranty
- Base cabinet inside width and depth
- Countertop material and thickness
- Mounting style (undermount vs drop-in vs farmhouse)
- Reveal preference (zero, negative, positive)
- Sink material (steel, composite, fireclay, etc.)
- Thickness/gauge and sound-dampening features
- Bowl size, depth, and corner radius (R0, R10, R15)
- Drain location (center vs rear) and disposal clearance
- Compliance and listing (cUPC; ASME/CSA for fixtures)
- Warranty terms and install requirements
Model comparison criteria: bowl dimensions, drain offset, soundproofing, certifications
When you compare models, look at inside bowl size (not just outside), the drain offset, padding coverage (full-body pads quiet the sink), and any certifications. For busy kitchens, a rear-offset drain and larger single bowl often feel better day to day.
Fit calculator (base width, countertop thickness, faucet clearance);
A quick rule-of-thumb method:
- Measure the inside width between the cabinet sides.
- Subtract space for mounting hardware and a safety margin (typically 2–3 inches total).
- The result is a ballpark max overall sink width.
- Confirm faucet and accessory clearance behind the bowl (often 2–3 inches minimum to the backsplash).
- Check bowl depth against disposal height and P-trap alignment.
Example: If your inside cabinet width is 28 inches, subtract 2.5 inches. Your safe max overall sink width is about 25.5 inches. Then check your chosen model’s spec sheet and ask your fabricator to confirm.
What size undermount sink fits a 30-inch cabinet?
Most 30-inch base cabinets accept an overall sink width around 26–27 inches, depending on construction and hardware. Always check your inside cabinet width and the sink’s spec. Your fabricator may approve a bit wider with careful planning, but 26–27 inches is a safe target for many 30-inch bases.
Budget, Brands, and Where to Buy (price tiers, warranties, standards)
Price ranges and what changes: thickness, finish quality, sound deadening, accessory bundles
- Stainless steel: about $120–$300 for basic, $300–$700 for midrange with good sound pads, $700–$1,500+ for premium or workstation sets.
- Granite/quartz composite: often $250–$800 depending on size and color.
- Fireclay/cast iron: often $500–$1,200+, especially for large bowls.
As prices rise, you typically get thicker steel, stronger sound-dampening, better finish, tighter manufacturing tolerances, and accessory bundles (grids, colanders, roll-up racks).
Warranty and build standards: cUPC, ASME A112.19.3/CSA B45, lead-free compliance
Look for cUPC listing and fixtures that meet ASME A112.19.3/CSA B45.4 (stainless steel plumbing fixtures). Faucets and connected fittings should be certified for lead-free compliance for potable water. Check warranty terms for install method and care requirements.
Where to buy and what to avoid: misleading gauge claims, thin steel, off-spec templates
Buy from sources that provide full spec sheets, templates, and certification details. Watch for vague gauge claims or spotty padding. Avoid sinks with flimsy templates or no support hardware for larger sizes. If specs don’t list corner radius, inside bowl dimensions, and cutout size, ask before you buy.

FAQs
1. Is a 16-gauge stainless steel undermount sink much quieter than 18-gauge?
In most cases, a 16-gauge sink will feel sturdier and quieter than an 18-gauge, simply because the metal is thicker and absorbs sound better. That said, the gauge isn’t the only thing that matters. Many modern 18-gauge sinks come with full sound-dampening pads and undercoating, which can make them perform almost as quietly as a 16-gauge model. So if you pair a well-padded 18-gauge sink with a solid countertop and proper installation, the difference in noise is often barely noticeable in everyday use. Another factor is how the sink is used—running water directly into a bowl or dropping heavy pots will make some noise regardless of thickness. Overall, while 16-gauge is slightly more premium, a carefully built 18-gauge with sound insulation can give you excellent performance without feeling cheap, making it a smart balance of quality and value.
2. What reveal is best for hygiene?
When it comes to keeping your sink area clean, zero or negative reveal is usually the way to go. A zero-reveal sink lines up flush with your countertop, creating a smooth edge with no lip for crumbs or spills to get stuck. Negative reveal goes a step further by letting the countertop slightly overhang the sink, which can help hide the rim and prevent splashes from reaching the counter edges. Both options make daily cleanup easier, since you can simply wipe crumbs straight into the sink without worrying about them catching on a visible lip. Positive reveal, where a small rim sits above the counter, looks nice but can trap debris if not cleaned regularly. No matter which reveal you choose, the silicone seam along the edge is key—keeping it clean and intact ensures that water and food don’t sneak under the counter, helping maintain a hygienic, worry-free kitchen.
3. Do I need a sink grid?
While a sink grid isn’t strictly necessary, it’s one of those small additions that can make a big difference in daily kitchen life. Essentially, a grid sits at the bottom of your undermount sink, creating a protective layer between the sink surface and your pots, pans, or sharp utensils. This helps prevent scratches, dents, and wear on stainless steel or composite sinks, keeping them looking new longer. Beyond protection, a grid also improves drainage—water can flow freely underneath dishes, reducing pooling and speeding up drying. It even helps glasses, cups, and delicate items stay stable while you rinse or soak them. Many people find that a grid makes washing large cookware or prepping food much easier. Considering how inexpensive and easy they are to install, a sink grid is a smart little upgrade that can save you time, protect your sink, and keep your kitchen looking sleek and functional.
4. How often should I re-seal the silicone seam?
Keeping the silicone seam around your undermount sink in good shape is key for preventing leaks, mold, and grime buildup. Generally, it’s a good idea to inspect the seam every few months. Look for small gaps, discoloration that won’t come off with normal cleaning, or a bead that feels loose or separated from the countertop or sink. Any of these signs mean it’s time to re-seal. Even if everything looks fine, a fresh check once or twice a year can give you peace of mind. Re-sealing is usually straightforward: remove the old silicone carefully, clean the area thoroughly, and apply a continuous, smooth bead of high-quality kitchen-grade silicone. This ensures a watertight, long-lasting seal. Staying on top of this maintenance not only keeps your sink hygienic but also protects your countertop and cabinet from potential water damage over time.
5. Can an undermount sink work with an ADA kitchen?
Absolutely—undermount sinks can fit perfectly in an ADA-compliant kitchen, but it does require a bit of planning. The key factors are counter height, bowl depth, and knee clearance. ADA standards typically call for a lower counter height so someone in a wheelchair can comfortably reach the sink, and the bowl shouldn’t be too deep, otherwise it becomes hard to reach the bottom. Plumbing also needs careful attention: make sure the P-trap and drain pipes are positioned so they don’t interfere with knee space, and avoid sharp edges or protruding hardware under the sink. With proper layout and careful installation, an undermount sink can provide the same sleek look and easy wipe-in cleaning as a standard kitchen, while remaining fully accessible. Many designers use rear-drain or offset-bowl setups to maximize under-sink space, making these sinks both functional and stylish in ADA kitchens.


Leave a comment
This site is protected by hCaptcha and the hCaptcha Privacy Policy and Terms of Service apply.