


Bidet installation is faster and more affordable than most homeowners expect. This up-to-date 2025 guide gives you clear, data-backed answers first—what a bidet installation costs, where DIY makes sense, and when to hire a pro—then walks you through the actual install steps for attachments, bidet toilet seats, and standalone fixtures. You’ll see typical labor ranges for complex jobs ($400–$1,500), the small things that delay installs (a missing GFCI outlet or a stiff shutoff valve), and simple ways to cut the total price. We’ll also cover maintenance, water and energy use, and how many homes see toilet paper savings up to 75%. Use the quick decision tools, checklists, and simple diagrams to choose your setup, install with confidence, and know when to call a plumber.
Bidet installation: quick answers and key costs
At-a-glance price ranges and time
Here are current national ranges for the three common ways to install a bidet on an existing toilet or as a separate fixture. Installed prices include parts and typical labor. Actual totals vary with your bathroom layout, plumbing condition, and local rates.
| Type | Installed Cost (typical) | Unit Cost (typical) | Typical Time |
|---|---|---|---|
| Standalone bidet | $700–$2,600 | $250–$800 | Half-day or longer |
| Bidet toilet seat | $250–$1,000 | $150–$700 | 20–60 minutes |
| Bidet attachment | $100–$300 | $20–$100 | 20–40 minutes |
Two quick takeaways: a basic bidet attachment is the fastest and least expensive way to add cleansing to your existing toilet; a bidet toilet seat adds comfort features (heated seat, warm water, air dryer) and still installs in under an hour for most homes.
What changes the price?
Most homeowners fall within these ranges:
-
Labor for installation: about $400–$1,500 for plumbing-heavy jobs (standalones, shutoff replacements, access issues); $100–$300 for a bidet toilet seat installation; often $0–$100 for basic attachments if you DIY or hire a handyman.
-
Extra materials and small parts: $50–$200 for connectors, valves, and miscellaneous hardware.
-
Adding an electrical outlet (GFCI): usually $120–$350 when the wall is accessible and the panel has capacity.
Your total cost to install a bidet depends on plumbing complexity (old shutoff valves and “skirted” toilets need more care), whether you need power for an electric bidet, and the brand/features you choose. Heated seats, warm-water tanks, dryers, and deodorizing features increase the unit price and may require a nearby outlet.
DIY vs professional installation—who should do what and why
You can install many bidet products yourself with simple tools. The key is knowing your limits.
-
DIY-friendly: non-electric bidet attachments and many non-electric bidet seats. These use a T-valve at the toilet’s water supply. If you can shut off water, disconnect a hose, and follow the manual, you’re set.
-
Pro recommended: standalone bidets with their own drain and hot/cold lines; any install that needs a new electrical outlet near the toilet; older homes with corroded shutoff valves; compact or skirted toilets that require special adapters.

Choose your setup: attachment, bidet seat, or standalone bidet
Choosing the right format is the fastest way to a smooth installation process and a fair price. All three will clean better than toilet paper, but they differ in features and complexity.
Bidet attachment—fastest, renter-friendly, non-electric
A bidet attachment slips under your existing toilet seat and connects to the cold water supply with a simple T-valve. It’s the quickest way to install a bidet on an existing toilet with minimal tools. Because it’s non-electric, it has fewer parts and fewer failure points. It’s also easy to remove if you rent.
The trade-off is features. Attachments typically offer adjustable spray and sometimes a second nozzle, but not heated seats, warm water tanks, or air drying. If you’re cost-sensitive and want to try a bidet in your home with low risk, this is a great start.
Bidet toilet seat—heated seat, warm water, and air dryer
A bidet toilet seat replaces your existing standard seat and “slides” onto a mounting plate attached through the seat bolt holes. Many models include a heated seat, heated water, nozzle self-clean, and an air dryer. You’ll need an electrical outlet near the toilet for an electric seat, and you’ll connect a T-valve at the shutoff to feed the seat’s water supply hose.
Check compatibility before you buy. Most seats come in elongated and round sizes. Measure from the center of the bolt holes to the front rim of your toilet bowl and note any tight clearances near the tank. If you have a skirted design or a very compact bathroom, plan your cord routing and confirm the mounting plate will sit flat.
Standalone bidet or integrated bidet toilet—best during remodels
A standalone bidet or a one-piece integrated bidet toilet provides the most refined look and custom control. These require dedicated hot and cold supply lines and a drain (like a sink). That means cutting and patching walls or floors in many homes. It’s the most expensive option to install but can be ideal during a remodel when floors are open and plumbing changes are already in scope.
If you want a one-piece unit that has bidet features built into the toilet itself, budget for a full toilet replacement and expect added electrical needs for comfort features. A general contractor or licensed plumber should handle this.
Which type of bidet is best for my bathroom?
If you want quick install and low cost, pick a bidet attachment. If you want comfort and warm water without a full remodel, choose a bidet seat and ensure you have a GFCI outlet within reach. If you’re renovating or replacing the toilet anyway, consider an integrated bidet toilet or a standalone bidet for a premium result.

Pre-install checklist and compatibility (DIY and pro)
A smooth install starts with the basics: tools, a good shutoff valve, and the right seat size. A few minutes of prep often saves an hour of rework.
Tools and materials you’ll likely need
-
Adjustable wrench or small basin wrench
-
Flat and Phillips screwdriver
-
Teflon tape (PTFE thread seal)
-
Bucket and towel
-
T-valve (size must match your shutoff and toilet tank fill valve)
-
Flexible water supply line (often worth upgrading for $10–$20)
-
Mounting plate and bolts (for bidet seats)
-
GFCI tester (for electric seats)
-
Non-marring tape measure
Electrical and plumbing readiness
For an electric bidet toilet seat, you need a GFCI-protected receptacle within cord reach. If you lack one, plan for a licensed electrician to add it. Keep cords away from water paths and create a “drip loop” so water cannot run along a cord into an outlet.
On the plumbing side, find the shutoff valve behind or near the toilet. Turn it clockwise to stop the water. If it won’t budge or it leaks, replace it before anything else. Check that your supply line is flexible and not brittle. House water pressure in standard homes is usually fine for bidet products; if spray feels weak later, we’ll cover simple fixes.
Measure twice: toilet shape, bolt spread, clearance, supply side
Measure your elongated or round toilet. From the bolt centers to the front rim, elongated is usually 18–19 inches; round is about 16–17 inches. Measure the bolt spread and note how close your tank is to the mounting holes; some seats need a small gap to slide the plate under the caps. Confirm which side your water supply sits on (usually left when facing the toilet). If you have a skirted toilet, you may need an alternate mounting kit or a side-access bracket.
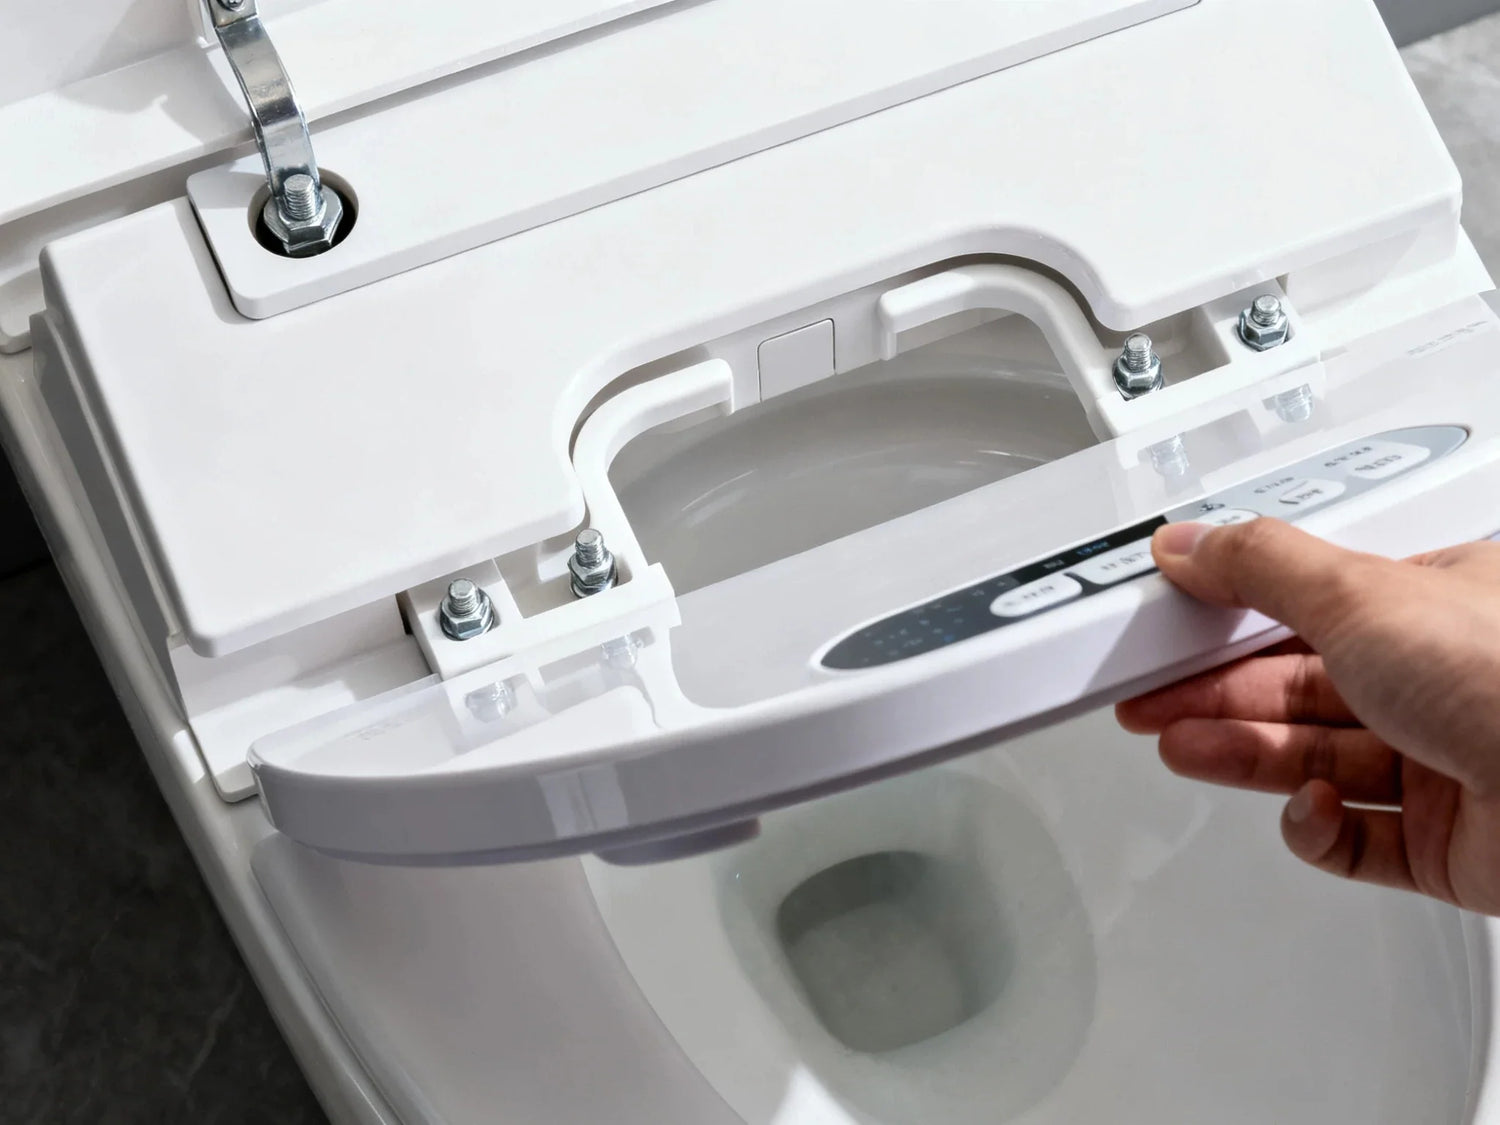
Step-by-step—installing a bidet attachment
A basic bidet attachment is the simplest path to a cleaner toilet experience.
Mount and connect
-
Turn the water supply off at the shutoff valve. Flush to empty the toilet tank. Hold the lever to drain as much as you can.
-
Place a towel under the tank. Unscrew the existing water supply line from the fill valve under the tank (top end).
-
Wrap Teflon tape on the T-valve threads if the manual calls for it. Thread the T-valve onto the tank’s fill valve; hand-tighten, then snug with a wrench—do not over-tighten.
-
Reconnect the supply line to the bottom of the T-valve.
-
Remove your existing toilet seat. Place the attachment on the bowl, align the holes, and reinstall the seat through both attachment and bowl.
-
Connect the small hose from the T-valve’s side outlet to the attachment’s inlet.
-
Slowly turn the water back on. Check every connection.

Leak test and fine-tuning
Watch for drips at the T-valve and at both hose ends. If anything seeps, shut off water and re-seat the fitting. A common cause of leaks is cross-threading—start threads by hand and spin a few turns before tightening. Align the seat so it sits centered on the bowl. Test the spray on low first. Adjust the control to your comfort.
How long does a bidet attachment install take?
Expect about 20–40 minutes with basic hand tools. If your shutoff valve or supply line is very old, add time to replace them. Most people find it’s an easy installation that beats their expectations.
Step-by-step—installing a bidet toilet seat
A bidet seat gives you heated seats and warm water (on electric models) with only a few extra steps beyond an attachment.
Mounting plate, seat alignment, water hookup; cord routing best practices
-
Shut off the water. Remove the old toilet seat and clean the rim.
-
Place the mounting plate over the bolt holes and secure it with the provided hardware. The plate should be snug and level.
-
Slide the bidet seat onto the plate until it clicks. Make sure it doesn’t wiggle.
-
Install the T-valve at the tank (as above). Attach the seat’s water supply hose to the T-valve side outlet.
-
For an electric seat, route the cord away from water paths and foot traffic. Leave a drip loop below the outlet height. Plug into a GFCI-protected outlet.
Test on low pressure first. Confirm the nozzle self-clean function and adjust the seat position if needed.

Power options and safety
Electric seats need a GFCI outlet near the toilet. If you don’t have one, plan to add a receptacle; typical costs are $120–$350 in accessible walls. Avoid extension cords. If a temporary cord is unavoidable, use a heavy-duty cord rated for bathrooms, keep it short, and plan a proper outlet soon.
Troubleshooting low pressure, leaks, or weak spray
If water pressure seems low, open the shutoff valve fully and check the seat’s inline debris screen (many have a small filter at the hose inlet that you can rinse). Confirm the T-valve is fully open to the seat. If you see drips, recheck all connections and verify you used the right seal method (some quick-connect couplers use O-rings and do not want Teflon tape; follow the installation instructions in the manual). If spray is weak on a non-electric model, try a new water supply line, which can improve flow.
Step-by-step—installing a standalone bidet or bidet toilet
Standalone fixtures or integrated bidet toilets need hot/cold supply and a drain. This is pro territory unless you’re doing a full remodel and comfortable with rough-in work.
Plumbing scope and permits
Expect new hot and cold supplies, a dedicated shutoff, a P-trap and vented drain tied into the bathroom line, and proper clearances per local code. Many areas require a permit for new plumbing fixtures. Backflow prevention is critical—your installer should use an appropriate anti-siphon or vacuum breaker as required by code. If switching to an integrated electronic bidet toilet, plan for a dedicated circuit if the nameplate demands it.
Costs and timelines in context
-
Typical labor: $400–$1,500, depending on access and finishes.
-
Materials and connectors: $50–$200.
-
Time: half-day or more, often with return visits for tile, patching, or inspections.
Standalone installs are most efficient when bundled with a larger bathroom update. You’ll open the floor or wall once and finish cleanly.
When to hire a plumber vs a GC; remodel sequencing tips
Hire a licensed plumber to run lines and set the fixture. If you’re changing flooring or moving walls, a general contractor can sequence the work: rough plumbing first, then subfloor or tile, then fixture set and final connection. Coordinate water shut-downs and protect nearby finishes before drilling tile or stone. If your tile must be drilled, use the right bit and low speed; masking tape helps keep the bit from wandering.

Real-world case studies and expert tips
Here’s what homeowners and tradespeople keep running into—and how they solve it.
DIY snapshots (attachments and seats)
Most DIY installs take about 20–30 minutes once tools are out. A small flexible supply line upgrade, often around $10–$20, cures many slow-flow or drip issues. The most common hiccup is a T-valve leak from over-tightening or cross-threading. Start by hand, add light wrench torque, and check again in a few hours. If your toilet is very close to the side wall, look for a slim-profile attachment or consider a seat with a front-mounted control.
Pro-assisted installs (older homes, electric seats, standalones)
In older bathrooms, shutoff valves may not close or may weep after you touch them. Plumbers often swap the shutoff and supply line in a short visit. For electric seats, an electrician can add a GFCI outlet in under an hour if the wall cavity is open or the run is short. For skirted toilets, an offset adapter plate or hidden bolt hardware may be needed; a pro can suggest the right kit and avoid cracked porcelain.
Do bidets increase water bills or reduce toilet paper?
Using a bidet adds a small amount of water per use, similar to handwashing, but most households report a sharp drop in toilet paper usage—often up to 75%. The water used to make toilet paper is far greater than the water used by a bidet wash, so many homes see net savings in both cost and environmental impact. Heated seats and warm-water tanks use some electricity, but modern units draw modest power, especially when set to Eco mode or when you turn off the dryer.
Sources to learn from
If you like visuals, look for licensed plumber tutorials and manufacturer install guides for your exact seat or attachment style. Short videos that show the installation process step by step can make your first install feel familiar before you start.
Total cost of ownership, savings, and maintenance
Think past the purchase to see the real value of a new bidet over the first year and beyond.
Line-item breakdown and budgeting
Here’s a simple way to budget a bidet installation and avoid surprises.
| Cost Component | Typical Range | Notes |
| Unit (attachment) | $20–$100 | Non-electric |
| Unit (bidet seat) | $150–$700 | Electric features cost more |
| Unit (standalone) | $250–$800 | Fixture only |
| Labor (attachment/seat) | $0–$300 | Many DIY; pros $100–$300 |
| Labor (standalone/plumbing) | $400–$1,500 | Access and finishes drive cost |
| GFCI outlet (if needed) | $120–$350 | Electric seat only |
| Parts, valves, hoses | $50–$200 | T-valve, supply line, adapters |
| Contingency buffer | 10–15% | Covers misc. needs |
Environmental and cost savings
A typical household spends hundreds per year on toilet paper, especially for larger families (EPA, 2025). Cutting usage by even half quickly offsets the price of a bidet. The water used per wash is small compared to the water footprint of paper production. Homes on septic often appreciate the reduced paper volume, too.

Maintenance calendar
-
Monthly: Wipe nozzles and seat surfaces with mild soap. Run the nozzle self-clean function if present.
-
Every 3 months: Check all connections for drips; snug gently if needed. Clean any inline screens or filters.
-
Every 6–12 months: Descale if you have hard water; follow the manual for a vinegar soak or filter replacement.
-
Before winter trips: For unheated spaces or non-electric models in cold climates, shut off the water and drain the line to avoid freeze damage.
Safety, code compliance, and choosing an installer
Water and electricity can live safely in the same room—if you follow a few simple rules and local codes.
Safety checklist
-
Use a GFCI-protected outlet for electric seats; test it with a GFCI tester.
-
Create a drip loop in the power cord below the outlet height.
-
Shut water off fully and hold the flush lever to drain before opening any line.
-
Use the right adapters and an anti-siphon/backflow device where required.
-
After install, check for leaks at 15 minutes, 2 hours, and the next morning.
-
Keep kids from playing with spray controls; demonstrate safe use.
Vetting a pro
When you request quotes, ask for license and insurance details, experience with bidet toilets and seats, what’s included (T-valve, hoses, adapters), and whether they’ll warranty the installation. For electric work, hire a licensed electrician who will install a GFCI receptacle to code and pull permits if required.
Simple message template to request quotes
-
Scope: “Install an electric bidet seat on my existing elongated toilet; add a GFCI outlet within 3–4 feet if needed.”
-
Constraints: “Old shutoff valve; skirted toilet; limited left-side clearance.”
-
Timing: “Flexible weekday mornings.”
-
Ask: “Please quote parts, labor, and any permits, and confirm warranty on your work.”
FAQs
1. Do I need a plumber to install a bidet?
Not always. Many bidet installation projects, especially non-electric models, are DIY-friendly. If you’re adding a simple bidet attachment or replacing your seat with a non-electric bidet toilet seat, you can often install it yourself with basic tools. However, hire a plumber if your home has old shutoff valves, limited space, or if you’re adding an electrical outlet. Professional bidet installation is essential for standalone fixtures or integrated bidet toilets that require new plumbing and drains.
2. What is the average cost of installing a bidet?
The average bidet installation cost varies from $100 to $1,000 depending on the type. A basic bidet attachment price ranges from $20 to $100, while a bidet toilet seat installation cost usually runs $150–$700. Standalone bidet toilets cost more because of extra plumbing and labor. Total expenses depend on your bathroom layout, water access, and whether you DIY or hire a professional plumber.
3. Can you install a bidet yourself?
Yes, you can. Most homeowners can complete a simple bidet installation in under an hour. Non-electric bidet attachments and basic seats use a T-valve at the toilet’s water supply, making the process simple and mess-free. Just turn off the water, connect the lines, and test for leaks. You only need a pro when electrical wiring or plumbing changes are required. Learning how to install a bidet yourself saves on labor and gives full control over setup and maintenance.
4. How much will a plumber charge to install a bidet?
The average labor cost to install a bidet depends on the model and complexity. For a seat or bidet attachment, plumbers usually charge $100–$300. More complex bidet installations, like standalone fixtures or integrated bidet toilets, cost between $400 and $1,500 in labor due to added hot/cold lines or drains. If you’re adding an outlet, expect an additional $120–$350. Always confirm total labor costs before booking the installation.
5. What is the average cost of a bidet?
How much is a bidet? Prices vary widely. A basic bidet attachment price is typically $20–$100, while an electric bidet toilet seat can range from $150 to $700. Premium bidet toilets or smart models may cost $800 or more. The final bidet installation cost depends on whether you install it yourself or hire a plumber. Considering long-term toilet paper savings and better hygiene, most homeowners find the investment worth it.
6. How much does it cost to install a toilet kit?
The average labor cost to install a toilet kit, such as a flapper or fill valve, is around $75–$150 plus parts. For a bidet toilet seat installation or “bidet kit,” expect $100–$300 in labor depending on the setup. Adding an electrical outlet or plumbing upgrades raises total bidet installation costs. A professional ensures leak-free connections and GFCI safety, while a DIYer can often complete minor installations affordably and quickly.

Leave a comment
This site is protected by hCaptcha and the hCaptcha Privacy Policy and Terms of Service apply.