


A well-done vessel sink installation can change the feel of your bathroom in a single afternoon. The bowl sits proud on the vanity, adds height and shape, and gives your space a fresh, custom look. The catch? It only looks great when the install is clean, level, and leak-free. This guide teaches you how to install a vessel sink accurately, common bathroom sink drain installation mistakes to avoid, and finish with a professional look. You’ll get an exact step-by-step vessel sink installation process, key measurements, material and sealant choices, and a full troubleshooting playbook. Real-world examples and cost comparisons will help you decide when to DIY your vessel sink installation and when to call a pro. Want to keep it simple and safe? Use the checklists and mini calculators to measure once, cut once, and seal right the first time.
In short, you’ll learn how to mount vessel sink, run the drain, connect the faucet, and test everything the right way. Along the way we’ll answer common questions in plain language: What holds a vessel sink in place? What do you need for vessel sink installation? Are vessel sinks easier to install? How much to install a vessel sink? What’s the problem with vessel sinks? Do you glue them down? Let’s make this vessel sink installation project simple, neat, and code-smart.
Quick Answer: Time, Tools, Cost, and Key Steps
How to install a vessel sink in 6 steps
Use this short sequence if you already have a drilled vanity top and a matching faucet and drain:
- Measure and mark the center. Dry-fit the sink and faucet to confirm reach and height.
- Use a hole saw to drill/cut the drain hole to spec. Deburr edges.
- Dry-fit the vessel. Check orientation and alignment with faucet and mirror.
- Apply a continuous bead of 100% silicone under the base and around the drain opening. Set the sink and press lightly.
- Install the pop-up drain with the correct washer order. Hand-tighten plus a 1/4 turn with pliers. Connect P-trap and supply lines.
- Leak-test with tissue and a full sink fill. Wipe squeeze-out. Let silicone cure 24 hours before use.
Visual: At-a-glance info card with icons showing 90–120 minutes, moderate difficulty, $150–$500 savings, PPE, wrench, silicone, and hole saw.
Tools and materials checklist
- Safety glasses and gloves
- Tape measure, pencil, and masking tape
- Drill with a hole saw sized to your drain hole (often 1.75 inches)
- Level, rags, and a putty knife for cleanup
- 100% silicone (use neutral-cure on copper/metal sinks)
- Adjustable wrench or channel-lock pliers
- Plumber’s tape (PTFE) for threaded connections
- Pop-up or grid drain matched to overflow type
- Faucet and supply lines, shutoff valves, and compression fittings
- P-trap kit with tailpiece and washers for your drain pipe size
Time, difficulty, and cost savings
Most vessel sink installs take under two hours of hands-on time if your vanity top is ready. If you need to cut stone, plan more time and specialized tools. A typical DIY can save about $150–$500 in labor. The job is a moderate DIY difficulty because it mixes careful measuring, safe drilling, and basic bathroom sink plumbing.
Safety and code must-knows
Shut off hot and cold water at the valves. Use PPE for drilling and chemical sealants. Follow the manufacturer’s instructions for the sink, drain, and faucet. Check your local adoption of the UPC or IPC for plumbing rules. Pick an EPA WaterSense faucet for flow efficiency. If accessibility matters, confirm vanity and rim height vs. ADA limits and keep clear floor space under the vanity. In short, build safe, measure right, and follow code.

Vessel Sink Installation: Step-by-Step
Measure and mark the countertop
Start with layout. Place the vessel on the vanity top and shift it until the drain lines up with the cabinet opening and the P-trap path is clear. Keep a rear setback so the bowl and faucet feel natural and the spout clears the rim. A common rule is about 3.5 inches from the back wall to the vessel’s edge, but adjust for your bowl size and faucet shape. Center the drain to the vanity’s plumbing when possible. Check mirror, backsplash, and wall clearance, especially for tall bowls.
Use masking tape on the vanity top. Trace the drain opening on the tape, then mark the true center with a crosshair. Mark faucet holes too, if you’re using a deck-mount faucet. Confirm the spout reach lands near the drain center. The water stream should drop about 1–1.5 inches from the spout to the water surface to lower splash.
Tip: Dry-fit the faucet and the vessel together. If you can’t line up the holes, move the sink slightly and try again. This is the best time to find conflicts with studs, drawers, or the size of the pipes in the cabinet.
Drill/cut the drain hole cleanly
Use a hole saw to cut the drain opening. Most pop-up drains fit a 1.5–1.75 inch hole, with 1.75 inches being common. Check your drain spec. Tape the top surface to reduce chipping on stone or laminate. Clamp a drilling template or scrap board to keep the saw from walking.
Drill at low to medium speed. Keep the drill square to the vanity top. If you are cutting stone, use the correct diamond hole saw and cooling method, and consider hiring out the cut. When done, deburr the hole. Vacuum dust, then wipe the area clean.
Safety note: Wear safety glasses. Protect the vanity and floor with drop cloths. Keep cords and water away from the drill.
Set, seal, and secure the vessel
Dry-fit the vessel again. Make sure any logo faces forward and the bowl sits level. Clean the bottom of the sink and the vanity top with alcohol or a cleaner that leaves no residue.
Run a continuous bead of 100% silicone around the underside of the base and around the drain hole. For copper or certain metals, use a neutral-cure silicone so you don’t cause corrosion. Carefully set the sink in place and press evenly. You should see a small, even squeeze-out around the base. This bead holds the vessel in place, seals out water, and stops rocking. Wipe excess with a rag or a putty knife while it is wet.
What holds a vessel sink in place? The sealant does most of the work. The weight of the bowl and the drain nut also help. Some models include a mounting ring that sits between the bottom of the sink and the countertop; this can keep a glass or stone bowl stable and level. Do you glue down a vessel sink? You don’t “glue” it in the woodwork sense, but you do “adhere and seal” it with silicone. That is the correct method.
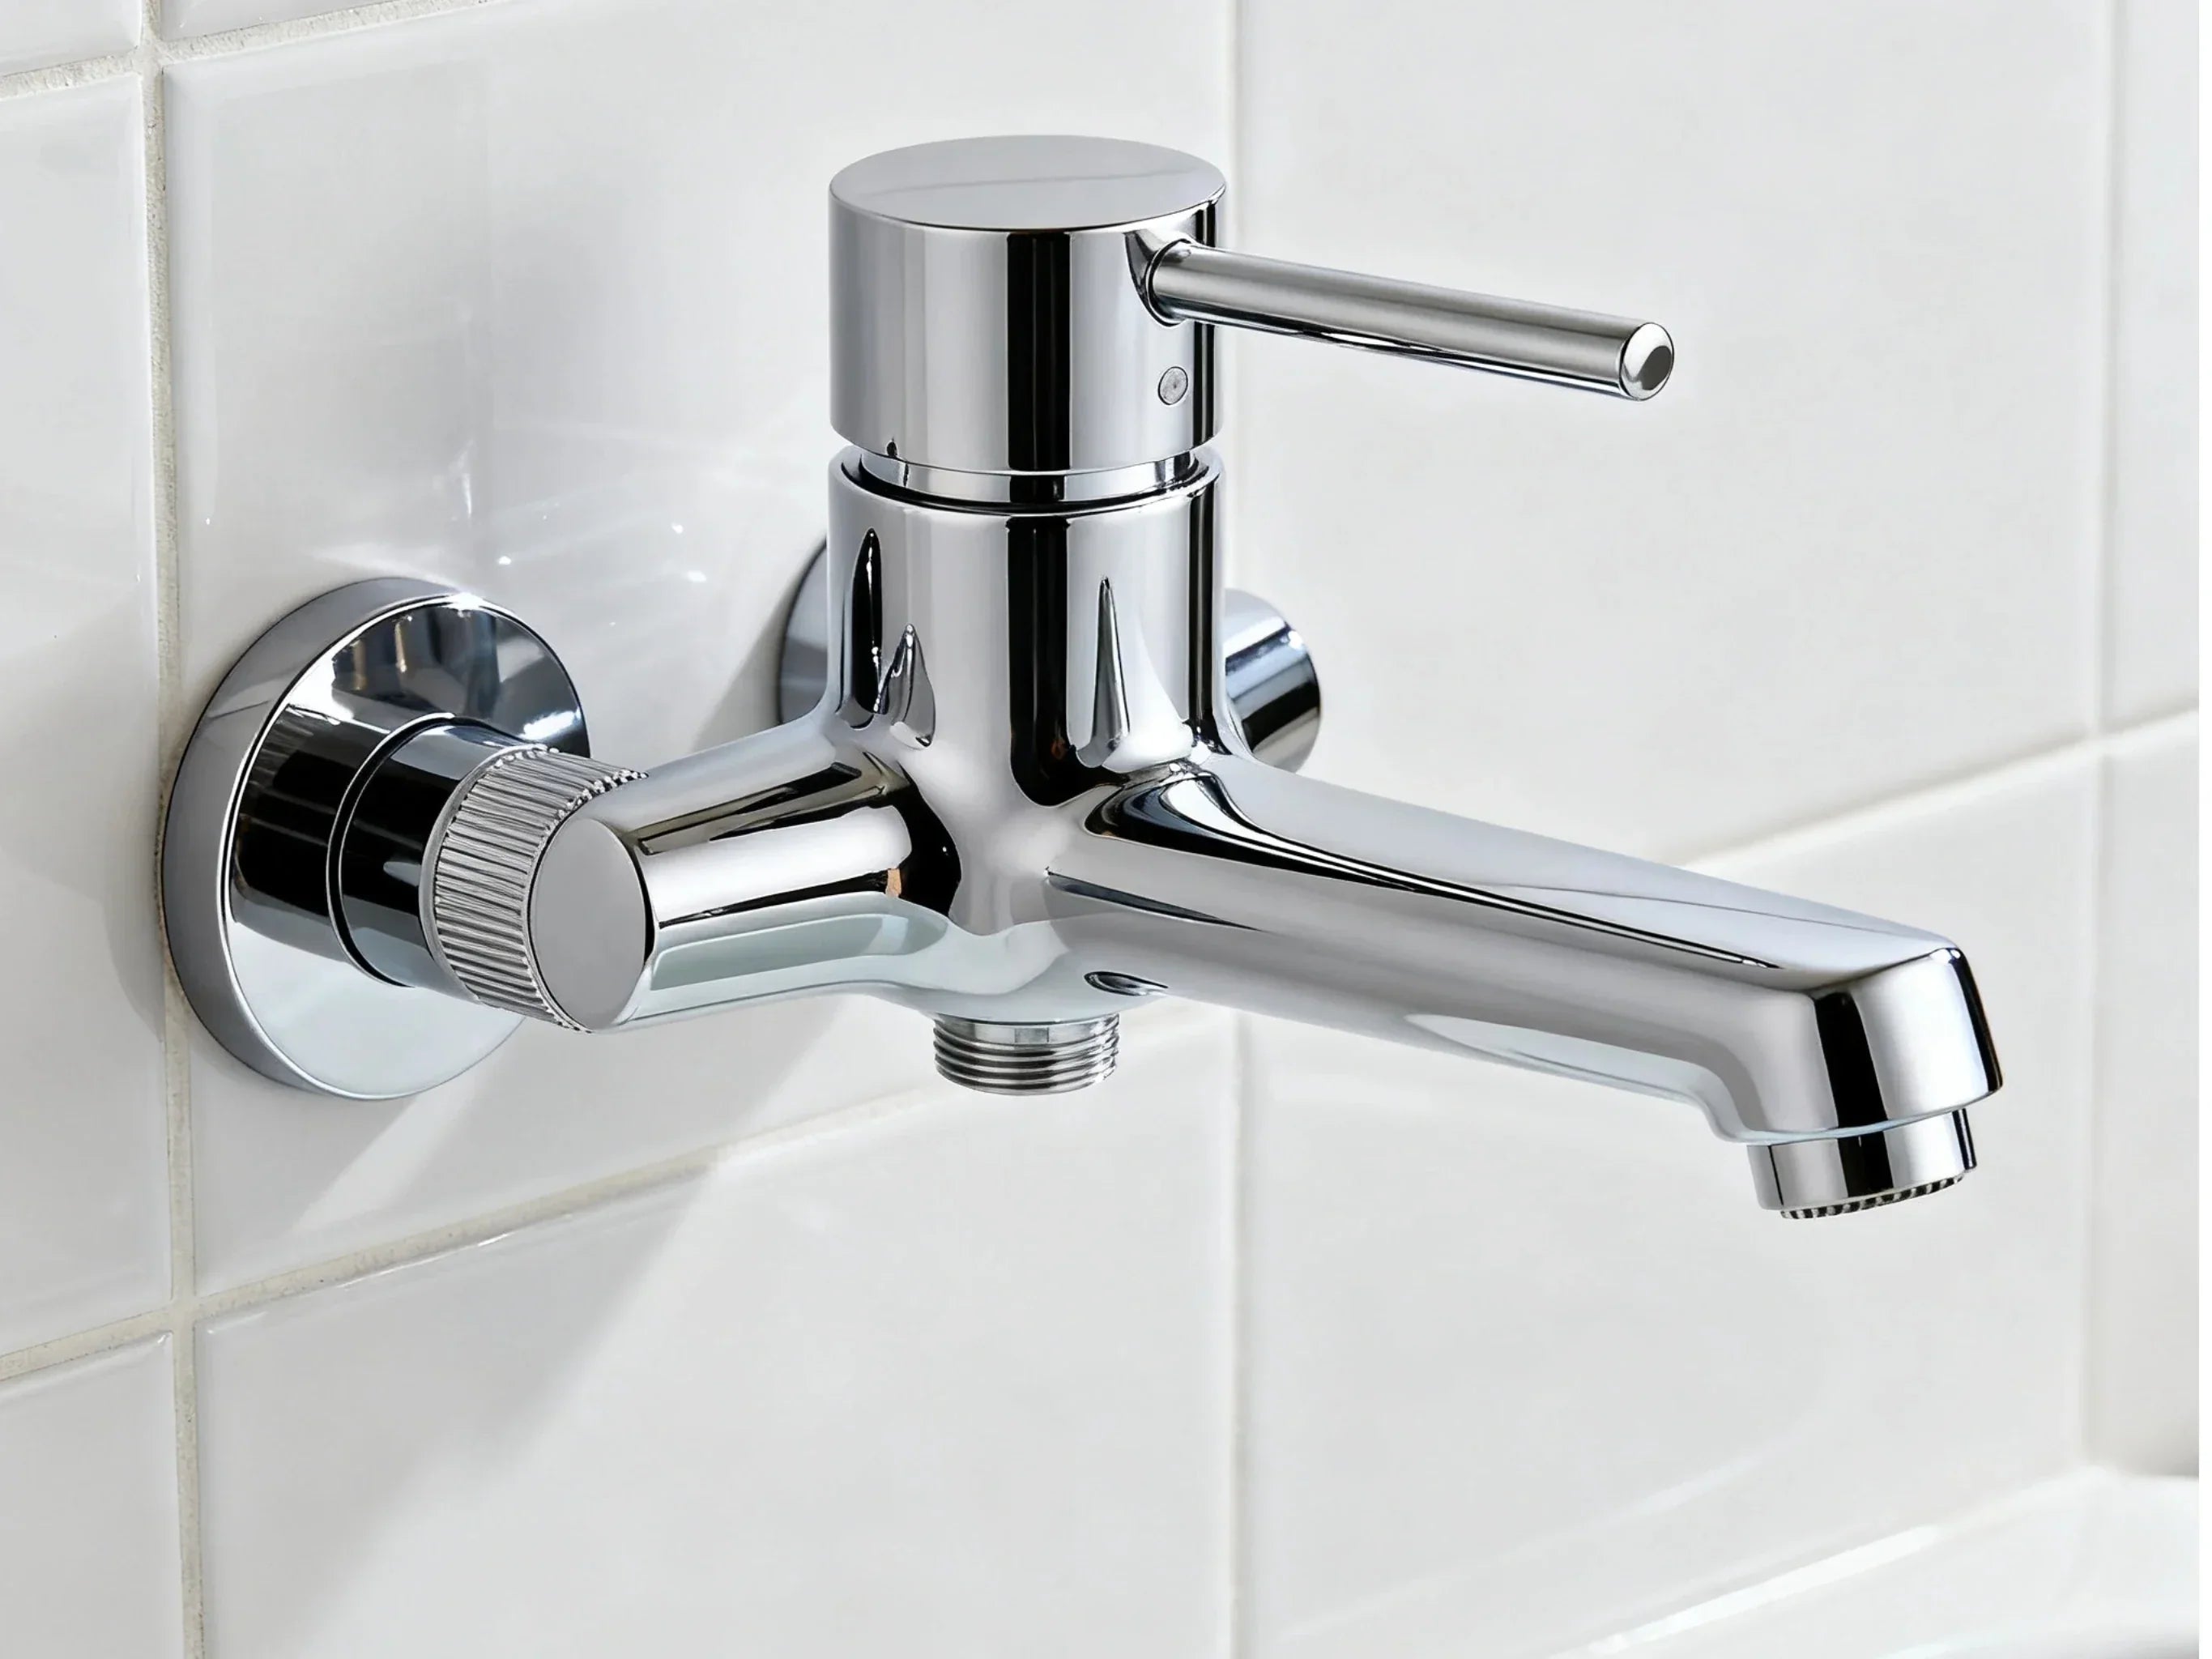
Install drain and connect plumbing
Assemble the drain through the sink and counter. Follow the washer order in the instructions. This matters a lot. Usually, there is a rubber gasket under the sink and a locknut below. If the sink has no overflow, use a drain made for no-overflow bowls. Tighten the mounting nut until the gasket compresses evenly. A good rule is firm hand-tight, then a 1/4 turn with pliers.
Attach the tailpiece to the drain, and connect the P-trap using compression fittings. Make sure the trap arm has a slight slope to the wall. Do not add a second trap; that leads to slow drain and odors. Connect the faucet supply lines to the shutoff valves. Use plumber’s tape on threaded joints where required. Open the valves slowly and check for leaks.
Leak test in two ways. First, run the faucet and check every joint with a dry tissue. Second, fill the bowl and let it drain while you check all joints again, plus the base of the vessel. If you see a drip, tighten a little more or re-seat the gasket. When all looks good, let the silicone cure for 24 hours before regular use.

Planning, Measurements, and Layout (Ergonomics + Splash Control)
Heights and clearances that work
Comfort starts with height. Many bathrooms aim for a total rim height around 34–36 inches from finished floor to the top of the bowl. If your bowl is tall, pick a lower vanity so the sink is installed at a comfortable height. Check the mirror height and backsplash line too. You want the spout to clear the rim, not hit it. Splash control improves when the water stream lands near the drain and not on a steep inner wall of the bowl.
If you need an accessible bath, learn your local rules. ADA guidance often limits lavatory rim height to 34 inches max, with clear floor space and knee clearance. Vessel bowls can make compliance tough, so plan early.
Faucet compatibility and spout reach
A tall deck-mount faucet or a wall-mount faucet with a long spout designed for vessel sinks both work well. The key is spout reach and height. Aim the stream to the drain center with a drop of about 1–1.5 inches to the water surface. This lowers splash and keeps water in the bowl. If deck-mount, confirm hole spacing. Some vanities come pre-drilled; make sure the plumbing won’t interfere with drawers or rails.
Countertop considerations and hole placement
Your vanity top might be stone, wood, or laminate. Each has its own drilling needs. Stone may need diamond tools and slow, cool drilling. Wood and laminate cut easily with a sharp hole saw. Thin tops may need reinforcement to handle a heavy stone bowl. Avoid cutting into support rails under the vanity top. Keep enough overhang so the bowl does not feel crowded by the wall. Also confirm cabinet access for the P-trap and shutoff valves. If you can’t reach them, servicing later will be hard.
What size hole do you need for a vessel sink?
Most vessel sink drains fit a hole around 1.75 inches. Some drains accept 1.5 inches. Always check the drain spec. If your sink has no overflow, you need a no-overflow drain, which often uses the same hole size but a different body and gasket stack. If you add a mounting ring, it sits above the counter and does not change the drain hole size.
Visual: Clearance calculator mockup with inputs for vanity height, vessel height, and faucet spout height/reach, showing a green check if total rim height and spout drop are in the safe range.
Materials, Drains, and Sealants (What to Use Where)
Vessel sink materials: pros, cons, install notes
Ceramic is durable, easy to clean, and forgiving to seal. Glass looks light and modern, but needs an even seal and careful handling to avoid stress points. Stone feels premium and solid, but it’s heavy, and the base must be flat. Metal (like copper or stainless) can add warmth or shine; match it with neutral-cure silicone so you don’t corrode it. When in doubt, place the bowl on a mounting ring to spread load and help leveling.
Drain choices: pop-up vs. grid; overflow vs. no overflow
Match the drain to your sink. If your vessel has an overflow, you must use a drain made for overflow sinks. No overflow? Then use a no-overflow drain. A pop-up drain lets you close the water with a push. A grid drain stays open but resists clogging and allows faster flow. If kids will use the bath, a grid can help prevent standing water and odor from a closed drain. Pick a finish that matches the faucet.
Sealants and gaskets that prevent leaks
Use 100% silicone around the rim and drain. For copper or certain metals, use a neutral-cure silicone. Some manufacturers forbid plumber’s putty on stone or with certain drain finishes. Read the instructions. Wait a full 24 hours for the silicone to cure before a long soak test or regular use.

Visual aids
Table: Material vs. sealant vs. care
| Sink material | Install notes | Sealant to use | Ongoing care |
| Ceramic | Flat base, easy to seal | 100% silicone | Non-abrasive cleaner |
| Glass | Use mounting ring, even bead | 100% silicone (clear) | Soft cloth, avoid harsh scrub |
| Stone | Heavy, check base flatness | 100% silicone; avoid oil-based putty | Seal stone if required by maker |
| Copper/metal | Use neutral-cure only | Neutral-cure silicone | Gentle soap, dry after use |
Schematic (described): Cutaway showing drain from top to bottom: flange, upper gasket (as spec), sink, counter, lower gasket, locknut, tailpiece, P-trap.
Common Mistakes and How to Avoid Them
Measurement and alignment errors
Many first-time installers place the bowl where it looks nice but miss the centerline of the drain and faucet. This causes the spout to hit the rim or splash over the edge. The fix is simple: dry-fit with both the sink and faucet in place, and confirm the water stream falls near the drain. Check P-trap alignment at the same time to avoid odd angles.
Sealing mistakes and overtightening
Too little silicone lets water wick under the base, stain the vanity, and cause a leak at the rim. Skipping cure time causes the bead to shift when you test. On the drain, overtightening can crack ceramic or glass or deform gaskets so they no longer seal. The goal is even gasket compression, not brute force.
Material-specific pitfalls
Using the wrong sealant on copper or metal can cause corrosion or poor adhesion. A glass or stone bowl placed on a rough or uneven countertop can wobble. Heavy stone bowls can stress a thin vanity top if not reinforced. Always check base flatness and support. If the vanity top flexes when you press the bowl, fix the support first.
Why is my vessel sink leaking at the base?
Common causes include a thin or broken silicone bead, reversed gaskets on the drain, or a misaligned drain body. The fix is to remove the drain, clean off old sealant, apply a fresh, continuous bead of silicone, install washers in the correct order, and tighten to hand-tight plus a gentle 1/4 turn. Then let it cure and test again.
Visual: Red-flag checklist overlay for each step: off-center spout, dry silicone bead, crushed gasket, rocking base, and missing overflow match.
Troubleshooting and Fixes
Leak diagnosis: drain, rim, or supply line?
Start dry. Use tissues around the rim and under the drain while the bowl is empty. Then run water, and watch for drips. If the rim is wet, re-seal under the base with silicone. If the drip is from the drain body, re-seat gaskets and tighten to spec. If the supply line leaks, shut off valves, reapply plumber’s tape if needed, and snug compression nuts.
Try a trap dye test for slow leaks: add a few drops of food coloring in the bowl and drain it. If you see color at a joint, that’s your leak.
Rocking or wobble
If the sink rocks, it either needs a flatter base or a more even bead. Clean off old sealant and set the bowl on a thicker, continuous bead. For fine tuning, use clear silicone pads or a mounting ring to stabilize. Check the vanity for flex. Tighten the vanity to the wall with screws into studs or use anchors for your wall type to stiffen the setup.
Slow draining, gurgling, or odors
Check that you have a single P-trap with a good water seal. Two traps or pipes that are too long can cause gurgling. A closed pop-up can slow flow; grid drains flow faster. Clear hair or debris from the drain tailpiece. If odors persist, check venting. A blocked vent can pull the trap seal dry and let odors in.

How tight should a vessel sink drain be?
Tight enough to compress the gasket evenly without warping. The simple rule is firm hand-tight plus a 1/4 turn with pliers. Stop if resistance jumps or the gasket starts to bulge out unevenly.
Visual: Interactive troubleshooting flowchart showing Yes/No steps: Where is water? Rim vs. drain vs. supply. Rocking? Shim or re-seal. Slow drain? Check trap, vent, and grid/pop-up choice.
Case Studies, Data, and Real-World Lessons
Key statistics snapshot
Based on field reports, training classes, and installer surveys:
- Most DIY vessel sink installs, with a ready vanity top, finish in under two hours.
- Around six in ten support calls trace back to sealing or alignment errors.
- Up to one in five early failures come from poor install practices, not product defects.
- When installed correctly and maintained, a residential vessel sink can last 10–20 years.
These numbers vary by material, countertop, and skill level, but they highlight the biggest wins: measure carefully and seal correctly.
Mini case studies
Example A: A homeowner installed a copper bowl with standard silicone. Weeks later, stains formed under the base and a slight green ring appeared. The fix was to remove the bowl, clean all surfaces, and reseal with neutral-cure silicone. After a 24-hour cure and a new leak test, the issue was gone.
Example B: A glass vessel looked great but splashed onto the vanity. The faucet spout dropped water onto the steep side of the bowl instead of the drain. Replacing the faucet with a spout designed for vessel sinks, with a longer reach and lower drop, moved the stream to the drain center. Splashing reduced right away.
Cost, Time, and When to Hire a Pro
DIY vs. professional cost breakdown
Most DIY installs cost the price of the sink and faucet, plus a drain kit, silicone, and basic supplies. If you already own a drill, hole saw, and pliers, your extra spend is small. Hiring a pro for a straightforward install can add about $150–$500 in labor, depending on your area. The biggest hidden costs come from countertop cutting, tool rentals for stone, or fixing water damage from leaks. If you’re careful with measuring and sealing, DIY can be a good value.
Short table: Typical costs
| Item | Typical range |
| Labor (pro install) | $150–$500 |
| Silicone, tape, misc. | $15–$30 |
| Drain kit (pop-up/grid) | Varies by finish and type |
| Hole saw (if needed) | $20–$60 |
| Stone cutting (outsourced) | Varies, call local shop |
Complexity triggers for hiring
Consider a pro if you need to core a stone top, re-vent the drain, move the supply lines, or if your vanity has tight access that needs custom fittings. Also, some warranties ask for pro installation. If you’re unsure how to pull a safe cut in quartz or porcelain slab, it’s smart to hire.
Do you need plumber’s putty or silicone for a vessel sink?
Most manufacturers specify 100% silicone for the seal between the sink base and countertop and often for the drain flange as well. Do not use plumber’s putty where the maker forbids it, such as on some stone tops or certain drain finishes. For copper or metal bowls, use neutral-cure silicone.
Warranty, code, and inspection considerations
Keep your receipts, and take photos of your install before you close up the cabinet. Photos help with future service and warranty questions. Check your local code adoption of the IPC or UPC for rules on traps, vents, and supply shutoffs. If you plan to sell the home, having a code-compliant, documented install is a plus.

Action Plan and Key Takeaways
10-point execution checklist
- Shut off water and protect surfaces.
- Measure vanity height, vessel height, and faucet reach; dry-fit.
- Mark centers for drain and faucet; tape the top.
- Use a hole saw to cut the drain hole; deburr and clean.
- Clean sink base and vanity top; dry-fit orientation.
- Apply a bead of 100% silicone under the base and around the drain opening.
- Set the bowl; press evenly; wipe squeeze-out.
- Assemble the drain with the correct gasket order; tighten mounting nut to spec.
- Connect the P-trap and water supply; test for leaks.
- Allow 24 hours for silicone to cure before regular use.
Quality control before first use
Do a full leak check with tissues. Fill the bowl to test the drain, then run the faucet to test supply lines. Wipe the base and rim dry, then check again after 10 minutes. Make sure the sink doesn’t rock. If it does, remove and re-seat on a fresh, fuller bead. After 24 hours, re-check the drain nut and supply compression nuts and snug if needed.
Maintenance and longevity tips
Wipe water around the base to protect the vanity top. Clean with non-abrasive products. If you see the base seal pulling away after years of use, remove the old bead and re-seal with fresh silicone. Inspect the P-trap and shutoff valves once a year for slow drips. Keep a small towel in the cabinet to spot leaks early.
Final reminder
A smooth vessel sink installation comes down to two things: precise measuring and proper sealing. When you choose the right drain, match the sealant to the material, and give the silicone time to cure, you avoid most leaks and headaches. Follow the maker’s instructions, and your new sink and faucet will give your bathroom a clean, upgraded look for years.
FAQs
1. What holds a vessel sink in place?
When you install vessel sink, stability comes from a continuous bead of 100% silicone applied under the base, plus the weight of the bowl and the clamping pressure from the drain assembly. For glass or stone models, a mounting ring between the top of the vanity and the sink helps keep things level and prevents rocking. When installing a vessel sink on a new vanity, make sure the surface is flat, clean, and dry before setting it in place. The silicone acts as both an adhesive and a watertight seal, securing the bowl without visible hardware. Proper sealing and even pressure around the drain ensure the vessel stays centered and doesn’t shift over time, even with daily use and cleaning.
2. What is needed to install a vessel sink?
To install a vessel sink correctly on your new vanity, gather all the right tools and materials before you start. You’ll need a drill with a hole saw for the drain hole, a tape measure, pliers, 100% silicone sealant, and a drain assembly that matches your sink’s overflow type. When installing a vessel sink, pair it with a new faucet—either tall deck-mount or wall-mount—so the spout clears the rim comfortably. You’ll also need water supply lines, shutoff valves, a P-trap kit, plumber’s tape, and safety gear like gloves and goggles. Always check the height of your new sink setup, ensuring the rim sits comfortably around 34–36 inches from the floor. Having everything ready makes vessel sink installation cleaner, faster, and more reliable.
3. Are vessel sinks easier to install?
Yes, installing a vessel sink is often simpler than setting a traditional undermount or drop-in sink. The bowl sits right on the top of the vanity, so you usually just drill one drain hole instead of cutting a full cutout. When you install a vessel sink on a new vanity, you can easily adjust placement to center the bowl and align it with your new faucet. The key challenge lies in getting the height right—plan the height of your new vanity and bowl together so the rim ends up comfortable for daily use. The most important part is sealing it correctly with silicone to prevent leaks. Once measured and leveled, most homeowners find vessel sink installation a rewarding and quick DIY project that instantly upgrades a bathroom’s look.
4. What is the problem with vessel sinks?
The biggest issues people face when they install a vessel sink usually come from poor planning or measurement errors. Common problems include splashing from a new faucet that’s too tall or misaligned, leaks from using too little silicone, or wobble if the top of the vanity isn’t perfectly flat. When installing a vessel sink, always dry-fit everything first to check spout reach, water stream, and bowl stability. Choosing the right drain type (with or without overflow) also matters. Another issue is comfort—if the height of your new vanity plus the bowl is too tall, it can feel awkward to use. The fix is simple: lower the vanity or pick a shallower bowl. With careful measuring, good sealant, and stable mounting, vessel sink installation problems are easy to avoid.
5. Do you glue down a vessel sink?
You don’t use wood glue to install a vessel sink—you secure it with a flexible silicone caulk that acts as both an adhesive and a watertight seal. During vessel sink installation, run a continuous bead of silicone around the underside of the sink base and the drain opening on the top of the vanity. Then press the bowl gently into place, allowing the weight of the vessel and the drain nut to hold it firmly. When installing a vessel sink on a new vanity, use neutral-cure silicone for metal or copper sinks to prevent corrosion. Let it cure for 24 hours before testing. The right sealant and proper curing time ensure your vessel stays stable, leak-free, and perfectly aligned with your new faucet—maintaining both beauty and durability for years.


Leave a comment
This site is protected by hCaptcha and the hCaptcha Privacy Policy and Terms of Service apply.