


The process of beginning a home improvement project brings significant satisfaction to homeowners. This guide provides a step-by-step process for wall mount sink installation. This guide will provide you with the necessary skills and confidence to complete the installation yourself.
The following guide provides step-by-step instructions for wall sink installation that will help beginners and experienced DIYers achieve professional results. You will discover how to transform your bathroom while developing a sense of accomplishment from your accomplishments.
What is Wall Mount Sink?
A wall-mounted sink is a bathroom fixture that saves space. It is fixed on the wall unlike the traditional sinks. It is thus suitable for both small and large bathrooms and gives a modern look.
These sinks are known for their design. They have mounting brackets that hold them tight to the wall. This design makes them look sleek and clean.
The wall-mounted sink features adjustable height settings. The design makes it suitable for users with disabilities. The sink design offers easy cleaning because it lacks typical nooks and crannies.
The installation of a bathroom sink wall mount in your home provides both aesthetic benefits and functional advantages. The design works particularly well in small bathrooms because it creates an illusion of expanded space.
Why Choose a Wall Mount Sink?
Wall-mount sinks have become more popular because of their numerous advantages. Wall mount sinks help maximize bathroom space while improving accessibility. These features fit well with today's modern living.
Space Optimization
Wall hung sinks are great for saving space. The washer sink is attached to the wall and this frees up floor space. This is especially helpful in small bathrooms.
Modern Aesthetic
Wall mounting sinks create a contemporary appearance in bathroom spaces. The sinks feature modern designs with smooth lines and a contemporary aesthetic. These sinks match various design styles which include modern and minimalist aesthetics.
Customizable Height
Wall mount sinks offer the advantage of height adjustment which makes them one of the best options. The installation allows you to customize the height according to your specific requirements. The adjustable height feature makes these sinks suitable for users of all ages including children and people with mobility challenges.
Accessibility
Wall mounting sinks are also great for accessibility. They are adjustable in height and have open space which makes them wheelchair friendly. Wall mounting bathroom sink is a good choice for bathroom usability for all users.

How to Attach a Sink in 6 Easy Steps
A floating sink installation for your bathroom can be completed within a weekend. The guide of sink installation instructions will walk you through it step by step. This guide will show you how to properly install your new sink while ensuring safety and functionality. Your bathroom will get a great look from a wall mounted sink installation.
Tools & Materials You’ll Need
First, get these tools and materials ready for your diy sink installation:
Pencil
Measuring tape
Level
Drill with masonry bit
Screwdriver
Wall hung sink bracket
Toggle bolts
Wrench
Silicone sealant
Step 1: Mark the Wall for Mounting
Begin by selecting the mounting location for your sink installation. Use a pencil and tape to mark the sink's height. The standard height is 30-34 inches from the floor. Check that the marks are straight using a level tool. The correct placement of the sink is essential for a proper wall mounted sink installation guide.
Step 2: Find the Wall Studs and Drill Pilot Holes
The installation requires proper identification of wall studs for support purposes. A stud finder will help you locate the studs which you should mark for future reference. Drill holes for the wall mount sink bracket or wall hung sink mounting bracket. The mounting holes need to be properly aligned to achieve a secure installation.
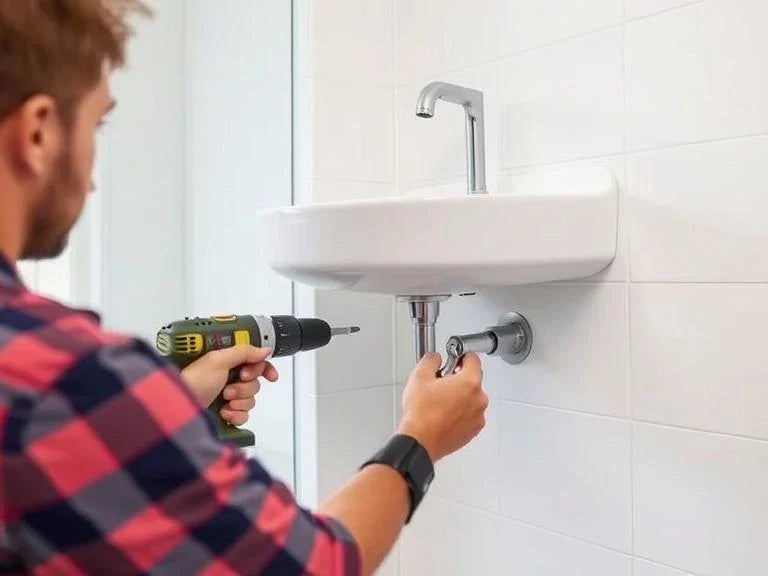
Step 3: Install the Wall Mount Sink Bracket
Next, install the wall mount sink bracket. Place it over the holes and screw it in with the bracket's screws and toggle bolts. Check that it's straight before tightening the screws. A strong mount is crucial for the sink's weight and safety.
The wall mount sink installation process will result in a functional and attractive sink when you follow these steps. The following instructions will help you complete your project.
Step 4: Attach the Faucet and Drain Assembly
The installation process becomes simpler when you attach the faucet and drain assembly before wall-mounting the sink. Follow the manufacturer instructions to connect the faucet and handles and spout. Plumber’s putty or silicone sealant should be used to seal any potential leaks. Install the drain assembly into the sink basin while verifying that all gaskets and seals are properly positioned. Check that all components are secure and properly aligned before you proceed to mount the sink.
Step 5: Sink Attach to Wall Bracket
The installation process requires you to place the sink onto its wall bracket. The sink weight may require help to prevent accidents or harm to yourself or the sink. Carefully position the sink onto the bracket or mounting clips according to the design specifications. Check that the sink touches the wall properly while all components remain correctly positioned. Check the sink for levelness and stability one last time before starting plumbing connections.
Step 6: Connect Water Supply and Drain, Check for Leaks
After mounting the sink you should connect water supply lines to faucet inlets and drain pipe to your home plumbing system. Use an adjustable wrench to tighten fittings, being careful not to overtighten and risk damaging threads. Turn on the water supply slowly and check all connections for leaks. Check the drain area for any signs of leakage while running water through both the hot and cold faucets to ensure smooth flow. Your installation is complete if everything functions properly without any leaks.
Tips for Achieving the Perfect Sink Height
The selection of appropriate sink height stands as a critical factor during wall mount sink installation. The height selection determines both comfort and usability. The height needs to fulfill requirements for adults or children or follow ADA standards.
For adults
Adults should choose sinks with heights ranging between 32 and 34 inches below the floor level. The height of 32 to 34 inches provides comfortable standing space for users. A detailed wall mount sink mounting guide can help you get it right.
For children
The sink height for children should be set between 26 to 30 inches. The height range allows children to wash their hands independently without needing a stool. You may need to modify the wall mount sink mounting guide to accommodate a lower counter.
For ADA compliance
The ADA requires sinks to be installed no higher than 34 inches from the floor. The sink must provide sufficient knee space for wheelchair users. This ensures safety and ease for everyone.

Final Checks Before You Enjoy Your New Mounted Sink
After you've installed your wall mount sink, it's important to do a few final checks. This ensures your sink works perfectly and looks great. Go through each step carefully to make sure everything is just right.
Double-check all plumbing connections
When installing a wall mount sink it is essential to verify the plumbing connections at least two times. Verify that all pipes and fittings are securely tightened and there are no free ends. This step is crucial to avoid leaks and water damage.
Ensure the sink is securely mounted and level
The sink requires inspection for correct mounting security and proper level position. A level tool should be used to verify its position. The sink brackets require adjustment until the sink reaches its correct level position.
Inspect the faucet and drain for any leaks
Check the faucet and drain for leaks in the last step. Turn on the water and check for any drips. If you find any, tighten the parts and add sealant if needed.
The following steps and tips will help you extend the lifespan of your wall mount sink while maintaining its optimal functionality.
How to Choose the Right Floating Sink
The right wall-mounted sink selection will enhance both functionality and visual appeal of your bathroom space. The selection of wall mount sinks requires consideration of size and shape as well as faucet placement and cleaning convenience.
Size: 12 inch or 17 inch
When selecting between small wall hanging sinks you need to think about size. A 12-inch sink is perfect for small spaces, it offers both style and function. A 17-inch sink gives more room for daily use while still looking sleek.
Shape: Rectangular or Triangular
The sink's shape is key to your bathroom's look. Rectangular sinks are classic and spacious. Triangular sinks fit well in corners, making them perfect for small bathrooms.
Faucet Position: Left-hand VS Right-hand VS Center-mounted
Wall sink faucets need proper placement because it affects both their appearance and functionality. The placement of wall sink faucets depends on user preferences and room configurations. Center faucets create a balanced appearance which matches various design styles.
Post-Installation Considerations and Long-Term Maintenance
After successfully mounting your wall sink, there are several essential post-installation steps and maintenance practices that should not be overlooked. While the initial installation covers the core structural and plumbing tasks, the functionality, safety, and durability of the sink depend on how well it continues to be maintained and monitored over time.
Inspect the Stability and Weight Distribution
One of the most critical factors in the long-term success of a wall-mounted sink is ensuring that the mounting remains stable under weight. Even if the sink feels secure immediately after installation, it's advisable to revisit the wall fixings after a week or two of use. Vibrations from plumbing use, settling of anchor bolts, or slight misalignments during initial installation can affect how the load is distributed across the mounting brackets.
Pay particular attention to any movement when pressure is applied to the front edge of the sink. A properly installed sink should not shift or produce creaking sounds. If movement is detected, it may be necessary to re-tighten the bolts or reassess whether the anchors are fully seated into the wall studs or blocking behind the drywall.
Confirm Watertight Sealing
Silicone sealant is often applied along the rear edge where the sink meets the wall, and sometimes around the drain or faucet mount points. This sealant prevents moisture from entering the wall cavity, which can lead to mold growth or deterioration of the mounting substrate. After the first few days of use, inspect the sealant to ensure it has cured properly and hasn’t developed any gaps or bubbles.
Over time, cleaning agents or temperature fluctuations can cause silicone to break down. Reapplying fresh caulk every couple of years—or sooner if cracks appear—is a simple yet critical task that will protect the surrounding wall and maintain a hygienic environment.
Plumbing Performance and Leak Detection
Another key aspect of post-installation care involves inspecting the plumbing connections. Compression fittings or threaded joints can sometimes loosen with temperature changes or due to improper torque during installation. Run both hot and cold water through the sink and closely examine the P-trap and supply lines with a dry cloth. Any signs of condensation, dripping, or odor from the trap area should be addressed immediately.
If leaks are discovered, shut off the water and disassemble the affected connection. Check for misaligned washers, cross-threaded fittings, or debris inside the joint. Applying plumber’s tape to threaded fittings and ensuring even torque (without overtightening) can resolve most minor issues.
Wall Integrity and Moisture Management
Since wall-mount sinks are affixed directly to structural elements within the wall, monitoring the integrity of the surrounding wall is important. Signs of moisture damage, such as bubbling paint, soft drywall, or mildew smell, indicate that water may be infiltrating from behind the sink or through an improperly sealed area.
In high-humidity bathrooms, consider installing a tile or waterproof backer board behind the sink area. If drywall was used, make sure it's moisture-resistant (green board or cement board) and well-primed. Proper ventilation in the bathroom will also reduce the risk of condensation buildup around wall fixtures.
Cleaning and Material Preservation
The exposed underside of a wall-mount sink makes cleaning easier, but the materials still require routine care. For ceramic or vitreous china sinks, use a non-abrasive cleaner to avoid dulling the glaze. Avoid harsh acidic products, especially near caulked seams. For models with chrome or stainless steel plumbing components, wiping them down regularly will prevent corrosion or mineral buildup.
If the sink incorporates a pop-up drain or overflow system, flush the components monthly to prevent clogging. Mineral-rich water can leave deposits inside traps and fittings, so descaling with vinegar or a mild descaling solution may be necessary in hard water regions.
Rechecking Hardware and Fasteners
Finally, inspect the sink’s fasteners and brackets every six months. Even minor loosening of screws can result in increased strain on the mounting system, especially in high-traffic bathrooms. Keeping a record of your installation layout, including stud locations and bracket types used, will help streamline any future maintenance or repairs.

FAQ
1. What tools and materials do I need to install a wall mount sink?
To install a wall mount sink properly, you’ll need several essential tools and materials to ensure a secure and professional result:
- Sink bracket: This is the main support that holds the sink against the wall.
- Screws and anchors: Heavy-duty screws designed to hold the bracket firmly. Depending on your wall type (drywall, tile, concrete), you may also need wall anchors or masonry plugs.
- Drill and drill bits: For making pilot holes in the wall where screws will go.
- Level: To make sure the sink is mounted perfectly horizontal.
- Stud finder: To locate the wooden studs behind the drywall, which provide the strongest support.
- Measuring tape: For precise measurements to ensure correct placement and height.
- Wrench or adjustable spanner: For tightening plumbing connections.
- Plumber’s tape (Teflon tape): To seal threaded plumbing joints and prevent leaks.
- Optional materials: Depending on your wall construction, you may also need blocking material (wood blocks) installed behind the drywall for extra reinforcement, especially if studs are spaced widely.
Tip: Before starting, gather all your tools and materials. Double-check that you have the correct sink bracket and mounting hardware suitable for your sink’s weight and wall type. Having everything ready will help the installation go smoothly.
2. How do I find the wall studs for my wall mount sink?
Locating the studs correctly is crucial since they provide the main support for the sink:
- Use a stud finder: This handheld device detects the edges or centers of wooden studs behind your drywall.
- Scan the wall slowly: Move the stud finder horizontally across the wall where you want to mount the sink until it signals the location of a stud.
- Mark the stud locations: Use a pencil to lightly mark the wall at the stud centers.
- Double-check spacing: Studs are typically spaced 16 or 24 inches apart, so mark multiple points to find a good mounting spot.
- Drill pilot holes: Mark exactly where you’ll attach the bracket and drill small pilot holes into the studs to ensure secure screw insertion.
Tip: Avoid mounting the sink on drywall alone; always anchor into a stud or install a backing board/block for safety and durability.
3. What is the ideal height to mount a wall sink?
The height of your wall mount sink depends on who will be using it and any applicable standards:
- Standard adult height: 34 to 36 inches (86 to 91 cm) from the finished floor to the top rim of the sink. This is ergonomically comfortable for most adults.
- Children’s height: Around 30 inches (76 cm) to make it accessible and safe for young kids.
- ADA (Americans with Disabilities Act) compliance: The sink height should be no more than 34 inches (86 cm) for wheelchair accessibility and usability.
- Consider faucet height: Ensure that the faucet and plumbing fixtures also fit comfortably with the sink height.
Tip: If you have multiple users, you can choose a height that balances comfort or install sinks at multiple heights.
4. How do I ensure the sink is level during installation?
Ensuring your sink is level is vital for both aesthetics and function:
- Attach the mounting bracket first: Secure the bracket on the wall according to the marked stud locations.
- Use a bubble or laser level: Place the level on top of the bracket or sink edge to check for horizontal alignment.
- Adjust bracket position if needed: Slightly move or shim the bracket until the level shows it is perfectly horizontal.
- Tighten screws securely: Once level, firmly secure the bracket with screws so it won’t shift.
- Mount the sink onto the bracket: Double-check the sink itself with the level once installed.
- Final adjustments: If the sink allows for any fine-tuning (e.g., adjustable mounting clips), make those adjustments now.
Tip: Having a second pair of hands to hold the sink during leveling can make the process easier and safer.
5. Are wall mount sinks suitable for small bathrooms?
Yes, wall mount sinks are often an excellent choice for small bathrooms due to their space-saving design:
- Space efficiency: Because they don’t have a pedestal or vanity beneath, wall mount sinks free up floor space, making the bathroom feel larger and less cluttered.
- Modern aesthetic: They provide a clean, streamlined look which can visually open up tight spaces.
- Accessibility: Easier for wheelchair access or for cleaning underneath.
- Variety of sizes and styles: Wall mount sinks come in compact designs perfect for powder rooms, guest baths, or small residential bathrooms.
Tip: Pair your wall mount sink with a wall-mounted faucet or mirror with built-in storage to maximize space usage even further.


Leave a comment
This site is protected by hCaptcha and the hCaptcha Privacy Policy and Terms of Service apply.