


Are you tired of looking at a scratched, dated, or stained bathroom sink? Sink paint offers a surprisingly simple fix—giving your old sink a stunning new look and saving you hundreds of dollars compared to replacement or professional refinishing. This guide shows you exactly how to transform your sink, based on DIY best practices, long-term results, and real user data.
Ready to give your bathroom or kitchen sink a much-needed facelift? Here’s your step-by-step path to a smooth, long-lasting finish.
What Is Sink Paint?
Sink paint usually refers to special epoxy-based or acrylic paints designed to stick to hard surfaces like porcelain, ceramic, or enamel. Many people use a tub and tile refinishing kit that works for sinks, tubs, and bathroom counters. These paints form a hard, waterproof layer that lasts years—making them perfect for a quick, affordable upgrade.
Can You Paint Your Sink? Material Suitability, Pros & Cons
Can you paint a sink? Whether you're aiming for a budget-friendly upgrade or testing out bathroom sink paint for the first time, it’s essential to consider your sink’s material and condition before reaching for the brush.
Material Suitability
Here’s a breakdown of how different sink materials respond to paint for sink surfaces:
Porcelain: One of the best surfaces to paint. With proper prep and curing, porcelain sink paint adheres beautifully and lasts for years. Just make sure to clean thoroughly and follow curing times.
Enameled or Ceramic: These sinks also work well with epoxy or specialized tub-and-tile paints. They're ideal for those wanting to refresh older bathrooms without replacing fixtures.
Stainless Steel: Painting metal sinks is possible but requires special primers designed for metal surfaces. Without the right base, the paint may chip or peel.
Acrylic or Composite: These vary in how well they take paint. Always check paint compatibility first—some may need sanding, etching, or a bonding primer for best results.
Solid Surface: These sinks generally respond well to sanding before painting. While adhesion is decent, results improve with a little extra prep work.
In short, you can paint a sink—but results depend on the material and how well you follow each step. And while a charming sink clipart can inspire your DIY vision, real-world results require real preparation.
If you're working with a bathroom sink and want long-lasting, professional-looking results, choosing the right paint for sink materials—especially for challenging surfaces—is key.
Here’s a simple chart to help you decide:
| Sink Material | Paint Compatibility | Notes/Limitations |
|---|---|---|
| Porcelain | Excellent | Needs thorough prep and proper curing |
| Enameled/Ceramic | Very Good | Use epoxy or specialty tub/tile paint |
| Stainless Steel | Moderate | Use specialty primers/paints for metal |
| Acrylic/Composite | Variable | Needs compatibility check; may need special prep |
| Solid Surface | Good | Sanding improves adhesion |
Pros of painting a sink:
- Saves money (often under $100 for supplies)
- Updates the look fast—without replacing counters, plumbing, or fixtures
- Hides stains, chips, and faded finishes
Cons:
- Not a fix for structural damage (deep cracks, leaks)
- Finish may chip under very heavy use or poor prep
- Limited color options compared to factory glazing
Quick checklist: Is your sink a good candidate for sink paint?
- No deep cracks or major leaks
- Surface can be cleaned and sanded
- Project is for cosmetic improvement, not fixing structural flaws
- Willing to wait 2-3 days (total) for cure time
If you match all these points, your sink is ready for a new look.

Sink Paint: Quick Facts You Should Know
Before you commit to painting your sink, it helps to understand the basic facts—especially if you're deciding between a DIY project and hiring a professional. The good news? Sink paint projects are typically affordable and rewarding, as long as you follow proper steps.
Expect to spend between $30 and $80 on DIY materials, including epoxy or tub-and-tile paint kits, brushes, tape, and prep supplies. In contrast, hiring a professional for sink refinishing can run between $220 and $500, depending on your location and sink size. That’s a significant cost difference, especially if you're updating multiple fixtures.
When done correctly, a painted sink can last 2 to 5 years—sometimes even up to 7 years with gentle use and proper maintenance. The most common reason for premature wear is poor preparation: skipping sanding, leaving behind residue, or using the sink before the paint has fully cured (which takes 48 to 72 hours). Rushing the process is the number one cause of peeling or flaking.
As for product choice, epoxy and tub-and-tile kits consistently perform best in durability tests. These formulas are engineered to withstand daily water exposure and soap residue, making them ideal for both bathroom and kitchen sinks.
Whether you're working on a tight budget or simply love DIY upgrades, sink paint offers a cost-effective way to refresh your space—just be sure to give it the care and curing time it needs to last.
| Feature | Details |
| DIY materials | $30–$80 |
| Professional job | $220–$500 |
| Typical lifespan | 2–5 years, up to 7 with care |
| Full cure time | 48–72 hours |
| Common issues | Peeling (poor prep/skipped cure) |
| Best paint | Epoxy or tub-and-tile kits |
Tools and Supplies Checklist
Here’s everything you need for a sink painting project:
- Two-part epoxy or tub-and-tile paint kit
- High-quality synthetic brush and/or small roller with fine nap
- Fine sandpaper (220–320 grit)
- Painter’s tape
- Plastic sheeting or drop cloths
- TSP substitute or degreasing cleaner
- Disposable gloves and N95 mask (for fumes from epoxy paint)
- Tack cloth or damp lint-free rag
- Surface primer (for stainless or acrylic sinks, as instructed)
- Soft sponge, bucket, regular spray cleaner
Tip: Print or save this list before heading to the store, so you don’t miss anything.
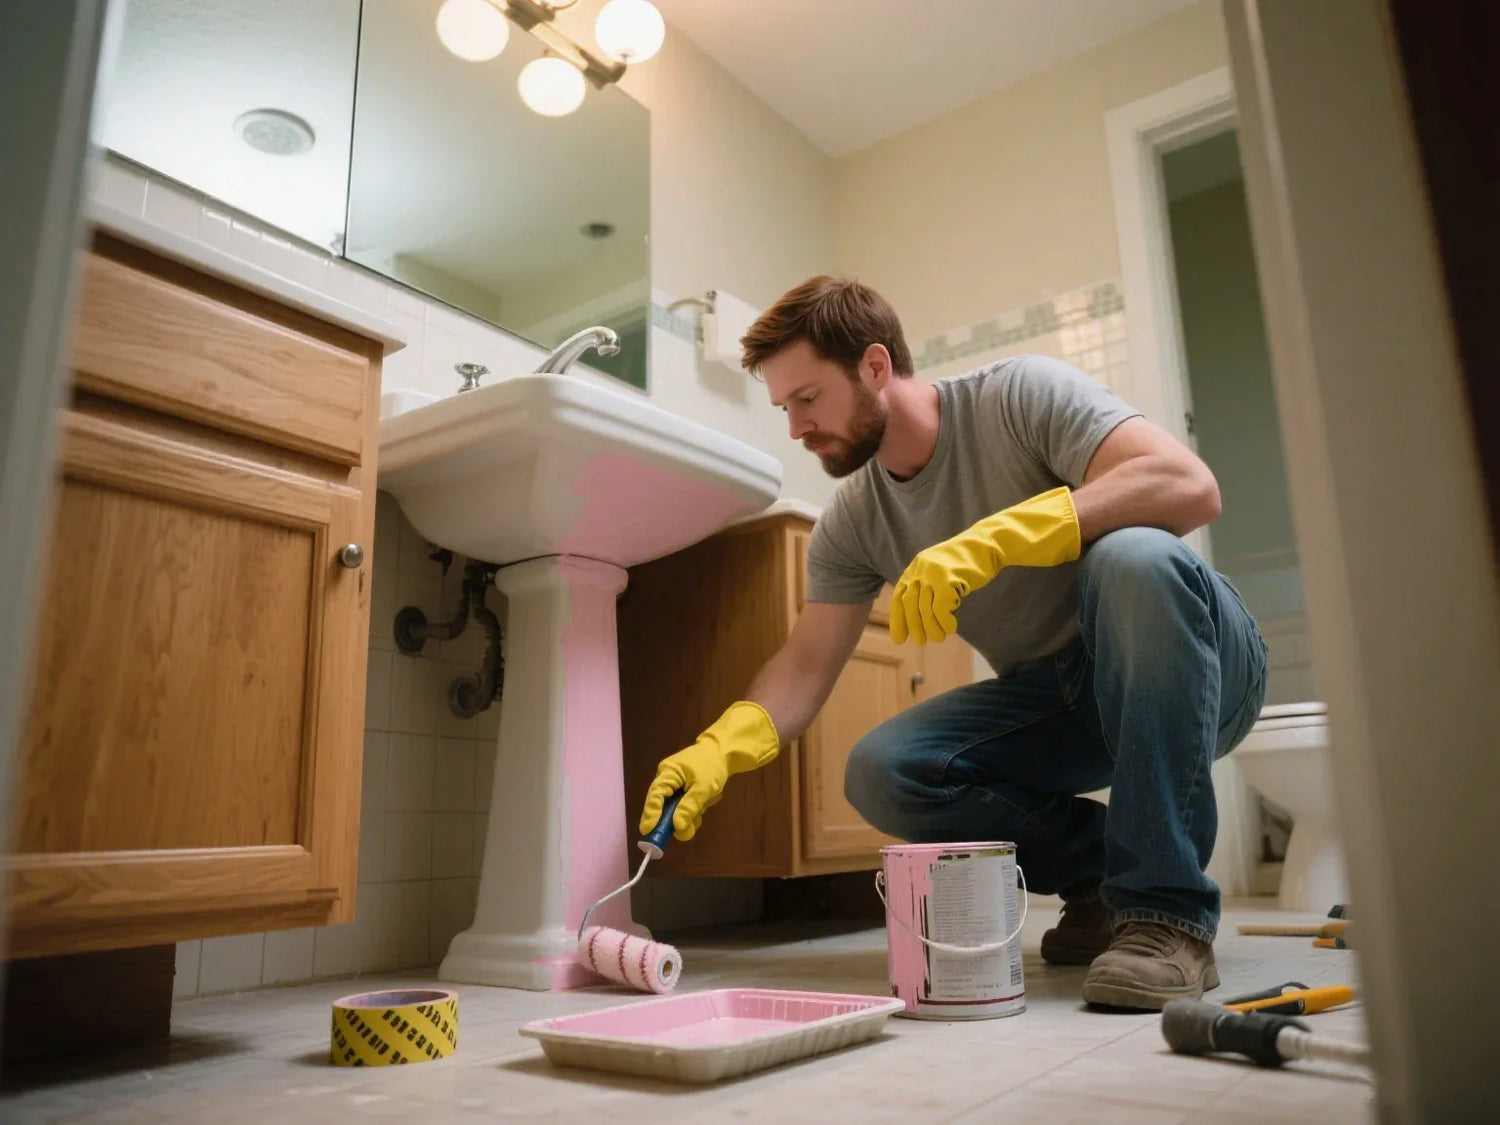
Step-by-Step: How to Paint Any Sink
Painting your sink isn’t hard, but you must follow each step for best results. Skipping prep or rushing can mean bubbles, peeling, or a short-lived finish. Using how to repaint bathroom sink techniques as a practical example, we’ll walk you through every stage—from preparation to final curing—so your sink makeover looks smooth, durable, and professionally done.
A. Prep Work (Critical for Success!)
- Clean the sink using regular spray cleaner, then a degreasing agent. Rinse very well and dry completely.
- Sand the sink. Use fine-grit sandpaper (220–320) to make the surface rough enough for paint to adhere. Don’t skip corners, curves, or the area around your sink drain. Wipe away dust with a tack cloth or a damp rag.
- Protect faucets and counters with painter’s tape and plastic. Tape off the drain, faucet, and any surfaces you don’t want to paint.

B. Priming (If Needed)
- Most porcelain or ceramic sinks do not need primer when using an epoxy tub and tile kit.
- For stainless steel, acrylic, or other tricky materials, a specialty primer helps the paint adhere better. Check your product instructions.
- Let primer dry fully before moving on.
C. Choosing the Right Paint
The type of paint you pick matters a lot:
| Paint Type | Durability | Where to Use | Dry Time | Cure Time | Notes |
| Epoxy | 2–7 years | Bathrooms & kitchens | 2–4 hrs | 48–72 hrs | Hardest, most water-resistant |
| Acrylic | 1–3 years | Guest/toilet rooms | 1 hr | 24 hrs | Easiest to apply, but softer |
| Specialty (tub & sink paints) | 2–5 years | Porcelain, tile, ceramic | 2–4 hrs | 48–72 hrs | Designed for wet, hard surfaces |
Do not use wall, furniture, or regular spray paint—they won’t last against water.
Extra tip: The U.S. Environmental Protection Agency (EPA) warns that many household paints—especially those containing solvents—release volatile organic compounds (VOCs), which can cause respiratory irritation and other health effects during indoor use. Epoxy paints emit strong fumes due to their chemical composition. Always work in a well-ventilated area, wear an N95 mask, and consider using a fan or open windows during and after application.
D. Application: Applying Sink Paint
- Mix the paint exactly as the kit instructions say. Only mix what you can use in one session.
- Apply paint in thin, even coats with a high-quality brush or roller. Start at the edges and work inward for a smooth surface.
- Wait 2–4 hours between coats. Most sinks need two to four coats for full coverage.
- Look for drips or bubbles as you go. Smooth them out right away with your brush.
E. Finishing Touches
- Check for any missed spots before the last coat dries—touch up with a small brush.
- Carefully pull off all tape while the last coat is still tacky.
- Clean your tools right away.
F. Curing
No shortcuts here! Do not use your newly painted sink for at least 48 to 72 hours after the last coat. Even if it feels dry to touch, water can spoil the bond. This step gives you the long-lasting finish you want.
Application Table
| Step | Tools Needed | Time Needed |
| Clean & Sand | Sponge, sandpaper, tack cloth | 30–45 minutes |
| Tape & Protect | Painter’s tape, sheeting | 10–15 minutes |
| Prime (if needed) | Primer, brush/roller | 20–30 minutes |
| Mix Paint | Paint kit, stick | 5 minutes |
| First Coat | Brush/roller | 15–20 minutes |
| Time Between Coats | None (wait to dry) | 2–4 hours |
| Final Coat | Brush/roller | 15–20 minutes |
| Cure Time | None (wait to use sink) | 48–72 hours |
Don’t rush drying or apply paint too thick—you want even, thin coats.
Common Pitfalls & Advanced Tips
Most frequent mistakes:
- Not cleaning fully—leaving soap, hair, or grease behind
- Skipping or poorly done sanding—paint flakes or peels later
- Using the sink before full cure—soft paint chips, gets scratched or peeled
Pro tips:
- For high-use kitchen sinks, spend extra time on cleaning and sanding.
- Use a clear topcoat after the last layer for extra protection (if compatible with your paint).
- If you’re sensitive to paint fumes, open windows and set up a fan during painting and for the next day.

Aftercare: Keeping Your Painted Sink Like New
You want your painted sink to last as long as possible, right? Here’s how to make it last:
- Avoid abrasive cleaners (no steel wool or magic erasers). Use soft sponges and gentle liquid soap.
- Never drop heavy or sharp items into the sink.
- Wipe out toothpaste, hair dye, or sticky messes quickly.
- Touch up chips or scuffs as soon as you spot them—most kits let you lightly sand and repaint problem areas.
With normal use and care, your newly finished product can look great for 2–5 years. Some users report a painted porcelain sink still looking good after 7 years!
Real-World Results & Case Studies
Need proof that painting your sink works? Here are some actual results:
- DIY homeowner: Painted a bathroom sink with a tub-and-tile kit. Seven months later, still looked “like new”; after a full year, only minor marks in high-use spots.
- Two-year mark: Epoxy-painted sinks hold up well, especially if nobody used abrasive cleaners. Most “failures” were caused by skipping cleaning or using the sink before the paint cured.
- Cost savings: Most people spent $30–$80 on materials. Professional refinishing often costs $220–$500, and a replacement sink plus labor can top $1,000.
Research, Data & Insights
- More than 80% of reviewers were satisfied with their painted sink at 1 year.
- About 35% of DIYers repainted sinks as a budget bathroom update in the last two years.
- 75%+ say the main reason was cost—saving $350–$950 over new installation.
- Most failed paint jobs had issues with skipped prep or ignoring the full curing time.

Conclusion & Your Next Steps
Painting a bathroom or kitchen sink with epoxy or specialty tile paint is a weekend project that makes a huge impact—without straining your wallet. With proper cleaning, sanding, and patience during drying and curing, you’ll enjoy a sink that looks brand new for years.
Why not give your bathroom countertop sink or kitchen sink a fresh coat of paint this weekend? Gather your tools, follow each step, and see how a simple DIY project can transform your bathroom, boost your home’s look, and make your family smile every time they wash their hands!
Have more questions, or want to share a before-and-after photo of your finished product? Join the conversation and help others turn their old sinks into something beautiful.
FAQs
1. What kind of paint do you use on a sink?
When choosing a paint for your sink, the best choice is a two-component epoxy paint or a special bathtub and tile refinishing kit designed for sinks, tubs and similar hard surfaces. These products are specially developed for porcelain, ceramic and enamel. Once brushed onto the sink, they are waterproof and will last a long time without losing paint or cracking. Daily bumps and bruises are not afraid. Ordinary spray paint, wall paint used on the sink, long-term contact with water will be scrapped in a few days. They are not as strong and durable as epoxy and specialty paints. If the sink is made of stainless steel or acrylic, it is also necessary to paint it with a special primer in advance. Strictly in accordance with the product instructions, leave enough curing time, painted sink value is comparable to new. It is guaranteed to give your kitchen and bathroom a new look!
2. Do painted sinks last?
With proper pre-treatment and maintenance, a painted sink can last two to five years without any problems. The key to its durability is solid preparation - before painting, the sink must be carefully cleaned and then sanded down to a rough surface so that the paint will fit snugly into the sink and not peel off easily. Choosing the right material is also crucial. A high-quality epoxy paint or professional repair kit can coat the sink in a protective armor. But let's be honest, if the sink is used a lot, such as a kitchen sink where you wash pots and pans every day, or a bathroom sink where you wash up every day, it's bound to wear out faster. You'll have to touch up the paint every once in a while, or the appearance will be very unattractive. You also have to be careful with daily use. Never use cleaners that contain abrasive particles, and don't scrub hard, which can wear down the surface of the sink. With the right choice of materials, the right method of operation, and a lot of attention, painting the sink is definitely a cost-effective option, which can easily keep the kitchen and bathroom at home in good condition! This way, the sink can last longer.
3. Can I paint over my sink?
Yes, as long as the sink is structurally sound and well-prepared, it can be repainted. This means that the surface of the sink should be free of deep cracks, severe rust or other serious damage that could damage the surface. Before painting, be sure to clean the sink thoroughly to remove dirt, grease and soap residue, then lightly sand the surface to give it a rough texture for better paint adhesion. Using the right refinishing tool (usually an epoxy or bathtub tile coating designed for sinks) will ensure a long-lasting surface. However, if your sink has structural issues, such as deep cracks or rust spots, they should be professionally repaired or replaced before painting to avoid paint peeling and further damage. Adequate preparation and evaluation are key steps to successfully completing a sink repainting.
4. Can you paint ceramic sinks?
Yes, ceramic sinks are great for painting and epoxy or specialized tile coatings work extremely well. Like porcelain, ceramic surfaces are smooth and non-porous, which means that thorough cleaning and sanding is essential to ensure good paint adhesion. First, remove dirt, grease and any old coatings, then lightly sand to create a slightly rougher texture, which will allow the paint to bond firmly. Using a high-quality epoxy or bathtub tile refinishing kit designed for wet and hard surfaces will create a long-lasting, waterproof finish that will keep your ceramic sink looking new for years. With adequate preparation and the right materials, painting your ceramic sink is a practical and cost-effective way to update your bathroom or kitchen without having to completely replace it.
5. How can I update a bathroom sink without replacing it?
If you're looking to refurbish your bathroom sink and don't want to spend a large amount of money and effort replacing it, then painting is an affordable and practical solution. Painting a sink is an easy DIY project that can give your bathroom a new look in just one weekend. The process involves thoroughly cleaning the sink to remove any dirt or soap scum; sanding the surface to ensure the paint adheres firmly; and carefully taping the surrounding area to protect the fixtures and countertop. Using a high-quality epoxy or bathtub tile coating designed specifically for sinks, you can apply a thin, even coat and allow enough curing time for a long-lasting, glossy finish. This simple remodel not only saves money, but also reduces waste by extending the life of your existing sink while giving your bathroom a fresh new look.
References:
U.S. Environmental Protection Agency (EPA). "Volatile Organic Compounds' Impact on Indoor Air Quality." https://www.epa.gov/indoor-air-quality-iaq/volatile-organic-compounds-impact-indoor-air-quality


Leave a comment
This site is protected by hCaptcha and the hCaptcha Privacy Policy and Terms of Service apply.