


A drop-in sink is the fastest way to refresh a kitchen or bathroom with minimal disruption. If you need simple installation, a friendly price, and broad countertop compatibility, a top-mount sink (another name for drop-in) checks every box. This guide focuses on what actually matters when you’re about to buy or replace: quick specs, how to pick the right material and size, step-by-step installation with sealing best practices, common mistakes to avoid, total cost, and real-world lessons from both DIYers and pros. We’ll also look at features to compare across brands without the sales fluff, plus care tips, trends, and standards to know. You’ll finish with printable checklists and a quick action plan so you can shop, install, and maintain with confidence.
What is Drop In Sink?
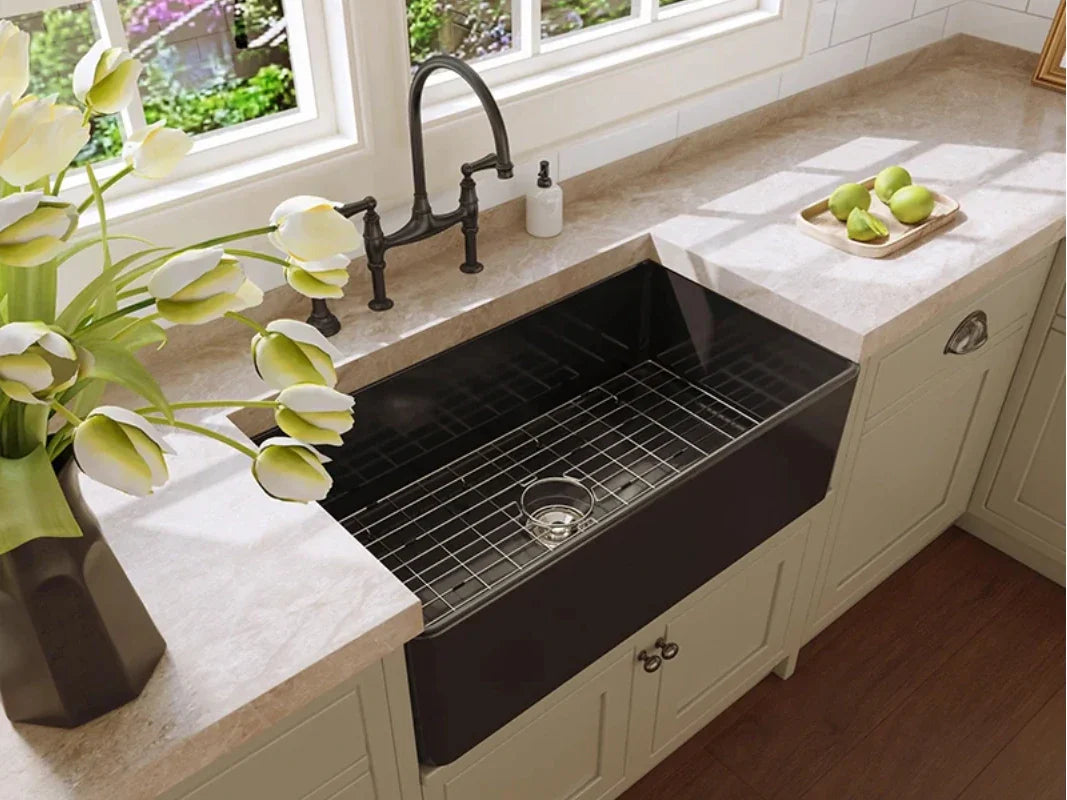
A drop-in sink has a rim or lip that rests on top of the countertop. The sink “drops” into a cut-out, and mounting clips secure it from below. The rim supports the weight and forms a seal with caulk (usually 100% neutral-cure silicone). Because the rim sits on top, a drop in sink kitchen installation works with almost any countertop—including laminate, quartz, granite, and tile. This is why they’re a favorite for DIY replacements and quick remodels in both the kitchen and bathroom.
In short, if you want a sink that’s easy to fit and easy to seal, a drop-in sink is a smart, low-stress choice.
Are drop-in sinks outdated?
No. Modern drop-in sink designs offer clean lines, slim rims, and new finishes. Many now include workstation features like cutting boards, grids, and colanders that slide on built-in ledges. Sound-dampening pads and undercoatings cut noise. Industry estimates show drop-in still accounts for a large share of DIY replacements, often over 40% in North America. In short, the style is classic, the tech is current, and the value is strong.
Quick Specs of Drop In Sink : Common Sizes, Depths, Faucet holes
Most drop in kitchen sink sizes fall into a few standard footprints that match common base cabinets. Depths and faucet hole counts vary by model.
- Typical widths include 25", 33", and 36".
- Standard front-to-back depth is about 22".
- Bowl depth varies (often 8–10" for kitchens; shallower for ADA).
- The number of faucet holes ranges from 1 to 5 to fit a single-handle faucet, side sprayer, soap dispenser, or filtered water tap.
Essential parts you’ll work with include the rim, the countertop cut-out, the under-counter clips, the faucet deck (if present), and the drain opening.
| Specification | Options / Details |
|---|---|
| Width (inches) | 25, 33, 36 |
| Front-to-back depth (inches) | ~22 (most models) |
| Bowl depth (inches) | 7–10 (standard kitchen); 5–6 (ADA-friendly) |
| Faucet holes | 1–5 (confirm spacing and accessories) |
Top Mount Sink vs Drop In Sink
When choosing a kitchen sink, it’s important to understand the difference between a top mount sink and a drop in sink. Both types sit on top of the countertop, making installation relatively easy, but there are subtle distinctions that can affect appearance and functionality.
Top Mount Sink
A top mount sink, sometimes called a self-rimming sink, has a visible rim that rests on the countertop surface. This traditional design is easy to install, generally more affordable, and compatible with most countertop materials, including laminate and solid surfaces. The downside is that the rim can trap crumbs and water, requiring occasional cleaning around the edges.
Drop-In Sink
A drop-in sink is very similar in concept, as it is also “dropped in” from above into a pre-cut hole. It is typically secured with clips or caulking and can vary slightly in rim design, sometimes making it easier to wipe down if the rim is narrow and flush. Drop-in sinks are DIY-friendly and budget-friendly, but the rim can still be visually noticeable and collect debris.

Choosing Between the Two
In short, both top mount and drop-in sinks offer simple installation and classic style, making them popular for many kitchens. If you want a sleek, modern look with seamless edges, an undermount sink might be a better choice, as it sits below the countertop for a cleaner appearance.
How to Choose: Materials, Layouts, and Fit
When picking the right material, size, and layout, consider how your sink looks, feels, and lasts. Use this section as your quick guide on how to pick a kitchen sink that matches your home and your daily routine.
Material comparison: stainless steel, composite granite, porcelain-enameled cast iron
Each material brings a different style, feel, and care routine. The most popular option is stainless steel, but composite granite and porcelain-enameled cast iron are strong contenders.
Material comparison (pros, care, cost range)
Stainless steel
- Pros: Light weight, wide size range, budget-friendly to premium options, easy for DIY, modern look.
- What to check: Gauge (16–18 gauge is thicker and quieter), sound-dampening pads, satin/brushed finish.
- Care: Rinse and wipe daily; use bar keepers-style cleaner for marks; avoid steel wool.
- Typical price: $100–$700+ depending on gauge and features.
Composite granite (granite/stone composite)
- Pros: Colorfast, matte look, good scratch resistance, quieter than thin steel.
- What to check: Heat tolerance, UV resistance (color fade), compatible cleaners.
- Care: Non-abrasive cleaners; scrub gently with a soft pad; use a composite-safe paFste for stains.
- Typical price: $200–$800+ depending on size and features.
Porcelain-enameled cast iron
- Pros: Glossy, classic look; very sturdy; long wear if well cared for.
- What to check: Weight (very heavy); confirm cabinet and counter support; protect enamel from chips.
- Care: Mild cleaners; avoid harsh abrasives; use a grid to prevent chipping.
- Typical price: $300–$1,200+ depending on finish and size.
Tip: If you have hard water, all materials benefit from routine drying to prevent mineral spots. A basin grid helps any sink avoid scratches and chips from cookware.

Bowl configuration and depth: single vs double, workstation features, ADA
A single bowl gives you one large space that fits sheet pans and stock pots. A double bowl splits tasks like washing and rinsing or separating prep from cleanup. If you cook often and handle large cookware, a single bowl often feels more open and efficient.
Workstation sinks add ledges for accessories like cutting boards, drying racks, colanders, and grids. If counter space is tight, a workstation can let you prep right over the bowl.
For ADA needs, look for shallow bowl depth (around 5–6"), open space below the sink for knee clearance, and reachable faucet controls. Always check local code and ADA guidance if accessibility is a goal.
Measure your cutout and counter: laminate, quartz, granite, tile
Good fit starts with careful measuring. Confirm the base cabinet width (often 30", 33", or 36" for kitchens). Measure the existing cut-out in your counter. Check the planned faucet hole count and spacing to match your faucet and any accessories. If you’re changing from a 3-hole to a 1-hole faucet (or vice versa), you may need a deck plate or new holes.
Countertop tips by material:
- Laminate: Seal all edges of the cut-out well. Laminate swells if water gets past the rim. A solid bead of neutral-cure silicone is key.
- Quartz and granite: Dry fit and mark your clip locations. Use existing anchor points or the supplied brackets. Avoid over-tightening.
- Tile: Check for lippage and plan for an even, continuous seal. You may need to level the rim line with a thin bead of silicone.
What size drop-in sink do I need?
Use this quick checklist:
- Base cabinet width: Most 33" sinks fit a 36" cabinet; many 25" sinks fit a 30" cabinet. Confirm your cabinet’s inner width.
- Existing cut-out: Measure width and front-to-back. Match or slightly adjust to the new sink template.
- Counter depth and faucet plan: Standard counter depth is around 25". Confirm faucet hole count, spacing, and clearance to the backsplash.
- Bowl depth and clearance: Check disposal and trap clearance in the cabinet. For ADA, aim for shallower bowls and reachable controls.
- Mounting clips access: Make sure you have space under the counter to tighten clips.

Best Drop-in Sink Options (2025): Feature Comparison Without the Hype
You don’t need brand names to make a smart choice. Focus on the features that affect daily use, install speed, noise, care, and long-term durability.
Side-by-side comparison: features, price, warranty, standout tech
Entry/budget
- Typical material: thinner stainless steel or economy composite
- Sound control: minimal pads/coating
- Accessories: basic strainer
- Faucet holes: 1–3
- Price range: lower
- Warranty: shorter limited warranty
Mid-range
- Typical material: 18-gauge stainless or solid composite
- Sound control: pads + undercoating
- Accessories: grid and drain kit; optional cutting board
- Faucet holes: 1–5
- Price range: mid
- Warranty: multi-year to limited lifetime
Workstation
- Typical material: thicker stainless or premium composite
- Sound control: full pads + thick undercoating
- Accessories: cutting board, colander, roll mat, bottom grid
- Faucet holes: often 1 (deckless faucets) or multi-hole with accessories
- Price range: mid to high
- Warranty: longer, often limited lifetime
ADA-friendly
- Typical material: stainless, porcelain-enameled cast iron, or composite
- Sound control: varies
- Accessories: optional; focus on shallow depth and clearance
- Faucet holes: 1–3 with reachable controls
- Price range: mid to high
- Warranty: standard to limited lifetime
Porcelain-enameled cast iron
- Typical material: cast iron with glossy enamel
- Sound control: inherently quiet
- Accessories: grid recommended
- Faucet holes: 1–5
- Price range: mid to premium
- Warranty: longer finish warranties more common
Look for clear spec sheets with materials, thickness/gauge, sound-dampening, finish type, included accessories, warranty length, and install manuals.
What different makers do well (without naming names)
Some makers focus on extra sound-deadening pads and thick undercoatings. Others polish the finish better so fine scratches blend in. Some bundle full workstation kits that save you the cost of buying accessories later. Others focus on lighter sinks that are easier to handle in a DIY installation. Decide which value matters most—silence, accessories, easier install, or premium finish.

Sustainability signals and recycled content
If you care about impact, check for:
- Recycled content in stainless steel (often listed as a percentage).
- Low-VOC manufacturing or coatings.
- Certifications for material safety or performance.
- Regional manufacturing to reduce shipping footprint.
These details may appear in spec sheets, sustainability reports, or certifying organization listings.
Where to verify reviews and specs
- Manufacturer product pages and install manuals for exact dimensions, cut-out templates, and mounting instructions.
- Certification databases (UPC/IAPMO, NSF/ANSI) to confirm listed compliance.
- Your local plumbing code portal for trap, vent, and air gap rules if relevant.
- Independent review platforms and homeowner forums for long-term feedback.
- Google Scholar for material performance papers (cleaning, corrosion, abrasion).
Installation: Step-by-Step (DIY and Pro Tips)
Most replacements take about 60–90 minutes if the cut-out size already fits. Add time if you’re changing the faucet, moving the drain, or widening the cut.
Prep checklist: tools, shutoffs, safety, time estimate
Tools and materials
- Tape measure, marker, square
- Jigsaw and drill (only if widening/adding holes)
- Screwdriver or nut driver for clips
- Putty knife and plastic scraper
- Clamps or a helper’s hands
- 100% neutral-cure silicone (for rim seal)
- Plumber’s putty (for the basket strainer, if allowed by your sink material)
- Teflon/plumber’s tape for threaded connections
- Bucket, towels, sponge
- PPE: safety glasses, cut-resistant gloves, hearing protection if cutting
Prep steps
- Shut off hot/cold water at the angle stops.
- Disconnect supply lines and the drain. Place a bucket under the P-trap.
- Clear the base cabinet for access.
- If reusing the faucet, remove it now. If installing new, prep per instructions.
Cut, seal, and set: neutral-cure silicone vs plumber’s putty
Dry fit: Place the sink into the cut-out to confirm fit and alignment. Mark the outline and clip locations under the counter if needed.
Surface prep: Clean the countertop around the cut-out. Remove old caulk with a putty knife. Wipe dry.
Sealant choice:
- Rim to countertop: Use 100% neutral-cure silicone. It’s safe for metals and many stones, and it cures without acidic byproducts.
- Basket strainer to sink: Many pros use plumber’s putty here, but check your sink material and manufacturer notes. Some composites and enameled finishes specify silicone instead of putty.
Apply: Run a continuous, even bead of silicone around the underside of the rim. Don’t skimp. A steady bead prevents leaks and mold.
Set: Lower the sink into place. Wiggle slightly to seat the sealant without smearing the rim.
Secure: Attach and tighten mounting clips evenly in a star pattern. Snug is enough—do not overtighten. Clean any squeeze-out with a plastic scraper and a damp cloth.

Cutting tips (if you must widen the opening)
- Use the paper or cardboard template that came with the sink.
- Drill starter holes for the jigsaw near the corners.
- Cut slowly along the line. Avoid over-cuts that weaken the corners.
- Seal raw wood edges (especially with laminate) with silicone to block water.
Plumbing reconnection: faucet, supply lines, drain, leak check
- Install the faucet and any faucet holes accessories before final plumbing if space is tight.
- Wrap Teflon tape on threaded joints—two to three wraps, clockwise.
- Install the basket strainer with putty or silicone per your sink’s guidance.
- Reattach the P-trap. Ensure the trap arm has the right slope and alignment.
- Turn on supply valves and run water. Fill the sink, then pull the stopper to stress-test the drain. Check every joint and around the rim for leaks.
If you see seepage at the rim, loosen clips gently, add a fresh bead, and re-seat. Wipe away extra before it skins over.
Avoiding Leaks: Common Mistakes, Troubleshooting, Fixes
Preventing leaks in your kitchen sink isn’t just about slapping on some silicone. Most issues come from small mistakes—uneven sealing, misaligned clips, or overlooked gaps. Understanding the common pitfalls, how to properly seat and secure your sink, and knowing what to check when problems arise can save you from water damage and costly repairs down the line.
Sealing failures: too little/uneven silicone, acidic cure, missed gaps
Most leaks come from a weak rim seal. Apply a continuous bead of neutral-cure silicone and seat the sink evenly. Skip acetoxy (acid-curing) silicone on metals or stone because it can cause corrosion or adhesion problems. If you miss a spot, water will find it and wick into wood or particleboard.
Clip tension and alignment: preventing flex, cracks, and wobble
Tighten clips in small steps in a cross pattern. The goal is firm contact, not brute force. Overtightening can crack tile or chip enamel. If your cut-out is weak at the corners, reinforce with small corner blocks under the counter so clips can pull evenly.
Can I reuse my existing faucet holes and drain?
Often yes. If your faucet has fewer holes than the deck, use a deck plate to cover extras. If you need extra holes, a hole saw rated for metal or stone can work, but it’s safer to order the sink with the holes you need. Confirm drain height and disposal clearance if you switch from a shallow to a deep bowl.
Troubleshooting: symptom → cause → fix
- Water under rim after use → Incomplete silicone bead → Remove sink, clean, re-apply continuous bead, re-seat, retighten evenly.
- Sink rocks when pressing corners → Uneven counter or clip torque → Loosen, add thin shims as needed, retighten in a star pattern.
- Slow drain or gurgle → Poor trap slope or vent issue → Re-seat trap, clear blockages, check venting per local code.
- Drips at supply lines → Missing tape or loose nut → Wrap threads with tape and re-tighten gently.
Care, Cleaning, and Longevity by Material
Choosing the right care routine for your kitchen sink depends largely on the material. Each type—stainless steel, composite granite, or porcelain-enameled cast iron—requires specific cleaning supplies and methods to prevent scratches, stains, or mold. Understanding these differences helps you maintain both the appearance and longevity of your sink, ensuring it stays functional and attractive for years.
Stainless, composite, and cast iron care routines
- Stainless steel: Rinse after use. Wipe dry to prevent mineral spots. Use a non-abrasive cleaner for streaks. A bottom grid reduces scratches. Light scuffs usually blend with the grain over time.
- Composite granite: Clean daily with mild soap and water. For stains, use a composite-safe paste or a baking-soda slurry. Avoid strong solvents or harsh abrasives.
- Porcelain-enameled cast iron: Use non-abrasive cleaners. Avoid dropping heavy pots that can chip enamel. A grid protects the base. For metal marks, a gentle cleaner often removes gray streaks.
Mold prevention under the rim and resealing cadence
Wipe along the rim when you wipe the counter. Keep the caulk bead clean and dry after heavy use. Inspect annually. If you see gaps or mold you cannot remove, cut away the old caulk carefully and apply fresh neutral-cure silicone.
Scratch, chip, and stain repair basics
- Stainless: Use the supplied grid; blend light scratches with a non-woven pad in the direction of the grain.
- Composite: Use a composite cleaner or manufacturer-recommended paste to lift marks. Avoid colored scrubs that can transfer dye.
- Porcelain-enameled cast iron: Minor chips may need a touch-up kit rated for food-contact areas. Follow all safety and curing directions.
How long does a drop-in sink last?
With normal care, a drop-in sink can last 15–30 years or more. Water quality, daily use, and maintenance matter. Stainless can show marks but stays sound. Composite holds color when cleaned as recommended. Enamel can last for decades if you prevent chips and keep the rim sealed.

Costs, Timelines, and Project Planning
Planning a sink replacement involves more than just picking a style. Costs, timelines, and project details vary depending on whether you go DIY or hire a professional, the type of materials and accessories you choose, and any additional upgrades like faucets or disposals. Understanding these factors upfront helps you set a realistic budget, avoid surprises, and keep the project on schedule.
Budget ranges and what they include
- DIY sink + materials: about $200–$700 for most homeowners. This covers the sink, sealants, and basic parts.
- Pro labor: add $150–$400 for a straightforward swap with no counter cutting.
- Accessories: grids, strainers, roll mats, soap dispensers add to cost.
If you upgrade the faucet or disposal at the same time, plan for those costs and extra time.
Timeline: 60–90 minutes plus contingencies
A simple replacement falls in the 1–1.5 hour range when the cut-out already matches. Add time if:
- You change faucet types or hole count.
- You widen or alter the cut-out.
- You replace the disposal or drain assembly.
- You need a hardware run for missing sealants or fittings.
Hidden costs: disposal, supply lines, sealants, tools
Budget for sink disposal, new supply lines if the old ones are stiff or leaking, fresh plumber’s tape, and a tube of neutral-cure silicone. If you must add holes or enlarge the cut-out, you may need a jigsaw blade for your counter material and a hole saw.
A simple budget note: sinks with better sound-dampening and included accessories can reduce future add-on costs and increase day-to-day comfort.
Real-World Insights: Case Studies and Social Proof
Homeowners who posted about their swaps often report a one-day success, especially with laminate countertops. The most common pitfall? Not enough caulk around the rim. That leads to slow seepage and swelling in particleboard. Many pros repeat the same three tips: use neutral-cure silicone at the rim, tighten clips evenly, and tape all threaded connections.
Recent trends show a shift toward single-bowl layouts because they handle large pans better. Industry estimates suggest drop-in still makes up a large share of DIY replacements (often around 40%), and a strong majority of laminate-counter owners pick top-mount for easier sealing and simple future replacement.
Is a drop-in sink better for laminate? In many cases, yes. The rim protects the laminate edge from water. With a good bead of silicone and routine wipe-downs, the counter stays dry and safe.
Action plan: choose, verify, install, maintain
- Choose: Pick your material, size, and bowl layout. Decide on accessories and faucet hole count.
- Verify: Check cabinet width, cut-out, and counter type. Confirm clearance for disposal and plumbing.
- Install: Dry fit. Run a continuous bead of neutral-cure silicone under the rim. Set, clip, and reconnect plumbing. Leak-test under pressure.
- Maintain: Wipe daily, dry after heavy use, inspect the rim bead yearly, and re-seal as needed.
FAQs
1. What are drop-in sinks?
Drop-in sinks are the classic kitchen sink style you probably recognize instantly—they have a rim that rests right on top of your countertop. The sink “drops in” to a pre-cut hole in the counter and is usually secured with metal clips underneath and a bead of silicone to keep water from leaking. They’re pretty straightforward to install and don’t require complicated under-counter support, which is why a lot of homeowners or DIYers love them.
2. Which is better, undermount or drop-in sink?
There isn’t a one-size-fits-all answer here—it really depends on your priorities. Drop-in sinks are easier to install, usually cost less, and are compatible with almost any countertop material. On the other hand, undermount sinks offer a sleek, seamless edge where the countertop flows right into the sink, which looks really modern and is easier to wipe crumbs directly into the basin. But undermount sinks require more installation skill, precise cutouts, and sometimes professional help, which can raise the overall cost. So “better” is really about what works for your style, budget, and kitchen setup.
3. What are the disadvantages of a drop-in sink?
The main downside is the rim itself. If you’re not careful with cleaning, crumbs, water, and spills can collect along the edges, which can be annoying to wipe regularly. Also, some people simply prefer the uninterrupted look of an undermount sink, where the counter edge is clean and smooth. So if you’re going for a super modern, seamless aesthetic, a drop-in might feel a bit traditional.
4. Is a drop-in sink the same as a top mount?
Yes! All those terms—drop-in, drop-in kitchen sink, top-mount sink, and top mount—basically mean the same thing. It’s just different ways people describe a sink that sits on top of the countertop instead of underneath.
5. What is the standard drop-in sink size?
Most drop-in sinks fall into a few common sizes: about 25, 33, or 36 inches wide, and roughly 22 inches front-to-back. Bowl depth depends on the model, ranging from shallow bowls around 7 inches to deeper ones over 10 inches for heavy-duty kitchen use. ADA-friendly options may be a bit shallower for accessibility.
6. What do I need to know when buying a kitchen sink?
Start by measuring your cabinet and countertop cut-out carefully so you know what will fit. Pick a material that matches how much care and maintenance you’re willing to do—stainless steel is easy to clean, composites are durable and quiet, and enamel-coated cast iron is classic but needs careful handling. Decide whether you want a single bowl or double bowl based on how you cook and wash dishes. Check faucet holes and whether you need extra accessories like grids, strainers, or soap dispensers. Finally, look at installation instructions and recommended care so you know what to expect long-term. Taking these steps helps avoid surprises and ensures your sink works perfectly in your kitchen.


Leave a comment
This site is protected by hCaptcha and the hCaptcha Privacy Policy and Terms of Service apply.