


Faucet corrosion is a common bathroom headache. Many bathroom faucets are prone to corrosion due to reactive metal and water chemistry. It shortens fixture life, causes brown rust stains and green or white crust, and can end with leaks or poor water flow—making it a key concern in home improvement projects and bathroom solutions planning. This guide gives you clear answers first. You’ll see exactly what to do today, how to check severity in one minute, and which fixes work in humid bathrooms and hard-water areas. We then explain the science in plain language—oxidation, galvanic reaction, and mineral buildup—so you can understand what’s going on under the surface. You’ll learn which materials and finishes resist damage best, how to set up smart maintenance, and how to do safe DIY faucet corrosion removal. Finally, we cover when to call a pro and share case studies, checklists, and references to help you prevent faucet corrosion for the long term.
Faucet Corrosion: Quick Answers and Action Plan
Before diving into the nitty-gritty steps, it helps to understand why faucets corrode and how quickly you can spot trouble. Corrosion can sneak up in the form of rust spots, mineral buildup, or a rough finish, and catching it early makes all the difference. Below, we’ve broken down quick actions, weekly habits, and targeted fixes so you can stop rust and pitting before it damages your fixtures for good.
Top 5 steps to stop rust and pitting now
- Dry the fixture after each use; wipe standing water and condensation with a soft cloth.
- Clean weekly with mild soap and water; avoid abrasives, bleach, and harsh acids.
- Apply or renew a clear protective coating every 3 months in humid environments.
- Improve bathroom ventilation: run the exhaust fan during showers and 20–30 minutes after; add a small dehumidifier if needed.
- In hard-water regions, consider a water softener or point-of-use filter and descale the aerator monthly.
60-second diagnosis checklist (symptoms, severity)
- Look for rust spots, green or white mineral buildup, pitting, flaking or peeling finish, and leaks.
- Check high-risk zones: around the base of the faucet, the aerator, seams, and handle joints.
- Run water and observe: does the stream spray sideways or slow? That hints at mineral buildup.
- Touch-test: is the finish rough, scaly, or blistered? That signals deeper damage.
Priority fixes by home type (hard water, coastal, humid bathrooms)
- Hard water: install a softener or filter; soak and scrub the aerator monthly; wipe fixtures dry daily.
- Coastal or very humid: improve ventilation and add a dehumidifier; reapply protective coatings quarterly; choose 316 stainless steel or treated brass for replacements.
- Older or low-grade chrome: plan a near-term replacement with stainless steel or coated brass if you see pitting, peeling, or leaks.
What Causes Bathroom Faucets to Corrode? Mechanisms and Risk Factors
Understanding causes of faucet corrosion helps you prevent damage before it starts. Corrosion isn’t just “rust showing up”; it’s a mix of chemistry, metal types, and environmental factors. From the reaction of water with metal to hidden mineral buildup and humidity issues, several forces work together to wear down your faucet. Below, we break down the main mechanisms, risk factors, and how different materials respond—so you know what to watch for and why some faucets hold up better than others.
Electrochemical basics: oxidation, galvanic corrosion, mineral scale
Most faucet corrosion is a chemical reaction between metal and water, air, or salts. If your faucet has iron-bearing parts or low-grade alloys, the surface can oxidize. That forms rust (iron oxides), which starts as small rust spots and can spread into stress fissures that promote further corrosion, especially when the faucet contains a reactive metal. Mix in two more drivers and the process speeds up:
- Galvanic corrosion: When two different metals touch in water (for example, a brass body and a steel screw), one becomes the “sacrificial” metal and corrodes faster. Mixed alloys in valves and fasteners can create this.
- Mineral scale: Hard water leaves mineral deposits (calcium and magnesium) that trap moisture around the faucet and under the base. The crust acts like a sponge and keeps the metal wet, which accelerates attack.
Environmental drivers: hard water, chlorides, pH, humidity and condensation
Hard water forms scale; high chlorides (common near coasts or in some water supplies) can attack stainless steel’s protective layer; extreme pH (too acidic or too alkaline) can increase corrosion. Moist air and poor ventilation keep the fixture wet. Condensation on cold water lines and metal surfaces leaves water beads “sitting” on chrome or nickel, which can creep under thin finishes. Bathrooms without enough airflow tend to show more corrosion around the base and at the aerator, according to the USGS.
Materials matter: stainless steel passivation, treated brass, low-grade alloys
Not all metals behave the same. Stainless steel contains chromium that forms a thin passive film (chromium oxide), making it one of the materials more resistant to bathroom faucet corrosion compared to reactive metals or low-grade alloys. That layer self-heals in air and helps the metal stay corrosion-resistant. Brass (copper and zinc) resists rust because it has no iron; it can tarnish but holds up well, especially with a protective coating. Cheaper zinc alloys or thin chrome plating over soft metal are more prone to pinholes and flaking, so they often fail first in hard water or humid bathrooms.
What’s the difference between rust, tarnish, and limescale?
- Rust is reddish-brown iron oxide on iron or steel. It can pit and weaken parts.
- Tarnish is a dark film on copper or brass. It changes color but doesn’t always harm the metal.
- Limescale is white or off-white mineral crust from hard water. It plugs aerators and traps moisture.
Identify and Measure Corrosion Early
Catching corrosion early is the key to keeping your faucet in good shape. Small spots, dull finishes, or minor pitting may not seem serious at first, but they’re the first warning signs of a bigger problem. In the sections below, we’ll show you how to spot these early signs, run simple DIY tests, gauge severity, and decide whether a repair or replacement is the best move.
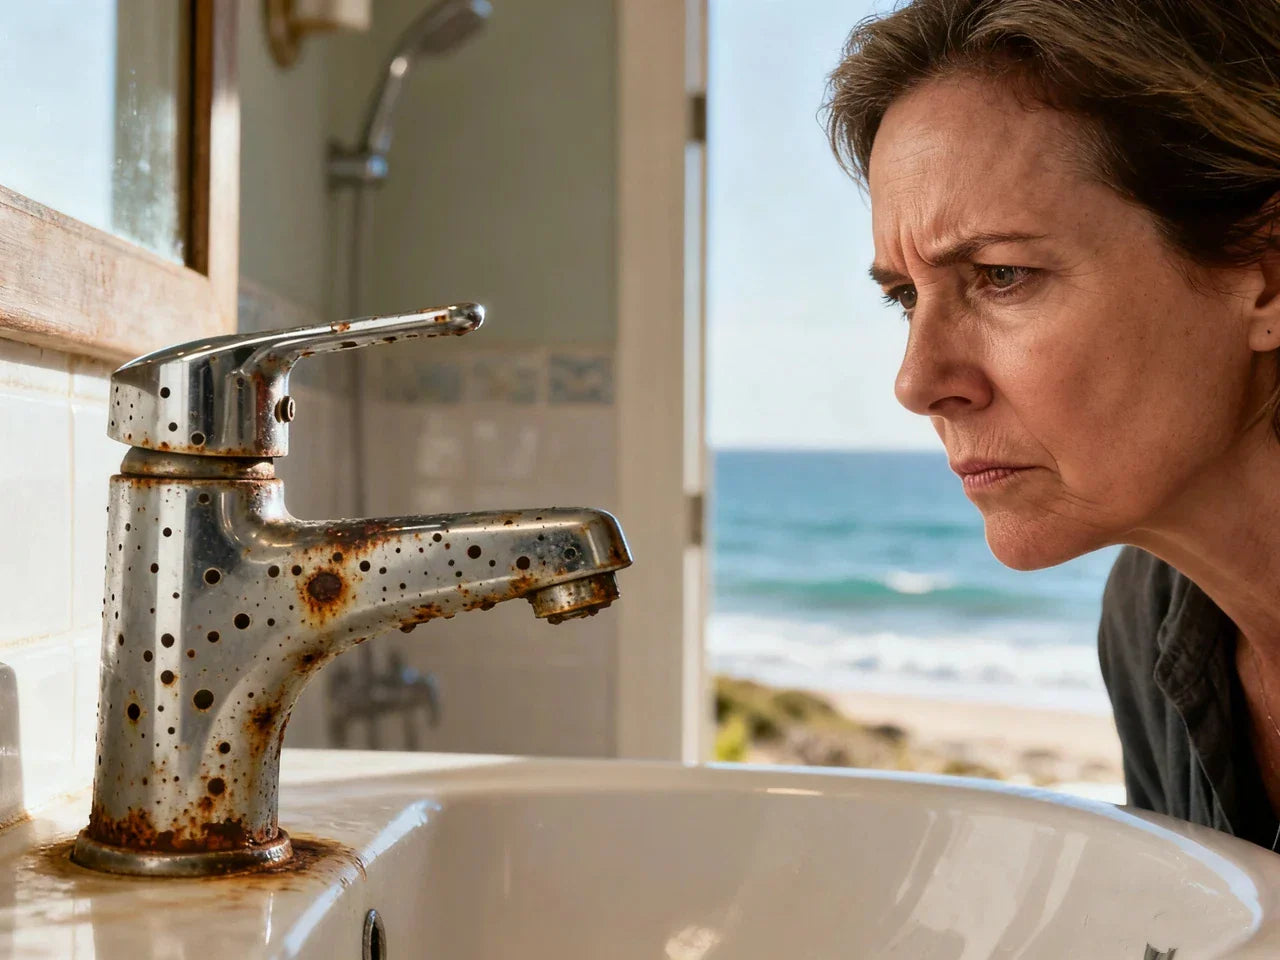
Signs and stages: discoloration, pitting, flaking, leaks, finish failure
Early signs show up as water spots that don’t wipe off, a dull or stained surface, or a small rust spot near a seam. Stage 2 brings small pits, green or white crust around the base of the faucet, and peeling finish. Stage 3 is clear damage: leaks at the body, a handle that wobbles or sticks because of internal corrosion, or large areas of flaking.
DIY tests: magnet test, water spot test, paper-towel humidity test
A simple magnet test can hint at the metal: many stainless grades are low-magnetic while plain steel is usually magnetic. A water spot test is quick: after cleaning and drying, spray water and watch. If spots form and turn crusty within days, you likely have hard water. For bathrooms with constant condensation, do a paper-towel humidity test: dry the area around the base at night, wrap a dry paper towel around it, and check after 24 hours. If it’s damp without any use, you have a moisture problem to fix with ventilation or pipe insulation.
Interactive: corrosion severity quiz + photo compare gallery
Use a simple quiz: count the number of pits, note if any leaks exist, and estimate the area of flaking. Pair that with a photo gallery showing what “minor,” “moderate,” and “severe” look like. The output should recommend repair vs. replace.

Repair vs replace: decision tree with thresholds
- Clean and protect if you only see mild discoloration, scale, or tiny rust spots.
- Repair parts if the handle is stiff, the aerator is clogged, or O-rings are worn.
- Replace the faucet when there is deep pitting, finish flaking on more than 30% of the surface, leaks from the faucet body, or a cracked spout or base.
Best Materials and Finishes for Corrosion Resistance
Choosing the right material of your faucet is one of the most effective ways to prevent corrosion, especially in bathrooms with hard water, coastal humidity, or high-chloride water. Here’s how the most common materials compare:
Stainless Steel Faucets
Stainless steel is one of the most reliable choices for corrosion resistance. 316 stainless is excellent against chlorides, making it perfect for coastal areas, while 304 stainless performs very well in most inland homes. Both grades need minimal maintenance—just regular cleaning—and offer high durability. Their sleek, modern look makes them a popular choice in contemporary bathrooms.
Lead-Free Brass Faucets
Lead-free brass resists corrosion effectively, though it may tarnish over time. Routine cleaning is sufficient, but in humid bathrooms, applying or renewing a protective coating every few months helps preserve the finish. Brass also accepts a variety of finishes, including durable PVD coatings, and provides a classic, warm aesthetic.
Bronze Faucets
Bronze faucets offer good corrosion resistance and high durability, with moderate maintenance requirements. They’re often used in premium fixtures and add a warm, traditional look to bathrooms.
Zinc Alloy Faucets
Zinc alloys with chrome plating are budget-friendly but less durable. Thin plating can peel if water seeps under pinholes, especially in hard water or humid conditions. Maintenance is higher, and corrosion may appear faster than with stainless steel or brass.
Composite / Engineered Polymer Faucets
Composite or engineered polymer faucets are rust-proof and require little maintenance. Durability is moderate, and designs are limited, so these materials are often used for internal components or specific faucet parts rather than main fixtures.

Faucet Finishes
The finish you choose affects both aesthetics and longevity. Thin chrome plating looks bright but can peel if water gets under pinholes. Brushed nickel hides water spots well, PVD coatings are tough and scratch-resistant, and matte black is stylish but needs gentle, regular cleaning to maintain its look.
Buying Tips
- Coastal or high-chloride water: Go with 316 stainless steel.
- Inland homes: 304 stainless or lead-free brass works very well.
- Safety & efficiency: Look for NSF/ANSI 61 and 372 certifications, and WaterSense labels for efficient aerators and cartridges.
- Hard water homes: Pair stainless steel or brass with a good finish and a water softener or point-of-use filter for maximum lifespan.
Simplified Summary Table
| Material | Corrosion Resistance | Maintenance | Durability | Notes |
|---|---|---|---|---|
| 316 Stainless Steel | Excellent | Low | Very High | Coastal/high-chloride water |
| 304 Stainless Steel | Very Good | Low | High | Common, reliable |
| Lead-free Brass | Very Good | Low–Moderate | High | Classic look; accepts many finishes |
| Bronze | Very Good | Moderate | High | Premium, warm tone |
| Zinc Alloy (Chrome) | Fair–Poor | Moderate–High | Low–Moderate | Budget option; plating may fail |
| Composite/Polymer | Good | Low | Moderate | Rust-free, limited styles |
Which faucet material lasts longest in hard water?
In hard-water homes, stainless steel and brass have the best corrosion resistance. Pairing these with a good finish (like PVD on brass) and adding a softener or filter gives the longest life.
Water Quality and Environmental Controls
Water quality and bathroom conditions play a huge role in how quickly faucets corrode or accumulate mineral buildup. Hard water, extreme pH, and high chlorides can quietly damage metal and finishes over time, while poor ventilation and persistent humidity make things worse. Understanding your water chemistry and controlling moisture with softeners, filters, and proper airflow helps you protect your faucet and extend its lifespan.
Hard water, pH, chlorides: how chemistry drives corrosion and buildup
Hard water contains calcium and magnesium. As water evaporates, these minerals stick to the fixture. The crust narrows passages and can cause poor water flow. High chloride levels can break down the passive layer on stainless steel and can also increase pitting on mixed metals. Water that is very acidic can attack metal parts and contribute to corrosion, while very alkaline water can speed scale. Knowing your water quality helps you pick the right fixes.
Water softeners and filtration: when to install, pros/cons, costs
A water softener swaps hardness ions for sodium or potassium to reduce scale. This helps aerators, cartridges, and finishes last longer. A point-of-use filter at the sink can reduce certain salts and particles, which may help if a whole-house water system is not possible. Softeners need salt and regular upkeep, and a bypass for outdoor spigots. Filters need cartridge changes. Typical installed cost for a whole-house softener can range from under a thousand dollars to a few thousand depending on size and features, with yearly salt or media costs. In many homes with very hard water, softening can cut deposits on your faucet and corrosion-related trouble by a large margin.
Ventilation and humidity control (fans, ACH targets, dehumidifiers)
Aim to keep bathroom relative humidity under 50% most of the time. Run the exhaust fan during each shower and for 20–30 minutes after. If mirrors stay foggy or you see moisture around the faucet long after use, upgrade the fan or add a small dehumidifier. Insulate or sleeve cold water lines to reduce condensation. Dry the metal surfaces at the end of your routine. These small steps help prevent water sitting where it can cause damage.

Enter ZIP to view local water hardness map
Use a hardness map to estimate your risk. Enter your ZIP code in a water hardness lookup tool and set a cleaning and descaling schedule that fits your area. If the map shows “hard” or “very hard,” set reminders for monthly aerator cleaning and consider a softener.
Maintenance Routines That Actually Work
Regular maintenance is the best way to keep faucets looking and working like new. Simple weekly cleaning, monthly aerator checks, and occasional protective coatings can prevent rust, scale, and finish damage before it becomes a problem. Tailoring your routine to your faucet’s material and your bathroom’s humidity or water hardness ensures long-lasting performance with minimal effort.
Weekly cleaning (mild soap + soft cloth); what to avoid
Wipe the faucet with soft cloth and mild soap; rinse and dry. This removes sweat, soap film, and splashes that can stain. Avoid harsh chemicals like bleach and drain cleaners near the finish. Avoid abrasive pads and steel wool. They scratch and open tiny channels where water can creep under the finish.
Monthly tasks: aerator descaling, gasket checks, wipe-down habits
Soak the aerator in a white vinegar and water mix (1:1) for 20–30 minutes, then brush gently with a soft toothbrush. This fixes a calcified faucet aerator and clears mineral buildup. Check O-rings at the handle for wear. Lubricate moving parts with silicone grease. Teach kids to give the faucet a quick dry after brushing. Small habits protect the finish for years.
Quarterly protection: clear sealants/waxes/anti-corrosion coatings
Apply a protective coating—a clear sealant or wax—every 3 months in humid environments or near the coast. Clean, rinse, and dry first. Use thin, even coats and let them cure per the label. The barrier reduces water contact and keeps scale from gripping the surface.
Maintenance calendar by material and climate
Make a simple calendar: weekly clean and dry for all faucets; monthly aerator soak for hard water; quarterly coat for humid/coastal bathrooms; and a yearly check of supply lines and shutoff valves.

DIY Removal and Professional Repairs
Removing corrosion and keeping your faucet functional doesn’t have to be intimidating. With gentle DIY methods like vinegar or citric acid soaks, soft brushes, and microfiber cloths, you can tackle small rust spots and mineral buildup safely. For more severe damage—deep pitting, leaks, or peeling finishes—professional repairs or replacements ensure long-term performance. Below, we break down step-by-step DIY techniques, protective coatings, and when it’s best to call a pro.
Safe removal methods: vinegar/citric acid soaks, non-scratch pads, microfiber
How to get corrosion off a faucet? Start mild and move slowly. For faucet corrosion removal, dampen a cloth with a 1:1 mix of white vinegar and water and lay it on the crusted area for 10–20 minutes. For heavier scale, use warm vinegar or a lemon juice soak. Scrub gently with a soft toothbrush or non-scratch pad. Rinse well and dry. For a corroded bathroom faucet with small rust spots on bare stainless, rubbing with wet aluminum foil can reduce rust marks as the foil reacts with iron oxide—test on a small hidden area first and avoid on delicate finishes. Always finish with a protective sealant once clean.
How to fix a calcified faucet? Focus on the aerator and cartridge. Unscrew the aerator, soak in vinegar, brush out the mineral deposits, and reinstall. If the handle feels stiff, mineral crust may be inside the valve. Shut off water supply, remove the handle and cartridge, soak safe parts in vinegar or a cleaner designed for metal, rinse, lubricate with silicone grease, and reassemble. This restores smooth water flow and stops drips due to scale on seals.
Applying protective coatings: steps, tools, cure times, reapplication cadence
- Clean the surface with mild soap; rinse and dry fully.
- Degrease with alcohol or a cleaner recommended by the coating maker; avoid harsh acids.
- Apply a thin, even coat with a microfiber pad. Don’t over-apply.
- Let it cure fully (often 12–24 hours) without heavy water use.
- Reapply every 3 months in humid bathrooms and every 6 months in dry climates.
When to call a pro: deep pitting, body leaks, valve damage, finish delamination
If you see deep pitting, peeling across a large area, or leaks from the faucet body, it’s time to call a plumber. Internal corrosion can crack a faucet stem or weaken metal components. A pro can replace valves, apply professional-grade coatings, or advise on a new faucet made from materials that are more resistant.
Can you remove corrosion without damaging the finish?
Yes—if you go gentle. Use mild cleaners, dilute acids like vinegar, and soft brushes. Rinse and dry well. Avoid harsh chemicals and abrasives that can cause damage to finishes like chrome, PVD, or matte black.
Real-World Case Studies and Myths
Real-world examples show how environment, material, and maintenance combine to determine a faucet’s lifespan. Coastal homes, hard-water areas, and low-grade chrome faucets often suffer corrosion within months or a couple of years, while stainless steel or brass with proper care can last 5–10 years or more. By looking at actual cases and separating myths from facts, you can see which strategies—softeners, protective coatings, or material upgrades—actually save money and extend faucet life.
Case studies: coastal vs inland; low-grade chrome (1–2 yrs) vs stainless (5–10 yrs)
In one coastal rental, low-grade chrome-plated faucets showed pitting at the base within a year due to salty air and daily condensation. The fix was better ventilation, daily dry-down, quarterly coating, and an upgrade to 316 stainless. Five years later, the fixtures still look clean with only light tea-staining that wipes off.
Inland, a home on very hard water had poor water flow and limescale on a bathroom sink faucet within months. The family added a whole-house softener and set a monthly aerator soak. They also replaced a peeling zinc-alloy faucet with brass finished in PVD. After two years, the faucet can last longer with routine care, and the aerator clogs far less.

Myth vs fact: “Stainless never rusts,” “Softener solves everything,” “All chrome is equal”
- “Stainless never rusts.” Not quite. In high-chloride settings, stainless can show light tea-staining. It’s resistant to corrosion, not magic. Regular cleaning keeps it bright.
- “A softener solves everything.” Softeners reduce scale but don’t replace regular cleaning, ventilation, or a good protective coating. You still need basic care.
- “All chrome is equal.” Chrome is only the thin outer layer. The metal under it and the thickness of plating decide how long it lasts.
Cost/ROI chart—softener + coatings vs repeated replacements
| Item | Upfront cost | Ongoing (3 years) | 3-year total | Notes |
| Whole-house softener | $1,200–$3,000 | $150–$450 salt/media | $1,350–$3,450 | Extends life of fixtures and appliances |
| Quarterly coating (DIY) | $20–$50 per application | $240–$600 | $240–$600 | Reduces staining and pitting |
| Replace budget faucet (zinc/chrome) twice | $150–$300 each | $200–$800 labor total | $500–$1,400 | Two swaps in 3–5 years adds up |
| Upgrade to 304/316 stainless or brass | $250–$600 | minimal | $250–$600 | Longer service life with routine care |
Numbers are typical ranges. In many homes, combining a softener with coatings and better ventilation costs less over 3–5 years than repeated replacements due to corrosion.
Wrap-Up: Key Takeaways and Next Steps
Keeping faucets corrosion-free comes down to three simple principles: choose the right material, control your bathroom environment, and stick to a consistent maintenance routine. Small, practical steps—like weekly cleaning, aerator descaling, and protective coatings—can make a big difference. Below, we break down key takeaways and a quick-start plan you can implement in the next 24 hours to protect your faucets.
3-point summary: material choice, environmental control, routine care
- Pick better materials: stainless steel (304 or 316) or lead-free brass with a durable finish.
- Control the environment: add ventilation, manage humidity, and fix hard water if present.
- Stick to a routine: regular cleaning, aerator descaling, and protective coatings.
Quick start in 24 hours: clean, dry, coat, and set reminders
Tonight, clean your faucet with mild soap, rinse, and dry it fully. Soak the aerator in vinegar while you tidy up. Tomorrow, apply a clear coat and set a calendar reminder for weekly wipe-downs and monthly descaling. These small steps prevent water left around the faucet from becoming deposits on your faucet that cause corrosion.
FAQs
1. How to get corrosion off a faucet?
Getting corrosion off a faucet doesn’t have to be scary or messy. A simple, effective method is using a 1:1 mix of white vinegar and water—just soak a cloth in it and wrap it around the corroded area for about 10–20 minutes. Then gently scrub with a soft brush, rinse thoroughly, and dry. For stubborn limescale, repeat the soaking process a few times, and you can use a non-scratch scrubbing pad to lift the buildup without damaging the finish. If you’re dealing with rust marks on bare stainless steel, rubbing gently with wet aluminum foil can work surprisingly well—but always test a small area first to make sure it doesn’t scratch. Once everything is clean, applying a protective sealant or wax can help slow future corrosion.
2. What causes faucet corrosion?
Faucet corrosion usually comes down to a mix of metal chemistry and water conditions. The metal parts with iron can oxidize over time, and if your faucet combines different metals, galvanic reactions can speed up corrosion. Hard water adds mineral scale, and leaving water sitting around the base or in humid bathrooms keeps moisture trapped, which also accelerates corrosion. Chlorides, extreme pH levels, and other chemicals in water can make it even worse. Basically, faucets corrode faster when metals, water, and air team up in an unhelpful way.
3. How to fix a calcified faucet?
A calcified faucet mostly suffers from mineral buildup from hard water, and the aerator is usually the first culprit. Unscrew the aerator, soak it in warm vinegar for a while, then brush out the deposits and reinstall. If your water flow is still sluggish, it’s time for a deeper fix: shut off the water, remove the handle and cartridge, and soak those parts in vinegar (just make sure vinegar won’t damage them). After rinsing, lubricate with some silicone grease to keep the mechanism smooth, then reassemble everything. This process usually brings the faucet back to life without a full replacement.
4. How to fix a corroded faucet handle?
Fixing a corroded handle starts with shutting off the water. Remove the handle cap and screw, lift the handle off, and inspect the stem for rust or crust. Clean it with vinegar or a metal-safe cleaner, replace any worn O-rings, and apply silicone grease to keep things moving smoothly. If the stem is deeply pitted or cracked, it’s safer to replace the cartridge or the entire handle assembly. Doing this not only improves the look but prevents leaks and further corrosion.
5. How to get a corroded faucet off?
Removing a corroded faucet can feel tricky, but patience and the right tools make it doable. First, shut off the water supply and disconnect the supply lines. Spray penetrating oil on the mounting nuts and give it time to work. A basin wrench is helpful for those tight spots. If scale has fused the nut, gently warming it with a hair dryer, tapping lightly, or wrapping it with a vinegar-soaked cloth can loosen it. Only if all else fails, use an oscillating tool or split-nut cutter—always protecting nearby surfaces and wearing eye protection. Taking it slow usually saves both your faucet and your sanity.
References
https://www.usgs.gov/special-topics/water-science-school/science/hardness-water https://www.epa.gov/watersense


Leave a comment
This site is protected by hCaptcha and the hCaptcha Privacy Policy and Terms of Service apply.