


Choosing the right bathroom sink drain affects clogs, leaks, and daily hygiene, according to the U.S. Environmental Protection Agency (EPA), which emphasizes proper plumbing fixtures help prevent water waste and maintain sanitary conditions. In this 2025 guide, you’ll learn about drain types, standard sink drain sizes, how to choose the right one, what it should cost, and how to install and maintain it yourself.
Fast Picks – The Right Bathroom Sink Drain in 30 Seconds
If you just want a quick answer before you read deeper, here is a fast guide:
-
Best overall for most homes: A modern pop‑up drain with overflow that matches your faucet finish and fits a standard 1‑1/4" bathroom tailpiece.
-
Best for clog prevention: A grid/strainer drain that stays open but stops hair and debris before they reach the P‑trap.
-
Best budget choice: A chain‑and‑plug or simple lift‑and‑turn drain for basic washroom sinks and rentals.
-
Best for vessel sinks or floating vanities: A press‑and‑seal or long‑tailpiece pop‑up sink drain, sized to reach the P‑trap under a thick countertop.
If you like to soak the sink or shave there, you need a drain that seals tightly, like a pop‑up or press‑and‑seal. If you want the lowest maintenance and hate clogs, a grid drain or strong strainer is often the smarter pick.
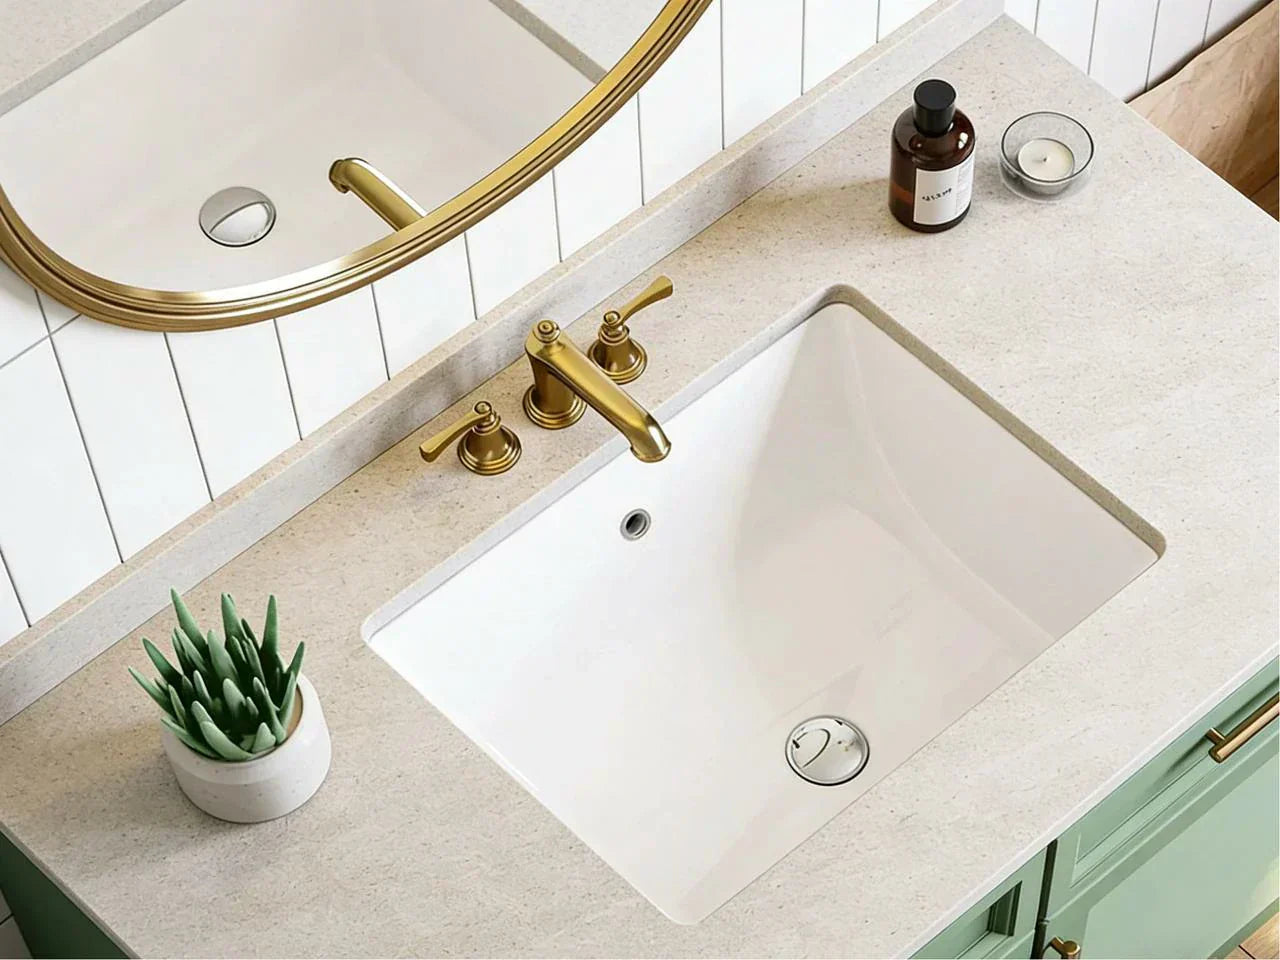
What Is a Bathroom Sink Drain? Key Parts & Sizes
A bathroom sink drain is the set of parts that lets water leave the sink, while also letting you open and close the hole when needed. It seals water in the basin when you want it, sends used water to the plumbing, helps control clogs, and adds to the style of your bathroom.
When you look at the drain from above, you only see a neat metal ring and maybe a stopper. Underneath the sink, though, there is a small system working hard every time you wash your hands or brush your teeth.
A typical sink drain assembly for a bathroom includes:
-
A flange – the visible ring inside the drain hole. This is the shiny (or matte) part you see around the opening.
-
A stopper – the part you press, lift, twist, or plug to close the drain.
-
A drain body – the main tube that passes through the sink and connects to the tailpiece.
-
A tailpiece – the straight tube that drops down to meet the P‑trap.
-
A pivot rod and lift rod (for many pop‑up drains) – a small rod under the sink that moves the stopper when you pull a lever behind the faucet.
-
Gaskets and washers – soft seals that prevent leaks where metal and plastic parts meet.
-
A locknut – a nut that tightens the drain body to the sink from underneath.
You may also see a small side opening near the top of the drain body. That is for the overflow, which we’ll talk about later.
Standard bathroom sink drain size
A lot of people ask, “Are all sink drains 1‑1/4?” The short answer is no, but 1‑1/4 inch is the most common size for a bathroom or washroom sink drain.
For most modern bathroom sinks:
-
The drain hole at the top of the sink is about 1‑5/8 inches wide.
-
The threaded part of the drain body that passes through the hole is usually between 1‑1/8 and 1‑5/8 inches.
-
The tailpiece (the pipe that connects to the P‑trap) is typically 1‑1/4 inches in diameter.
Some drains come with a 1‑1/2 inch tailpiece. This size is more common in kitchen sinks and some larger specialty setups. In a normal bathroom, 1‑1/2 inch parts are rare and often not needed. Many modern P‑traps and adapters can step between 1‑1/4 and 1‑1/2 if needed, but you should not assume; always check the size printed or stamped on parts.
So, how do you tell drain size in your sink? You can:
-
Measure across the tailpiece or the P‑trap opening with a small ruler.
-
Check any markings on the pipe. Many traps and tailpieces show “1‑1/4” or “1‑1/2”.
-
Put a tape across the drain hole at the top of the sink. If it is around 1‑5/8 inches, you almost always use a standard bathroom drain with a 1‑1/4 inch tailpiece.
Overflow vs non‑overflow drains
Another key detail is whether your sink has an overflow. Look inside the bowl. Do you see a small slot or round hole near the top edge? If yes, your sink has an overflow that connects to the drain.
-
Sinks with overflow need a drain with overflow slots. These slots let water from the overflow path enter the drain body safely.
-
Sinks without overflow (many vessel sinks and some modern basins) need a non‑overflow drain. These drains have a solid wall at the top so water cannot escape where it should not.
If you mix these up, you can have slow drainage, poor sealing, or even leaks around the flange, because the paths for water do not match.

Types of Bathroom Sink Drains (Pros, Cons, Best Uses)
There are several common bathroom sink drain types. Each one fits different habits and bathroom styles. When you know how they work, you can match the drain to your life, not just to a picture.
Pop‑Up Drain with Lift Rod
The classic pop‑up sink drain uses a small lift rod behind the faucet. When you pull the rod up, a pivot rod under the sink pushes the stopper down to seal the water. When you push the rod down, the stopper pops up to open the sink drain.
This type is best if you:
-
Often fill the sink to shave or wash your face.
-
Like a clean, simple look with no loose plug or chain.
-
Want a familiar setup that most plumbers know well.
A pop‑up has some clear pros. It gives a tight seal, works well for soaking, and is part of many standard faucet kits. But there are also disadvantages of a pop‑up drain you should think about:
-
There are more moving parts and small linkages.
-
Hair and soap can collect around the stopper and pivot rod, which makes cleaning harder.
-
The linkage can go out of alignment so the pop up stopper bathroom sink does not close all the way or does not open high enough.
If you are asking, “How to fix pop‑up plug in bathroom sink?” the cause is often that the pivot rod or the clip on the rod is not in the right hole on the strap. Adjusting the connection one hole up or down usually helps the stopper seal or open better. Worn rubber at the base of the stopper can also cause leaks and may need replacement.
Pop‑up drains are commonly made for overflow sinks, but you can also find non‑overflow versions.
Lift‑and‑Turn Drain
A lift‑and‑turn drain has a stopper you grab with your fingers. To close it, you press down and twist until it stays lowered. To open it, you twist the other way and lift.
This type works well if you:
-
Want a simple, low‑cost upgrade.
-
Are fitting a rental, guest bath, or spare washroom sink.
-
Prefer to avoid the extra moving parts of a pop‑up rod system.
Lift‑and‑turn drains are easy to use and have fewer parts under the sink. That means fewer things to adjust. On the other hand, they can be a bit slower to operate and may feel awkward if your hands are soapy or wet. Many are also made to work with overflow sinks.
Grid / Strainer Drain
A grid or strainer drain has a fixed grate instead of a moving stopper. It is always open, so you cannot fully plug the sink. Water flows through holes in the grid while hair and debris stay on top.
This type is best if you:
-
Want very low clog risk in a kid’s or guest bathroom.
-
Have a high‑use restroom in a shared home or rental.
-
Rarely need to soak items in the sink.
Because the grid catches hair right at the top, it can cut clog incidents from hair and debris by around 70% compared with a plain open drain. That means fewer times you need to snake the P‑trap or use a hair tool. Flow is also strong, because the opening is always clear.
The main downside is simple: you can’t fill the sink. If you like to soak delicates, bleach items, or hold water for shaving, a grid drain on your main bathroom sink may annoy you.
Press‑and‑Seal / Click‑Clack Drain
A press‑and‑seal drain (often called click‑clack) uses a spring‑loaded stopper. You press down to close it, and press again to open it. There is no lift rod behind the faucet and no pivot arm under the sink.
This style works well for:
-
Modern vanities and vessel sinks where you want a clean, uncluttered look.
-
Homeowners who want tool‑free operation and simple use.
-
Retrofits where the old rod system is broken or annoying.
The pros here are clear. You get a clean look, no visible rod, and very easy operation. It is often a good swap when you ask, “How do I install a bathroom sink drain without changing the faucet?” because you can leave the old rod in place and just not use it.
The cons center on the seals and the spring. Cheaper models can wear faster. The spring may weaken, or the rubber ring can crack and start to leak. Some press‑and‑seal drains work with overflow sinks, while others are for non‑overflow only. You must read the description and make sure it matches your sink.
Chain‑and‑Plug Drain
A chain‑and‑plug drain is as simple as it sounds. The drain opening is just a ring, and you have a loose plug on a small chain. Drop the plug into the hole to seal it, then pull the chain to open the sink drain when you are done.
These drains are:
-
Very cheap and easy to install.
-
Good for basic washrooms, garages, or retro styles.
-
Simple to repair, because you can replace only the plug if needed.
The downsides are that the plug can get lost, the chain may look messy, and small kids like to pull on it. Still, for low‑cost or vintage bathrooms, this classic style can be a fine choice.
Specialty & Decorative Drains
There are also specialty drains that solve specific problems or add visual interest:
-
Drains with a rotating flapper or odor‑control flap inside. These can help limit sewer smells by closing off air flow when not in use.
-
Decorative strainers with patterns, shapes, or special finishes for designer basins.
These are worth a look when style or odor control is just as important as function. They often cost more but can tie the whole bathroom together.
Bathroom Sink Drain Types vs. Best Uses
Here is a simple comparison to help you match drain type to your situation:
| Type | Best For | Main Pros | Main Cons | Works With Overflow? | Typical Price Range (USD) |
| Pop‑up w/ lift rod | Main family baths, soaking | Tight seal, classic, hands‑free | More parts, harder to clean | Often yes | 20–80 |
| Lift‑and‑turn | Budget upgrades, rentals | Simple, fewer parts, durable | Slower to use with wet hands | Often yes | 15–50 |
| Grid / strainer | Kids/guest, high‑use sinks | Great hair catch, high flow | Cannot fill sink | Often yes | 10–50 |
| Press‑and‑seal | Vessel, modern | Clean look, easy operation | Seals and springs can wear | Varies | 20–80 |
| Chain‑and‑plug | Low‑budget, retro, utility basins | Cheapest, very simple | Plug loss, less tidy, kids pull chain | Often yes | 5–30 |
| Specialty/flapper | Odor concerns, decorative basins | Odor control, style options | Higher cost, less common parts | Varies | 40–120+ |
Sizing, Compatibility & Getting the Right Fit
Many people assume drains are “standard.” That is how they end up with leaks and “almost fits.” Measuring is more important than guessing, especially with vessel sinks and thick countertops.
How to tell drain size in your bathroom
To check your sink drain sizes, you can follow three simple checks:
-
Measure the drain hole at the top. Use a tape across the widest part of the hole in the sink. A typical standard bathroom sink drain size is around 1‑5/8 inches.
-
Measure the threaded part of the old drain. When you remove it, measure across the threads. Most bathroom drains fall between 1‑1/8 and 1‑5/8 inches.
-
Measure the tailpiece and P‑trap. Measure across the outside of the tailpiece pipe that goes into the P‑trap. In a bathroom, this is usually 1‑1/4 inches. If it measures closer to 1‑1/2 inches, you may have a larger or mixed system, and you might need a small adapter.
These three steps answer both “*How to tell drain size?” and “Are all sink drains 1‑1/4?*” Very clearly: no, but most bathroom drains are, and measuring keeps you safe.
Sink types and compatibility
Different sink setups change how long the drain and tailpiece must be.
-
Drop‑in (self‑rimming) sinks sit on top of the counter. Most standard drains fit with no extra parts.
-
Undermount sinks attach below the counter. This sink design is popular because it creates a seamless countertop surface, makes cleaning easier, and allows water to be wiped directly into the basin. However, this added thickness makes drain selection more critical, as the threaded body must be long enough to clamp securely and maintain a proper seal.
-
Vessel sinks and above‑counter basins sit high above the counter. They are often chosen for strong visual impact and flexibility in design, especially in modern or spa-inspired bathrooms. Because the basin sits higher, these sinks usually require a drain with a longer tailpiece—sometimes 8 to 12 inches—or an extension tube to properly meet the P-trap and maintain correct drainage slope.
In 2025, more homes use floating vanities and thicker stone tops. That is why longer tailpieces and drain bodies are becoming more common. Always check the thickness of your sink and countertop together and compare that to the maximum clamping thickness listed on the drain.

Matching overflow or non‑overflow
We touched on this above, but it is so important that it is worth repeating. To ensure a good seal and safe flow:
-
Use overflow drains only on sinks that have an overflow channel.
-
Use non‑overflow drains only on sinks with no overflow.
If you ignore this, water can leak into spaces in the drain body that were not made to hold water, or the sink may drain poorly. A quick look inside the bowl for that extra hole or slot prevents days of frustration later.
How to Choose the Best Bathroom Sink Drain for Your Bathroom
Picking the right bathroom sink drain is like choosing shoes. Size is key, but so is how you use them. You can walk through a simple path to make a smart choice.
Step 1 – Confirm Your Sink Type and Overflow
Start by writing down three details:
-
Sink type: drop‑in, undermount, or vessel.
-
Overflow: yes or no.
-
Thickness: measure from the top of the sink to the bottom where the drain passes through, including the countertop if the bowl sits under or on top.
This helps you filter drains that will even fit. If you skip this step, you can end up with a drain ring that does not clamp tightly or a tailpiece that does not reach the trap.
Step 2 – Pick the Right Drain Type for Your Habits
Ask yourself a few simple questions:
-
Do you often fill the sink to soak clothes, wash your face, or shave? Then a pop‑up or press‑and‑seal drain that seals firmly is better than a grid.
-
Do you hate cleaning clogs and pulling hair out of the P‑trap? Then a grid/strainer drain or a drain with a built‑in hair catcher under the stopper can help you a lot.
-
Is this a rental or a home you plan to keep for many years? For rentals, simple and cheap systems like lift‑and‑turn or grid drains are great. For your forever home, you may want a higher‑grade brass pop‑up or a strong press‑and‑seal for long life.
Think about how often you clean, who uses the bathroom (kids, guests, older adults), and how important soaking is for you.
Step 3 – Choose Materials & Finish
Drain materials matter for both life span and safety.
-
Solid brass drains resist corrosion well and can last many years. They often cost more but handle hard water better.
-
Stainless steel parts also hold up well and do not rust easily.
-
Plastic drains are cheap and can work fine for a guest bath, but they are more likely to crack or warp over time, especially if over‑tightened.
For the finish, you usually want to match the faucet, handles, and other hardware in the bathroom. Common finishes include shiny chrome, brushed metal looks, matte black, and warm bronze tones. A matching drain helps the sink look complete, rather than like a late add‑on.
Step 4 – Budget & Quality
So, how much does it cost to replace a bathroom sink drain? In 2025, you can expect:
-
About $10–$30 for basic chain‑and‑plug drains or simple plastic pop‑ups.
-
Around $30–$60 for mid‑range brass pop‑ups or better press‑and‑seal drains.
-
$60–$100 or more for designer, decorative, or odor‑control drains.
If you hire a plumber, add labor costs, which can be another $75–$150 or more depending on your area. For a simple DIY project, you pay only for the parts.
A good rule is to spend a bit more on the main bathroom, where you use the sink many times every day. Look for warranties in the 1–5 year range as a sign that the maker stands behind the seals and finish.
Best Bathroom Sink Drain Options in 2025 (Types & Brands)
There are many brands that make bathroom sink drains, from low‑cost hardware store lines to high‑end designers. Since we are staying neutral here, let’s talk in terms of types and quality tiers, not brand names.
Top Picks by Category
In 2025, these patterns stand out:
-
Best overall pop‑up drain: A solid brass pop‑up with overflow, 1‑1/4 inch tailpiece, strong finish, and a removable stopper for cleaning.
-
Best grid/strainer for clog control: A metal grid drain with enough open area for strong flow and a top that lifts out so you can clean hair easily.
-
Best press‑and‑seal for vessel sinks: A taller, non‑overflow press‑and‑seal drain with long tailpiece and thick gaskets designed for above‑counter basins.
-
Best budget drain for rentals or flips: A simple lift‑and‑turn or chain‑and‑plug drain in a standard finish that fits 1‑5/8 inch holes and 1‑1/4 inch traps.
Leading Brand Types to Know
When you shop, you will see:
-
Large fixture makers, which focus on matching drains to their faucets and sinks, with good quality control and clear instructions.
-
Plumbing supply brands, which offer many sizes, materials, and repair parts for pros.
-
Decorative specialists, which make artistic or custom‑look grids and covers to pair with designer basins.
What matters most is not the name, but the material, sizing, warranty, and reviews from people who used the drain for at least a year.

Quick Comparison Table
This table compares typical drain options by type and general performance:
| Drain Type | Typical Material Options | Works With Overflow? | Ideal Sink Type | Approx. Price (USD) | Durability Notes |
| Pop‑up w/ rod | Brass, stainless, plastic | Often yes | Standard undermount/drop‑in | 20–80 | Brass/stainless last longest |
| Lift‑and‑turn | Brass, zinc, plastic | Often yes | Budget baths, rentals | 15–50 | Few parts; seals may wear with heavy use |
| Grid / strainer | Brass, stainless | Often yes | Kids/guest, high‑use sinks | 10–50 | Very low clog risk; easy to clean |
| Press‑and‑seal | Brass, zinc, plastic | Varies | Vessel, modern | 20–80 | Spring and rubber may need replacement |
| Chain‑and‑plug | Brass, stainless, plastic | Often yes | Retro, garages, utilities | 5–30 | Plug or chain easiest parts to replace |
Step‑by‑Step Bathroom Sink Drain Installation (DIY-Friendly)
Many people ask, “How do I install a bathroom sink drain by myself?” If you are handy with simple tools, you can often handle this in under an hour.
Tools & Materials Checklist
You will need:
-
Adjustable pliers or wrench
-
Plumber’s putty or bathroom‑grade silicone
-
Small bucket or pan
-
Towel or rag
-
Putty knife or plastic scraper
-
Tape measure
-
New drain assembly (and tailpiece extension or new P‑trap if needed)
Removing the Old Drain
Follow these steps:
-
Place a bucket under the P‑trap. This catches water when you loosen the pipes.
-
Loosen the slip nuts on the P‑trap. Use your hand or pliers to loosen the nuts on each end of the trap, then remove it and pour out the water.
-
Disconnect any pivot rod or stopper linkage. For a pop‑up, unscrew the nut that holds the pivot rod in the back of the drain body. Slide the rod out and remove the stopper from the top.
-
Loosen the big locknut under the sink. Use pliers to loosen the nut holding the drain body to the sink.
-
Push the drain body up and lift the flange out from above. Wiggle if needed. Old putty may hold it tight.
-
Scrape away old putty or silicone. Clean the sink surface around the drain hole. A clean surface is important for a good new seal.
Installing the New Drain
Now it is time to put in the new parts.
-
Dry‑fit the drain. Without any putty, set the drain body through the hole to make sure the threads are long enough. Check that the tailpiece lines up with the P‑trap position.
-
Apply sealant under the flange. Roll a small rope of plumber’s putty and place it under the flange ring, or apply a bead of silicone if the maker says so. Plumber’s putty is common for metal sinks; silicone is often suggested for stone or some plastics.
-
Insert the flange and thread the drain body from below. Hold the flange in place in the sink, then screw the drain body onto it from under the sink.
-
Align overflow holes if needed. If your sink has an overflow, make sure the slots in the drain body line up with the overflow channel so water can pass through.
-
Tighten the locknut. Hand‑tighten first, then snug with pliers. Do not over‑tighten, or you may crack a ceramic or plastic sink.
As you tighten, some putty will squeeze out around the flange. Wipe the extra off with your finger or a plastic tool.
Connecting to the P‑Trap
-
Attach the tailpiece to the drain body. Many drains come with an integrated tailpiece. If not, slide the nut and washer on and screw the tailpiece on snugly.
-
Connect the P‑trap. Fit the trap back onto the tailpiece and the wall arm. Make sure the washers face the right way and tighten the slip nuts by hand, then snug gently.
-
Check alignment. The drain should drop more or less straight into the trap. Sharp angles or stress on the joints can lead to leaks later.
For double sinks, both drains usually connect into a center outlet tee before going to the main trap. The same principles apply: gentle slopes, no strain.
Pop‑Up Specific Adjustments
If your new drain is a pop‑up:
-
Drop the stopper into the drain from above. Make sure the hole in the bottom of the stopper faces the back of the sink.
-
Slide the pivot rod into the side of the drain body. You should feel it catch the bottom of the stopper. Tighten the nut on the rod.
-
Connect the rod to the lift lever by a small strap. There are several holes in the strap. Use the one that gives you a full open and a tight close.
-
Test the movement. Pull and push the rod to see if the stopper opens high enough and closes fully. Adjust the strap hole as needed.
If you’re wondering “How to remove pop‑up drain stopper in bathroom sink later?” you usually reverse this: loosen the pivot rod nut, slide the rod out, then pull the stopper straight up.
Leak Testing & Fine Tuning
When everything is in place:
-
Run water with the stopper open. Check under the sink for drips around every joint and under the drain body.
-
Fill the sink halfway and let it sit. Look again under the sink, and feel around the flange area. If water collects or drips, you may need to re‑seat the flange with fresh putty or tighten the locknut a bit.
-
Open the drain and watch the flow. If the drainage is slow, you may have a partial blockage further down or a vent issue. On a new setup, this is rare, but worth checking.

Maintenance, Clog Prevention & Troubleshooting
Once your new drain is in, simple habits can keep it working for years.
Routine Maintenance
For most bathrooms:
-
Weekly or every two weeks, remove hair and debris from the stopper or grid. A quick wipe with a tissue or cloth goes a long way.
-
Once a month, run hot water down the drain for a few minutes. You can add a bit of mild dish soap to help break light grease and soap scum.
-
Avoid harsh chemical drain cleaners when you can. Many can damage rubber seals and finishes over time and are not great for pipes or the environment.
Preventing Clogs
Most bathroom clogs come from hair and soap scum sticking together in the drain body or P‑trap. A grid drain or hair catcher can stop about 70% of these clogs before they start.
If you must use a pop‑up because you like to soak the sink, you can still add a small hair catcher basket below the stopper. This catches hair without blocking flow.
Common Problems & Quick Fixes
Here are some common questions and answers that tie into daily use.
Slow drain
If the sink drains slowly:
-
Lift or remove the stopper and clean any build‑up.
-
Use a small plastic drain cleaning strip to pull hair from the top of the P‑trap.
-
If still slow, remove the trap and clean it out by hand.
Leaks at the flange
If you see water around the ring in the sink:
-
You may not have used enough putty or silicone, or the flange is not tight.
-
Remove the drain, clean the sink surface, and apply a fresh, even seal.
Pop‑up won’t seal
If your pop up stopper bathroom sink does not hold water:
-
Adjust the pivot rod connection on the strap one hole up or down.
-
Check the rubber seal on the stopper bottom; replace if cracked or worn.
How to open up a sink drain stopper?
For a pop‑up, pull the lift rod up or push the press‑and‑seal stopper. For lift‑and‑turn, twist and lift. If the stopper is stuck, lifting it by hand and cleaning off gunk around the stem usually helps.
Bad odor from the drain
Smells often come from gunk in the P‑trap or from a trap that has dried out in a rarely used bathroom. Cleaning the trap, running water often, or using an odor‑control flapper drain in problem areas can help.
When to Call a Plumber
Call a pro if:
-
Several fixtures back up at the same time.
-
Clogs return often even after cleaning the trap.
-
You see rusted or cracked pipes under the sink.
-
A leak has soaked the cabinet or floor and you are not sure where it starts.
Cost, Lifespan & 2025 Trends in Bathroom Sink Drains
In 2025, bathroom sink drain costs vary widely based on material and design, with higher-quality drains typically lasting longer and requiring less maintenance. Current trends focus on anti-clog features, longer tailpieces for modern vanities, matte finishes, and odor-control designs that improve both usability and long-term reliability.
Upfront Cost vs Long‑Term Value
Spending a bit more on a quality drain can save money later on repairs and water damage. A cheap plastic drain might cost half as much today, but if it cracks and leaks in two years, the damage to a cabinet or floor can be far more expensive.
Think about:
-
Main bathrooms – worth a mid‑ to high‑grade brass or stainless drain.
-
Guest baths – a mid‑range drain is often enough.
-
Rarely used sinks – a basic model may be fine.
As we covered earlier, parts alone often range from about $10 to over $100, depending on material and design.
Expected Lifespan
A drain’s life depends on material, water quality, and cleaning habits:
-
Plastic drains might last a few years in light use, but can crack more easily, especially if exposed to hot water or if over‑tightened.
-
Brass and stainless drains can last many years with normal care, often beyond 10 years, especially if seals are replaced when they show wear.
-
Hard water, strong chemicals, and poor cleaning can shorten the life of any drain.
Replacing only the rubber gaskets or the stopper is often enough to extend life without changing the whole assembly.
2025 Design & Tech Trends
In 2025, some clear drain trends show up in guides and user forums:
-
More anti‑clog designs, including better strainers, smoother internal finishes, and removable baskets under the stopper.
-
Longer tailpieces and adjustable kits for floating vanities and thick stone countertops.
-
A shift toward matte finishes like black and brushed metals to match modern hardware.
-
Increased use of grid drains in rentals and family bathrooms for lower maintenance.
-
Extra interest in odor‑control flapper drains for small or poorly vented bathrooms.
These trends aim at less daily fuss: fewer clogs, fewer leaks, and a cleaner look.

Summary: Key Takeaways for Choosing the Best Bathroom Sink Drain
Choosing the right bathroom sink drain can mean fewer clogs, fewer leaks, a better daily routine, and a more polished bathroom style.
Remember these points:
-
Confirm the size and overflow status of your sink before you buy anything.
-
Match the drain type to how you actually use the sink: soaking needs a pop‑up or press‑and‑seal; low‑maintenance setups do best with a grid or good strainer.
-
Pick durable materials like brass or stainless for main bathrooms, and make sure the finish matches your faucet and hardware.
-
Follow a clear step‑by‑step installation process and test for leaks.
-
Do light regular maintenance to prevent up to 90% of common drain issues.
If you are ready to upgrade, measure your current drain, decide how you want to use the sink, and choose the type that fits both your habits and your budget. With the right choice and a bit of care, your new drain should serve you well for many years.
FAQs
1. Are all sink drains 1 1/4?
Most bathroom sinks actually use a 1‑1/4 inch tailpiece, but not every drain is exactly this size. The opening at the top of the sink is usually around 1‑5/8 inches, and the threaded part of the drain that goes through the sink can vary slightly, typically between 1‑1/8 and 1‑5/8 inches. Some older sinks or specialty basins, like kitchen-style or vessel sinks, might need a 1‑1/2 inch tailpiece. The important thing is not to assume the drain is standard; always measure the top hole, the threaded drain body, and the P-trap connection before buying. Using the wrong size can lead to leaks, slow drainage, or difficulty sealing the sink properly. Even with adapters available, matching the sink drain to its tailpiece size ensures smooth installation and prevents water damage or future repairs.
2. How much does it cost to replace a bathroom sink drain?
Replacing a bathroom sink drain is generally affordable, but the price depends on the type and material you choose. Basic plastic or chain-and-plug drains for guest bathrooms or rentals might run $10–$30, while a brass pop-up or a higher-quality press-and-seal drain often costs $30–$60. Designer or specialty drains, like odor-control or decorative models, can reach $60–$100 or more. If you hire a plumber, add another $75–$150 for labor. The good news is that installing it yourself is usually straightforward with just a wrench, plumber’s putty, and basic tools. Spending a little more on a durable drain for your main bathroom pays off long-term, because you avoid leaks, cracks, and repeated replacements. Choosing the right drain ensures both smooth water flow and longevity of your bathroom sink drain.
3. How to tell drain size?
Figuring out the correct drain size is easier than it sounds. Start by measuring the opening at the top of your sink; most bathroom sinks are about 1‑5/8 inches wide. Then, remove the old drain if possible and measure the threaded portion of the drain body. Finally, check the tailpiece that connects to the P-trap, which is usually 1‑1/4 inches for most sinks. If any measurement differs, you may need a drain or adapter that fits the exact size. Checking the size before purchasing prevents leaks, ensures proper alignment with the P-trap, and saves time during installation. Many people skip this step and end up with mismatched parts, so taking three simple measurements—top hole, threaded body, tailpiece—keeps the project smooth and trouble-free. Always double-check the markings or engravings on the old drain for confirmation.
4. How to fix pop-up plug in bathroom sink?
If your pop up sink drain isn’t sealing or opening properly, it’s usually a matter of misalignment or worn rubber. First, check the pivot rod under the sink—it should sit in the correct hole on the lift rod strap. Moving it up or down one hole often fixes the seal and allows the stopper to pop up fully. Next, inspect the rubber gasket at the bottom of the stopper; if it’s cracked or hardened, replace it. Soap scum and hair buildup can also prevent smooth operation, so give everything a good clean. Make small adjustments and test frequently by filling the sink halfway. With a properly aligned pop-up plug, you’ll get a tight seal for soaking and easy drainage when needed, without leaks or sticking issues.
5. How to remove pop-up drain stopper in bathroom sink?
Removing a pop-up stopper is straightforward once you know the steps. Underneath the sink, locate the pivot rod connected to the drain body and the stopper. Loosen the retaining nut and gently slide the rod out. Once disconnected, you can pull the stopper straight up from the top of the sink. Cleaning is much easier this way; remove gunk, hair, and soap buildup from both the stopper and the drain opening. Reinstall by reversing the steps, making sure the pivot rod catches the stopper properly and the lift rod strap aligns. This process prevents leaks and ensures smooth operation for your bathroom sink drain. Regular cleaning like this keeps the stopper moving freely and extends the life of the pop-up mechanism.
6. What are the disadvantages of a pop-up drain?
A pop-up drain offers convenience and a clean look, but it does come with a few downsides. The small moving parts under the sink, like the pivot rod and lift rod strap, can go out of alignment, which might prevent the stopper from closing fully or opening completely. Soap scum and hair also tend to accumulate around the linkage, making cleaning more involved than a simple grid drain. Over time, the rubber gasket or seals at the bottom of the stopper can wear out, leading to leaks. For households with heavy use, pop-up drains require occasional maintenance to keep them working smoothly. Despite these minor drawbacks, a pop-up drain is still the best choice if you want a sink stopper that allows for soaking or filling the basin.
7. How to open up a sink drain stopper?
Knowing how to open sink drain stoppers is key for both everyday use and maintenance. For a pop-up drain, simply pull the lift rod behind the faucet or press the stopper, depending on the design. For lift-and-turn drains, twist the stopper and lift it up. If the stopper is stuck, it usually means hair or soap buildup around the stem or pivot rod. Carefully removing the stopper and cleaning the gunk is the easiest fix. Once freed, reinsert it, check for smooth operation, and test drainage. Proper operation not only makes your sink convenient to use but also helps prevent minor clogs and slow drainage issues, keeping your bathroom sink drain functioning efficiently for years.
References


Leave a comment
This site is protected by hCaptcha and the hCaptcha Privacy Policy and Terms of Service apply.