


Bathroom sink measurements drive comfort, fit, and everyday function. Get them wrong and you’ll wrestle with splash, tight elbows, and bathroom vanity drawers that won’t open. Get them right and your sink, bathroom faucet, vanity, and plumbing feel like they were made for each other. Most bathroom remodel mistakes start with missing bathroom sink dimensions, unclear terminology, or skipping a simple fit check around the sink. This guide puts bathroom sink measurements front and center for 2025 with clear standards, step-by-step measuring methods, and fit checks for every kind of bathroom sink—whether rectangular sinks, oval sinks, or undermount bathroom models often found in modern homes.
You’ll find exact sink sizes, rough-in bathroom sink dimensions, ADA height rules, and room-by-room recommendations, plus simple printable checklists to avoid costly misfits. We open with a quick reference of standard sizes, then move into how to measure front to back, installation heights, sink-type tradeoffs, and layout planning for small and primary baths, including how to find the right sink and vanity pairing. We close with case studies, a printable checklist, and trusted references you can use to verify specs and local code.
If you came here asking, “What is a standard bathroom sink size?” or “What size sink fits a 24, 30, or 36 inch bathroom vanity?” you’ll get clear, practical answers below—backed by the dimensions that pros use every day.
Quick Reference: Standard Bathroom Sink Measurements (2025)
Key standard sizes by sink type
To keep terms clear in this guide:
- Length = left‑to‑right (side‑to‑side)
- Width = front‑to‑back (projection from the wall)
- Depth = basin depth (rim to bottom of bowl)
These are the most common bathroom sink sizes you’ll find today. They work across drop‑in, undermount, vessel sinks, wall‑mounted, pedestal, and integrated tops.
| Sink Type | Length (inches) | Width (inches) | Depth (inches) | Notable Features/Use |
| Top-Mount / Drop-In | 16–30 | 12–22 | 5–8 | Easy installation; covers imperfect cut-outs |
| Under-Mount | 17–27 | 12–22 | 5.5–8 | Clean counter edge; common in stone tops |
| Vessel (Round) | 14–20 diameter | – | 4–7 | Statement look; choose shallower to reduce splash |
| Vessel (Square/Rect.) | 15–25 | 15–20 | 4–5 | Modern; needs lower counter height |
| Wall-Mounted | 11–24 | 10–18 | 5–8 | Space-saving; good for small bathrooms |
| Pedestal | 19–24 | 16–22 | – | Classic; hides plumbing; depth varies |
| Console/Integrated | 24–36 | 16–24 | – | Counter & basin combined; consistent dimensions |
Trend for 2025: Wider yet shallower bowls (often under 7 inches deep) for better splash control and more counter space.
What is a standard bathroom sink size? For a typical single bowl in a guest or primary bath, the most common range is 19 – 24 inches in length, 15–22 inches in width, and 5–8 inches in basin depth. Small sinks for powder rooms often run 11–20 inches wide.
Most popular sizes by bathroom type
- Powder rooms: 11–20 inches wide; wall‑mount and compact pedestal types win when space is tight.
- Guest baths: 15–22 inches wide; drop‑in or undermount bowls make installs simple.
- Primary baths: 19–24+ inches for single; 30–48+ inches of bowl span for double‑vanity setups.
You’ll see these sizes repeated across many bathroom sink specifications, vanity dimensions, and small bathroom layout guides. The reason is simple: these ranges balance reach, splash control, and storage clearance in most homes.

Rough-in and height essentials at a glance
Use these as planning targets and verify with local code and your product specs.
- Drain rough-in height: 18 –20 inches to drain center above finished floor (Source: ICC International Plumbing Code, 2021, 2021 IPC)
- Supply lines: about 20–22 inches above floor to valve centers
- Vanity/sink height: 32–36 inches typical; ADA max 34 inches (Source: ADA Standards for Accessible Design 2010, Read the report)
- Horizontal rough-in: 18–24 inches from finished wall to drain center (verify your plan and trap)
Visual: Size comparison table and “sweet spot” ranges
| Room Type | Typical Sink Width | Sweet Spot Notes |
| Powder | 11–20 in | 14–18 in stays compact and easy to aim |
| Guest | 15–22 in | 17–20 in balances reach and storage |
| Primary (single) | 19–24+ in | 20–22 in with 6–10 in deck space total |
| Primary (double) | 30–48+ in bowl span | Aim for 30 in between bowl centers |
How to Measure a Bathroom Sink and Vanity Cut-Out
You don’t need fancy tools. You do need a clear plan. The key is to measure the available space, the cut‑out, the plumbing rough‑ins, and the faucet reach—and then confirm with the manufacturer’s template.
Tools and prep checklist
- Tape measure, straightedge, and small level
- Masking/painter’s tape and a pencil
- Smartphone photos with a note app (label each photo)
- Manufacturer template for the sink or a piece of cardboard to trace
- Note the existing drain and supply rough‑ins
- Mark stud locations and backsplash height
- Confirm counter thickness and overhang at the front edge
Tip: Snap a photo of the inside of the vanity showing the P‑trap, drain, and drawer paths. It saves headaches later.
Measure width, length, depth, and basin depth
- Start with the vanity/counter. Measure the overall length (left‑to‑right) and width (front‑to‑back). Note the front edge overhang and the backsplash thickness if present.
- Mark your planned sink centerline on the counter. Keep at least 15 inches from the sink center to a side wall for elbow room.
- Measure the sink length and width you can fit while leaving 1–2 inches of counter on each side of the rim for structure and splash. Many pros like 2–3 inches from the front edge to the sink rim for a drip edge and comfort.
- Check basin depth (rim to bowl bottom). Shallower bowls (about 5–7 inches) reduce splash and make it easier for kids and shorter users to reach the drain.
- Note that overall rim height and bowl depth are different. A vessel sink may have a shallow bowl but a higher rim above the counter. Aim for a total rim height of 34–36 inches above the floor for most homes.
Diagram to sketch on paper:
- Top view: show counter edges, backsplash, sink centerline, left/right clearances, faucet hole(s).
- Cross‑section: show counter thickness, rim or undermount reveal, bowl depth, and the distance from floor to rim.
Countertop cut-out, rim overhang, and faucet hole spacing
- Use the manufacturer’s template for your cut‑out. For drop‑in sinks, the cut‑out will be smaller than the bowl rim so the rim sits on the counter. For undermount, confirm the reveal (how much of the bowl is visible) or a zero reveal for a flush look.
- Faucet hole spacing is standard: 4 inches (centerset), 8 inches (widespread), or single‑hole. Confirm the sink and faucet match. A deck plate can cover extra holes if needed.
- Keep at least 2 inches of stone or solid-surface material in front of a cut‑out for strength. On very narrow counters, confirm with your fabricator.

How do you measure a bathroom sink correctly?
- Measure the available counter length and width.
- Mark a sink centerline that keeps at least 15 inches to any side wall.
- Confirm drain and supply rough‑in heights (about 18–22 inches to center).
- Check bowl depth and planned rim height (target 34–36 inches from the floor).
- Match faucet hole spacing to your faucet.
- Tape down the template, trace it, and dry‑fit your trap and valve locations.
- Double‑check drawer and shelf clearance in the vanity.
Rough-In Dimensions and Installation Heights
These numbers are common targets in residential work. Always verify with local code and the manufacturer’s instructions.
Drain and supply line rough-ins
- Drain center height: 18–20 inches above the finished floor to the center of the outlet.
- Horizontal rough‑in: 18–24 inches from the finished wall to drain center (depends on vanity depth and trap layout).
- Supply valves: about 20–22 inches above the floor, usually 6–8 inches apart and centered on the drain.
- Tip: Dry‑fit the trap and valves before ordering a vanity with drawers. It’s common to need an offset drain to clear drawers.
Ergonomic heights and vanity standards
- Counter heights: 32–36 inches to the top of the counter in most homes. Taller users often prefer closer to 36 inches.
- ADA requires the rim or counter at 34 inches max above the floor.
- With vessel sinks, lower the counter so the top rim lands around 34–36 inches high. This keeps reach and splash in check.
Wall clearance, centerline, and stud backing
- Keep the sink centerline 15–18 inches from a side wall to avoid cramped elbows.
- Add blocking between studs for wall‑mounted sinks or console brackets. A 2x8 or 2x10 at fixture height makes anchoring easier.
- Draw a simple elevation diagram for your installer: show the floor, counter, rim height, drain center height, and valve heights.
What is the standard drain rough-in height?
The most common target is 18–20 inches above the finished floor to the drain center. Always confirm with your sink’s spec sheet and local code.

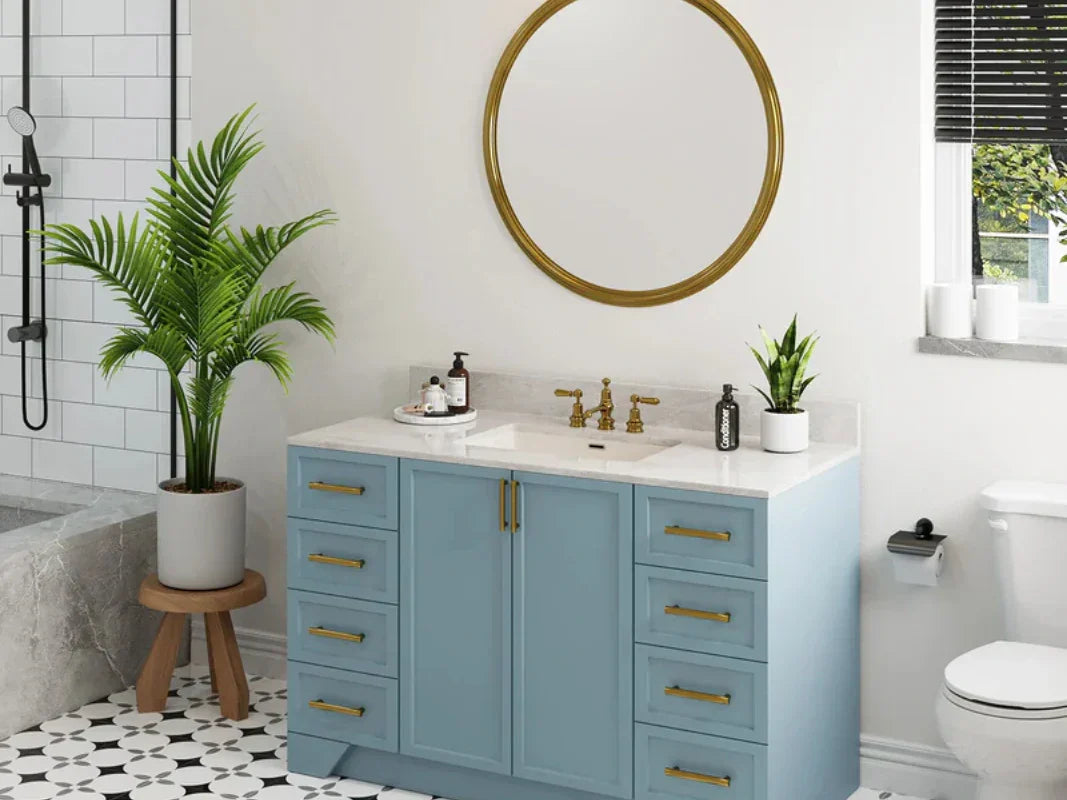
Choose the Right Size by Sink Type
Drop-In and Under-Mount: everyday workhorses
These two cover most bathrooms because they’re flexible and come in many bathroom sink sizes.
- Pros: Drop‑in is easy to install and forgiving of imperfect cuts. Undermount gives a clean, wipe‑in edge that many people love on stone or solid‑surface tops.
- Cons: Drop‑in rims need more cleaning; undermounts need a stronger top and pro install.
- Best fits: Guest and primary baths. A sweet spot is 19–24 inches long, 15–22 inches wide, and 5.5–8 inches deep.
Vessel Sinks: style vs splash control
Vessel sinks can be round, oval, or rectangular. They sit above the counter, so the rim height gets tall fast.
- Pros: A bold look, easy swap later, and when paired with the right faucet, shallow bowls reduce splash.
- Cons: The added rim height can make it harder for kids or shorter users. Splash risk rises if the spout is too high or the bowl too deep.
- Best fits: Powder rooms and guest baths. For round bowls, 14–20 inches in diameter; depth sweet spot 4–5 inches with a mid‑arc faucet.
Wall-Mounted and Pedestal: space savers
These shine in small bathrooms where counter space is limited.
- Pros: Open floor feel, easier cleaning, and tight projections (as little as 10–16 inches front‑to‑back).
- Cons: Minimal counter surface and possible exposed plumbing (use a finished P‑trap).
- Sizes: Wall‑mount length 11–24 inches; pedestal length 19–24 inches. Pair with compact faucets and keep spout reach tight to the bowl center.
Console/Integrated and Specialty
Integrated tops combine the counter and basin, often with narrow depths that help in tight rooms.
- Pros: Seamless look and easy cleaning. Dimensions are consistent and clear.
- Sizes: 24–36 inches long and 16–24 inches wide. Integrated basins often have better splash control thanks to gentle slopes.
Room Size, Layout, and Double Vanities
Small bathrooms and powder rooms (under 40 ft²)
Tight rooms live or die by the projection from the wall and the door swing. Your bathroom sink measurements should protect your walking path and still offer reach to the faucet.
- Aim for 11–20 inches of sink width. Keep projection to 10–16 inches to save space.
- Choose wall‑mount or compact pedestal sinks. Use corner sinks when a straight wall won’t work.
- Sketch the footprint showing the door swing, the toilet clearance, and a 30 x 48 inch clear floor space in front of the sink when possible.
Primary baths and double sinks
Double setups need more than two bowls; they need clear elbow room and space for tools like hair dryers and shavers.
- Plan for 60 inches or more of counter width for two bowls. A single sink is comfortable on 36 inches of counter.
- Keep at least 30 inches between the centers of the two bowls if you can, and 15 inches from a bowl center to a side wall.
- For double vanities, many people like 20–22 inch wide bowls with 8–12 inches of deck space between them.
Narrow-depth and corner solutions
- Look for 12–18 inch deep consoles or integrated tops to keep walkways clear.
- Consider off‑center bowls to clear drawers or give better shoulder room where walls pinch the space.
- Rounded fronts can save bumps and feel less tight next to a doorway.
What size sink fits a 24-inch vanity?
For a 24‑inch vanity or cabinet, look for a sink about 16–20 inches long (left‑to‑right). Leave 1–2 inches of counter on each side of the rim, and check the front‑to‑back fit (often 12–18 inches) so the bowl and faucet fit without hitting the backsplash.

Fit Factors Most People Miss
Faucet reach, spout height, and valve alignment
The faucet should hit near the bowl center or just behind the drain to reduce splash and drips. What does that mean? Match the spout reach (tip to center) to the bowl centerline. If the spout lands on the deck or behind the drain, you’ll wipe water constantly. Confirm that your faucet hole spacing (single, 4‑inch, or 8‑inch) matches the sink and counter.
Plumbing and drawer clearance, P-trap alignment
Open the vanity and check drawer paths and shelves. Many newer vanities have full top drawers that collide with standard traps. Use an offset drain, a shallow P‑trap, or shift the centerline to clear drawers. Dry‑fit the trap height against your 18–20 inch drain rough‑in before you order.
Splash control: bowl depth vs vessel height
Splash has three main levers: rim height, bowl depth, and spout height. Keep the rim about 34–36 inches above the floor, choose 4–5 inch deep vessel bowls, and aim the spout at the bowl center. A soft‑flow aerator and normal water pressure help too.
Correct vs incorrect cross-section
In a correct setup, the spout arc lands near the bowl center, and the rim sits within easy reach. In an incorrect setup, the spout hits the side wall of the bowl or the counter, causing splash and puddles behind the faucet. A one‑inch change in spout reach can fix 90% of splash problems.
ADA, Universal Design, and Family Ergonomics
ADA-compliant heights and knee/toe clearances
If you’re building an accessible bath, follow ADA for rim height, knee space, and protected pipes.
- Rim or counter height: 34 inches max above finished floor
- Knee clearance: 27 inches high, 30 inches wide, 11–25 inches deep (varies by height measured)
- Toe clearance: space under the front of the sink lets wheelchair footrests approach
- Exposed pipes under the sink should be insulated or covered
- Provide clear floor space of at least 30 x 48 inches in front of the sink
Accessible layouts and operable parts
Use lever handles or sensor faucets. Keep controls within a 15–48 inch reach range for a forward or side reach. If you choose a wall‑mount sink, include sturdy backing in the wall for safe transfers and to meet load requirements.
Child-friendly and aging-in-place tips
Families often like 34 inches or less at the rim so kids can reach with a step stool. Add anti‑scald valves and set the heater to about 120°F max. Choose rounded corners on counters to prevent bumps. A shallower bowl helps kids and older adults reach the drain and clean easily.
What is the ADA height for a bathroom sink?
The maximum rim or counter height is 34 inches above the finished floor. You also need knee clearance under the sink and protected pipes to meet accessibility rules.
Case Studies: Real-World Sizing and Rough-In Wins
30 ft² powder room optimization
A tiny 30 ft² powder room felt tight with a deep pedestal. The remodel used an 18‑inch wide, 12‑inch deep wall‑mounted basin paired with a 4–5 inch deep round vessel. The drain rough‑in at 19 inches high and supply valves at 21 inches worked with a compact P‑trap. The result was more circulation space, less splash, and an easier cleaning routine.
Remodel pitfall: cut-out mismatch and offset plumbing
A homeowner swapped a drop‑in for an undermount on a stone top without checking the template. The original cut‑out left too little stone at the front, and the faucet holes were off by an inch. The fix: use the correct manufacturer template, add a deck plate, and shift to a minor offset at the drain to clear the new trap and top drawer.
Historic home with narrow walls
An older house had a bathroom only 60 inches long wall‑to‑wall. A corner sink with 10–12 inches projection solved the walkway issue. The team added blocking in the wall for the bracket and installed a finished exposed‑trap kit. Now the room meets basic clearances and feels larger.
Data snapshots
- Users report wider yet shallower basins (often under 7 inches deep) make daily use easier and cut splash in small sinks.
- Many mistakes trace back to faucet reach and bowl center misalignment rather than sink size alone.
- A quick template fit test and trap dry‑fit solve most surprises before the countertop is cut.

Tools and Printables
Interactive calculator
If you build or use a simple calculator, include:
- Inputs: vanity width and depth, sink type, target rim height, rough‑in heights
- Outputs: Suggested sink size range, expected rim height, splash risk rating, and faucet reach guidance
A rule of thumb the calculator can use:
- Leave 1–2 inches of counter on each side of the rim, and 2–3 inches from the front edge to the rim.
- Aim the spout to land within 1 inch of the bowl center.
Printable measurement worksheet and cut-out template
Create a one‑page worksheet with:
- Fields for length, width, depth, rough‑in height, faucet hole spacing
- A tick box for undermount reveal or drop‑in rim
- Space to paste or trace the manufacturer’s template
- Notes for stud locations and blocking
Keep a QR code or link to download the sink template from the brand site.
Pre-purchase checklist (to avoid returns)
- Confirm sink length/width fit the vanity with 1–2 inch side clearances
- Verify bowl depth and target rim height (34–36 inches typical; ADA 34 max)
- Match faucet hole spacing (single, 4‑inch, 8‑inch)
- Dry‑fit trap height and drawer clearance; plan offset if needed
- Check rough‑in positions (drain 18–20 inches high; valves 20–22 inches high)
- Note stud/blocking if wall‑mount or console
Putting It All Together: Practical Scenarios
Think about your available space, your users, and the type of sink that fits your room.
- Small powder room with a 22‑inch deep counter? A 16–18 inch wide wall‑mount or compact pedestal with a shallow bowl keeps splash down and walkways open.
- Family bath with a 60‑inch vanity? A double bowl layout wants 30 inches between bowl centers and 20–22 inch wide bowls, with faucet spouts landing near the bowl centers.
- Short backsplash and tall faucet? Measure the faucet spout height and reach so the arc hits the bowl center and clears the backsplash. If not, select a mid‑arc faucet or adjust bowl position.
Step-by-Step: Measure and Plan (quick refresher)
- Measure the vanity/counter length and width; note front overhang and backsplash.
- Mark a sink centerline; keep 15 inches minimum to a side wall.
- Choose a sink size that leaves 1–2 inches of deck per side and 2–3 inches of front setback.
- Confirm faucet hole spacing and spout reach to bowl center.
- Verify rough‑ins: drain 18–20 inches high; valves 20–22 inches high; center the valves on the drain.
- Dry‑fit the P‑trap and check drawer clearance.
- Tape down the manufacturer template and trace the cut‑out (or use a cardboard mock‑up).
- Re‑measure before you cut or order stone.
Materials and Maintenance Notes
While most bathroom sinks are vitreous china (porcelain), you’ll also see stone, glass, solid surface, cast iron, and even stainless steel in modern designs. Porcelain is popular because it’s durable and easy to clean. Stone looks rich but needs sealing. Glass can show splash if the spout is too high. Cast iron is tough but heavy. Pick a sink material that suits your cleaning habits and how the room is used.
Final Fit Tips You’ll Be Glad You Knew
- Keep your rim height at 34–36 inches for comfort. If you choose a vessel, lower the counter to stay in that range.
- For double sinks, protect elbow room: 30 inches between bowl centers is a friendly target.
- On narrow counters, watch the front setback: at least 2 inches of counter in front of the rim helps with drips and structure.
- A one‑inch tweak in spout reach can transform splash control. Aim for the bowl center.
- Save your template, cut‑out trace, and rough‑in notes for the installer. They prevent miscommunication and costly re‑cuts.
By keeping these bathroom sink measurements in mind—and by checking rough‑ins, faucet reach, and clearances—you can choose the right sink for your bathroom with confidence. Whether you’re fitting a 24‑inch cabinet in a powder room or planning a 72‑inch double in a primary suite, the same simple plan applies: measure, mock‑up, and match the specifications before you cut or buy.

FAQs
1. How high should a vessel sink faucet be?
When planning sink installation for a vessel bowl, you’ll need to pair the faucet so its spout sits a few inches above the vessel rim. The water arc should land near the center of the bowl for comfort. Mid-arc faucets work best with vessels around 4–5 inches deep. Choosing the right sink size and faucet height also depends on bathroom sizes and the sink vanity setup. Think about size and shape of the vessel—taller bowls need higher spouts. By taking time to find a sink and faucet that align with typical dimensions, you’ll avoid splash and ensure your sinks are easy to clean while looking balanced in the room sink layout.
2. How much space do I need between two sinks?
For comfort, you’ll need at least 30 inches between bowl centers. This allows elbow room and avoids crowding when two people use the sinks at once. At minimum, keep 15 inches from a bowl center to a side wall, which is a common guideline when choosing the right sink size for double sink vanity layouts. Since bathroom sizes vary, you’ll need to choose spacing based on typical dimensions and available wall length. When you find a sink that fits your vanity, check both size and shape. A proper fit ensures easy sink installation and keeps sinks easy to clean while maintaining flow in the room sink design.
3. Do I need special blocking for a wall-mounted sink?
Yes. For safe sink installation, you’ll need solid blocking, usually a 2x8 or similar, set inside the wall at the mounting height. This ensures the sink can hold its weight and withstand daily use. Without blocking, anchors may loosen, especially in bathrooms with heavy sink vanity units. Choosing the right sink size and type means planning for wall reinforcement during installation. Since room sink layouts differ, you’ll need to choose placement based on bathroom sizes and typical dimensions. When you find a sink you like, check manufacturer instructions—sinks are easy to clean and maintain only if mounted securely.
4. Can I reuse my old faucet with a new sink?
In many cases, yes—you’ll need to check if the hole spacing matches. Typical dimensions are single-hole, 4-inch centerset, or 8-inch widespread. If your new sink vanity has more holes than the faucet, a deck plate can help cover extras. When choosing the right sink size and faucet pairing, think about bathroom sizes and whether the faucet arc matches the bowl’s size and shape. Before you find a sink, decide if reusing the old faucet makes sense for your room sink setup. With proper sink installation, sinks are easy to clean and function smoothly, even when paired with existing fixtures.
5. Which is better, a ceramic or porcelain sink?
Most bathroom sinks sold as “vitreous china” are porcelain, which is actually a refined ceramic with a glass-like glaze. Since porcelain is denser and less porous, sinks are easy to clean and resist chips and stains better than other ceramic options. You’ll need to choose based on your bathroom sizes, sink vanity design, and cleaning habits. Porcelain is often the right sink size and shape for typical dimensions found in residential bathrooms. While other ceramics can look stylish, porcelain sinks are among the most durable and practical. If you want to find a sink that balances style with performance, porcelain is a smart choice for long-term sink installation.


Leave a comment
This site is protected by hCaptcha and the hCaptcha Privacy Policy and Terms of Service apply.